Recently Synology sent their DS1812+ unit for a thorough review. We will be breaking this piece into several parts. This one will cover the initial unboxing as well as the exterior of the unit. Unless you open up the case, this review will cover what you will see as a user of the Synology DS1812+. Overall, I have been very impressed with this small NAS. Let’s take a look at what the box has and some of the basic physical features of the Synology DS1812+ 8-bay NAS.
Unboxing the Synology DS1812+
The Synology DS1812+ arrived in a nice cardboard box with a handle. Nothing too special about the box but at least Synology brands the package. The handle did help a bit as we received a bunch of hardware on the same day to review.

Upon opening the package one is greeted by a fairly standard plastic packing foam structure protecting the 8-bay NAS. The NAS is further enveloped in a foam bag to protect it during shipping. There is also a smaller cardboard box with the various installation bits. This box had things such as the power cable, and screws for the drive trays.

Overall, this is industry standard packaging. The non-visible parts of the box did see a bit of shipping damage but I was happy to see that the overall unit was unharmed. Let’s take a look at the NAS enclosed inside!
The Synology DS1812+
Once liberated from its packaging, the Synology DS1812+ is a very sleek looking unit. I will have it be known that I wish someone produced this exact chassis with space for a mini ITX motherboard. This is a great storage form factor.

Immediately visible from the above picture are two features. First, air vents on the side of the chassis that are branded with Synology. Second, the Synology DS1812+ is an 8-bay NAS. The eight hot swap drive trays are clearly visible from the front of the chassis. A nice beveled edge accentuates the drive trays while at the same time providing extra room for fingers working with the latches. Speaking of drive trays, here is what they look like:

The drive trays are primarily made of plastic. Generally, I prefer metal hot swap trays. In the case of the Synology DS1812+ the plastic is not flimsy at all and they feel very sturdy. One can clearly see the drive locking mechanism and the LED indicator light pathway built into the trays. The other major feature that should be pointed out is that there are both 3.5″ mounting holes as well as 2.5″.
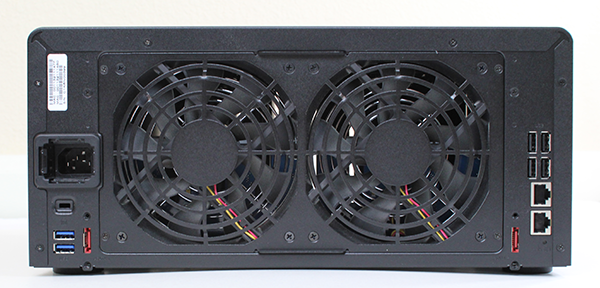
Moving to the rear of the chassis, the unit is dominated by two large 120mm fans.

On the rear of the chassis we see several of the unit’s features. On the left hand side there is a standard 3-pin power input. Below that is a Kensington Lock port. That lock is very useful as the Synology DS1812+ is meant to sit in an office. The minimum amount of security that lock provides is welcome and should be utilized. Below the lock are two USB 3.0 ports. Flanking the fans, we see two eSATA ports. The right side of the chassis has two Gigabit Ethernet ports and four USB 2.0 ports. From a feature standpoint, there is quite a bit going on with the unit.
Conclusion
Of course, the next question is what is inside that good looking case. Next week, we will have a tear-down and show off the hardware of the Synology DS1812+ before delving into the management software and performance of the unit. Since writing and publishing schedules do lag our actual testing, I did want to say that I have been very impressed overall with the Synology DS1812+ which we will see in coming articles. At around $1,000 USD this is certainly not a super inexpensive solution, but it is very simple to manage as we will see shortly. Stay tuned!


Looks great! Can’t wait for the next installments.
Have heard great things about Synology.
You have a typo “One cane clearly see the drive “
What is its power utilization during sleep and write/active?
Price seems steep compared to DIY but the juice is in their software stack, it’s pretty much tops for the pricepoint.