Today’s article introduces a $50 circuit board that can save you $500. Interested? The board is the Supermicro CSE-PTJBOD-CB1 JBOD power board and it helps turn a standard computer chassis into a DIY JBOD chassis. You aren’t supposed to know about this board – it’s sold as a spare part for a complete Supermicro JBOD system – but it’s too useful to keep secret.
Introduction
To set the stage, imagine that you’ve run out of disk slots on your storage server and want to add more disks – maybe lots more – by adding an external JBOD chassis. You might start with a Google search for “24 Bay JBOD”, a search that retrieves half a million results. The good news is that you have options if you want to buy a pre-made external JBOD. The bad news is that these pre-built options are expensive – often over $2,000. Can you, instead, build your own for less money?
Of course you can! Perhaps you have an old chassis laying around or maybe you stumbled onto an eBay deal for a rack mount server chassis with lots of drive bays, the Norco RPC-4224 or Supermicro SC826, for example. Whatever your chassis, you quickly add a power supply and your disk drives, but you still don’t have a working JBOD. The problem is that your power supply needs something to turn it on and off and you need some way to control the chassis cooling fans. Normally the motherboard provides these functions, but you’re building an external disk-only JBOD chassis and have no need for a big, complicated, power hungry, and possibly expensive motherboard just to take care of these simple tasks. That’s where nifty little Supermicro power board comes in.
You can think of the Supermicro JBOD power board as a tiny low-power motherboard stripped down to just the basic functions you need for a JBOD chassis – managing power, controlling fans, illuminating LEDs, and providing a fan failure warning buzzer just in case. You plug in your power supply, your fans, and your chassis panel header and then you are done.
Physical Details
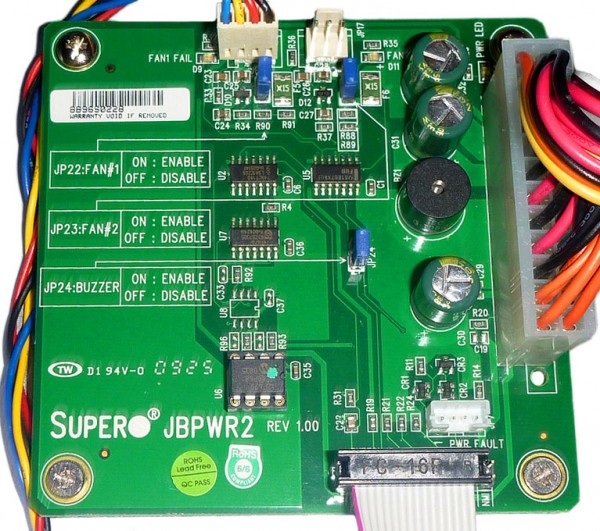
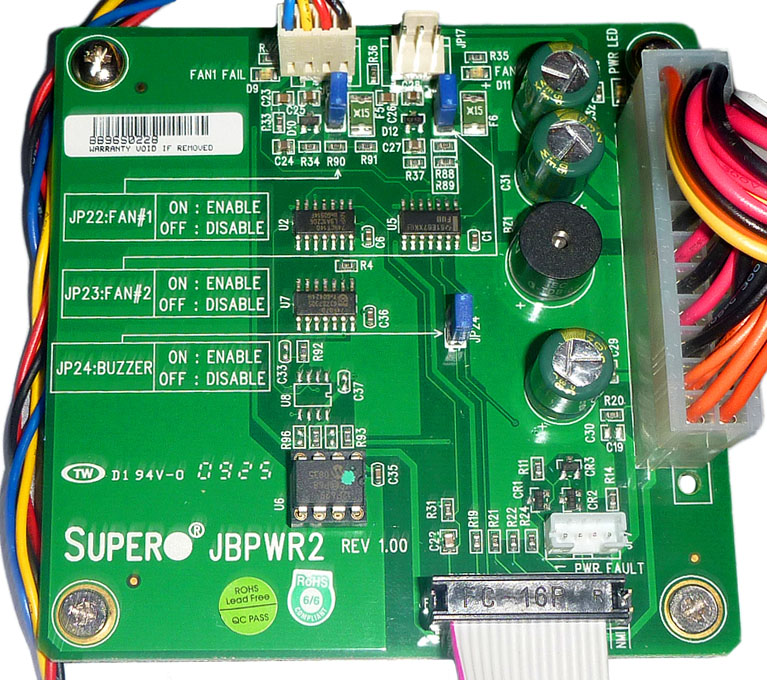
See the photo below for a picture of the Supermicro CSE-PTJBOD-CB1.

On the right side of the board is a standard 24-pin power connector into which you plug the output from your power supply. At the top are two fan connectors for three-pin or four-pin fans. This is far fewer fans than any server motherboard, which might seem like a problem, but remember that you are cooling only your disks. There are no CPUs, RAM, or RAID cards generating heat in your JBOD chassis so two fans are plenty. In fact, the board includes jumpers just below the fan connectors that let you disable one or both fans – which is very useful if your JBOD is stuffed with low-power drives or SSDs that don’t need much cooling above and beyond what your power supply exhaust fans provide. The fan jumpers are necessary because the buzzer will otherwise scream if a working fan isn’t plugged in to each fan connector. If you use variable speed fans then they will run at roughly half of their maximum speed, keeping them fairly quiet.
At the bottom of the board is a familiar looking header for chassis buttons and LEDs. In our photo the pins themselves are not visible since the chassis cable is already plugged in. The header includes well-labeled power and reset pins plus pins for the power LED. There are other pins as well – such as those for for NIC1 and NIC2 LEDs – that don’t actually do anything on this board. Only the power switch is truly required.
There is also a white four-pin connector at the lower right. You can ignore this connector completely, unless you are using a specific model of Supermicro backplane in which case it’s an I2C connector made just for you.
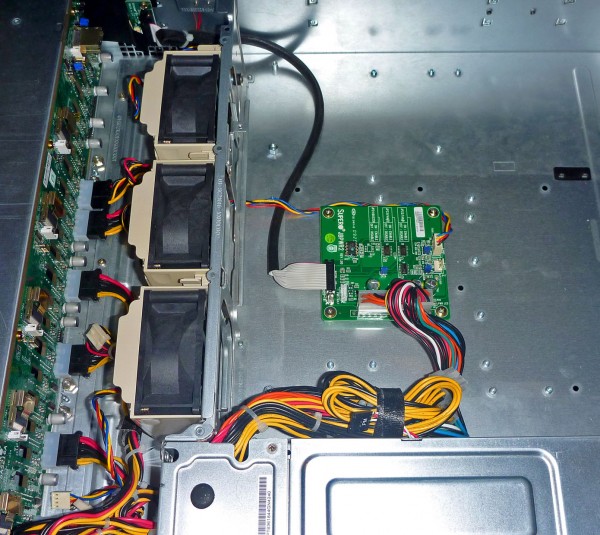
When properly connected, a push of the power button on your new JBOD chassis will power up the fans and spin up the drives. Holding the power button down for approximately four seconds will power off the fans and drives. Should a fan fail or become disconnected, you’d hear a moderately loud buzzer warning. Here is a photo showing the board mounted in a 2U 24-Bay SSD chassis. What strikes me is the simplicity of the wiring compared to some DIY solutions.

Enjoy your new JBOD chassis, and the money you saved by building it yourself. You might consider filling the space saved by removing the motherboard with – what else – more disk drives!
The New Version – You Probably Don’t Want it
If you are looking to buy a Supermicro JBOD power board, you should be aware that there is another version available with a very similar part number – Supermicro model CSE-PTJBOD-CB2. This later version of the board is around $10 more expensive, but is less desirable in most cases. While the original Supermicro CSE-PTJBOD-CB1 retails for about $50, the CSE-PTJBOD-CB2 costs around $60. Unlike the original, the new version does not allow you to disable individual fans. On the other hand, the newer version includes a three-pin I2C connector and a five-pin connector that I suspect is used to monitor the power supply directly. If your chassis is a Supermicro, talk to technical support to find out which version was designed for you, otherwise stick with the less expensive original model.
Other DIY JBOD Articles
If you are planning to build your own JBOD chassis, you should definitely read Patrick’s two-part article describing his SAS expander-based chassis project. His articles go beyond power to talk about the use of SAS/SATA expanders. Part one is here and part two is here.


is this with sas expander for $50? seems good. any pictures of the new version?
This is great news for DIY people. The next big hurdle that needs to be explained in an article, is: how do we connect all disks to the controller card with miniSAS cables?
How do you suggest we do that? Let us say we have a LSI2008 with sff8088. Then the sff8088 cables goes from the server to the JBOD chassis… in where? The SATA disks are inside the chassis. The point with a JBOD, is that we should be able to move it around, so it is not permanently tied to one server. So the disks in the JBOD chassis are accessible, how?
How to build cheap DIY JBOD with 15 SATA disks:
1) Get this piece of Supermicro hardware for $50 as described above
2) Get a empty PC chassis. Anyone can recommend a model?
3) Get three of these http://bigbruin.com/2006/mb455spf_1
4) How to allow the SATA disks to connect to the server via miniSAS sff8088 cables? <- open question
Hi Eddy,
The part is just a power board; there are no SATA or SAS connectors or functions. Patrick’s article delves into the expander, as do a number of posts on the forums.
Adding to dba’s awesome article and comment :-)
Typically with these you purchase a chassis that already has hot swap bays. It lowers overall costs by quite a bit.
Might be an interesting project to re-do the old guide with one of these…
Michael,
I was thinking of a short article with exactly that info. I’ll talk to Patrick and see if he is interested. The short answer: a SAS adapter PCI bracket. Unfortunately, there are two different wirings possible, and only one works.
Eddy, here is a photo for you:
http://images.ncix.com/forumimages/009044CC-13FF-4900-B422ED78C7229142.JPG
I think this is a great idea. Shoot me a mail with what you need.
It would be great if the board has a pci-e slot to power the sas expander…
I’ll stick to an old motherboard.
Hi JimmyZ,
Right you are. If you are using a PCIe-based expander that doesn’t also have a Molex power connector then the Supermicro board is definitely less appealing. To power the PCIe expander you’d need to add a passive backplane like Patrick did, and while you get a nice clean setup you end up spending a few dollars more. For a non-PCI expander, like the Intel RES2CV360, the board is perfect.
“The short answer: a SAS adapter PCI bracket. Unfortunately, there are two different wirings possible, and only one works.”
Thanx for the info. This needs some explanation apparantely. I didnt know this.
I am interested in a DAS for ZFS based cheap servers. Then the IBM M1015 card can be suitable. And a small empty chassis that holds three 3-5 disk enclosures, the chassis should be small as possible.
Some explanations of the “SAS adapter PCI bracket” would be great. And also, a note in the article, for those people who wants to use a SAS expander. Those should be fewer, because expanders are very expensive. This build is targeted to cost averse people, it should be cheap as possible.
Then I will link to your articles on different sites.
Michael, I submitted an article to Patrick that talks about cabling and adapters. Hopefully he’ll post it, though it will need to be put in the queue so it might take some time.
Targeting Monday.
Nice article, except there is one problem, it doesn’t work! This card will not fit any other chassis other that supermicro. I feel like I have been fooled by taking this article to heart, how I have hit a wall with my project because the information was inaccurate. The image above is a Supermicro 2U chassis so of course it will fit, but if you have a different chassis or server case, then forget it. I wasted a lot of time and money because of this article. Thanks for nothing.
Evan couldn’t you make a few holes in the not supermicro case to screw the board in? it doesn’t seem to be too difficult and there is no reason to blame the article for your inettitude.
a nice case for icy dock 5x hdd in 3×5,25inch is sharkoon t9. it has 9 bays of 5,25inch
https://www.kitguru.net/components/cases/simon-telford/sharkoon-t9-green-value-edition-case-review/
in combination with
https://www.icydock.com/goods.php?id=155#tabs-2
(this fatcage-serie. you can put your own slim-fan on it very easy.)
you will have 15hdd jbod case
Great article! I am trying to build a 4-bay JBOD. Ideally I want it to have esata or usb3 connectors on the back of the case that connect to the hot swap bays. Could someone point me in the right direction?
Can you use a consumer power supply? I’m interested in the 45 bay Supermicro units but I’m not a fan of the redundant power supply.
Good luck getting the CSE-PTJBOD-CB1
Tried many places, can only find the CSE-PTJBOD-CB2 :/