Previously we looked at how to install the Microsoft iSCSI Target software on a Windows Server 2008 R2 machine and then setup the iSCSI target on the server. The next step is being able to connect a client system to the iSCSI target. For Microsoft Windows, there is a built-in iSCSI initiator software that is very simple to configure to work with iSCSI targets.
Test Configuration
For this guide I simply used the Big WHS which uses Windows Server 2008 R2 as a base and is running the Microsoft iSCSI Software Target.
- CPU: Intel Xeon W3550
- Motherboard: Supermicro X8ST3-F
- Memory: 24GB ECC unbuffered DDR3 DIMMs (6x 4GB)
- Case (1): Norco RPC-4020
- Case (2): Norco RPC-4220
- Drives: 8x Seagate 7200rpm 1.5TB, 4x Hitachi 5K3000 2TB, 20x Hitachi 7200rpm 2TB, 8x Western Digital Green 1.5TB EADS, 2x Western Digital Green 2TB EARS.
- SSD: 2x Intel X25-V 40GB
- Controller: Areca ARC-1680LP (second one)
- SAS Expanders: 2x HP SAS Expander (one in each enclosure)
- NIC (additional): 1x Intel Pro/1000 PT Quad , 1x Intel Intel Pro/1000 GT (PCI), Intel EXPX9501AT 10GigE
- Host OS: Windows Server 2008 R2 with Hyper-V installed
- Fan Partitions updated with 120mm fans
- PCMIG board to power the HP SAS Expander in the Norco RPC-4220
- Main switch – Dell PowerConnect 2724
With plenty of drives, being able to export volumes using iSCSI is important on the network.
Installation Steps
This is a very simple guide to setting up the iSCSI Initiator software. The Microsoft iSCSI initiator actually has many more features than will be shown here, but this series is meant to be a basic guide to getting Microsoft iSCSI targets and initiators set up. The first step, of course is to make sure one has the iSCSI initiator software installed. Once this is done, one needs to run the iSCSI initiator software and allow access via UAC prompts if one comes up. Assuming Quick Connect does not work on the Targets tab, one may need to go to the Discovery tab and make sure that the iSCSI Target server is on the target portals list.
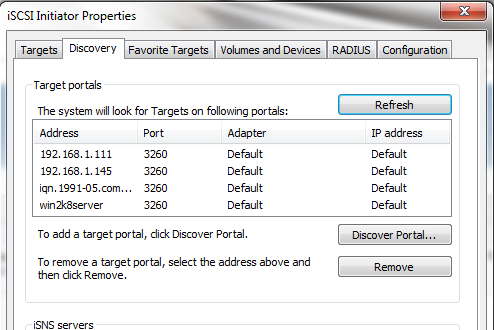
Once it is, one usually will see the IQN of the iSCSI target listed on the Targets tab with an inactive connetion. Note, one may need to refresh the list, and I have seen the list take a few minutes to update on two occasions (less than 5 minute delay.)
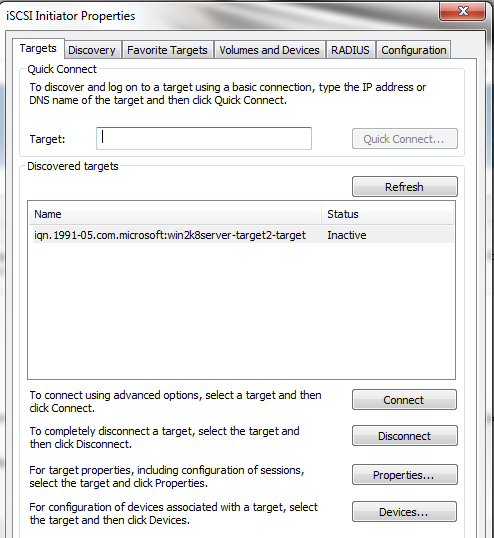
Next, one generally wants to click Connect and connect to the correct IQN of the iSCSI Target that one is looking to attach. This example only has one IQN to make it clearer, but with typical storage implementations one will see this list have lots of IQNs listed, making it all the more important to use descriptive names.
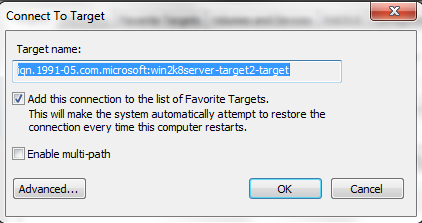
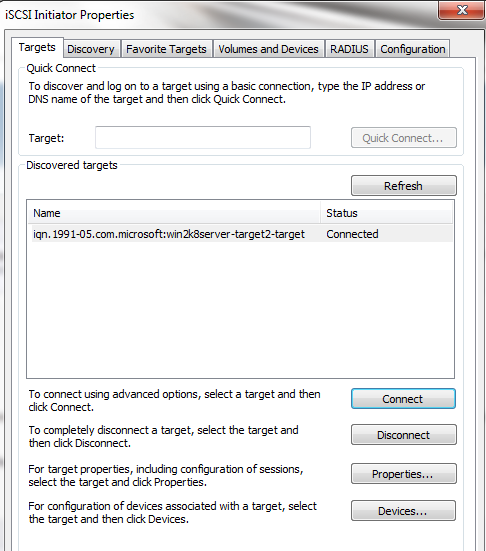
For this simple example, we will want to keep the check box on the “Add this connection to the list of Favorite Targets.” line and keep the target name the same. More advanced users can be more adventureous. Once clicking OK if all went well one should see on the Targets tab that everything is connected.
Now that the target is connected, one should go to the Volumes and Devices tab and select Auto Configure.
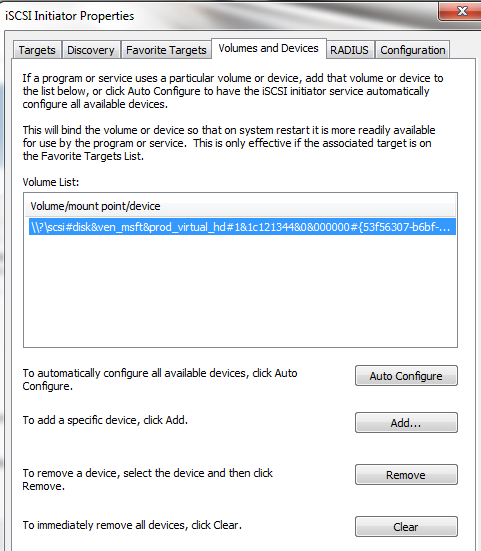
Once this is done, one can go into Windows Disk Management and see the volume attached as one would if a drive was directly connected into the machine. From this point forward, one can use the device as though it is a standard drive when it comes to formatting.

Although things can get much more complex, the basic Microsoft iSCSI Initiator/ Target setups are very simple.
Conclusion
Overall, this guide shows that once the iSCSI target has been configured, connecting clients to the network storage is very simple. There are many considerations when deciding to use iSCSI versus standard file-based network attached storage. In many cases I do highly recommend NAS storage. With that being said when looking at things like VMware vMotion or other features, simple network attached storage is not enough. Hopefully this series of guides help one to quickly configure iSCSI targets and initiators for the Windows platform.
Feel free to discuss this article in the ServeTheHome.com Forums!

