Many users are familiar with Windows networking and browsing shared folders over a local network. For constantly accessed shared folders, a simple way of accessing the same folder immediately is to simply create a shortcut. The other, and potentially better way to regularly access information from a server is to map the shared folder as a network drive. When Windows is started, it will automatically re-connect to this network location. The network location will have a drive letter instead of a potentially long path.. Mapping network drives also tends to make saving documents and other tasks faster.
Luckily, Microsoft has made it easy to map network drives, and with products such as Windows Home Server, make it simple to set up share locations. Here is a step-by-step guide to mapping a network drive. To make things simple, This demonstration will use a Windows 7 machine to map a Windows Home Server share location.
Step 1: Locate the place on your server that you want to map as a network drive.
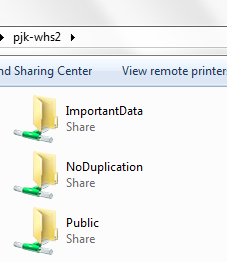
For this example, I will use my “NoDuplication” share on the PJK-WHS2 Hyper-V Windows Home Server Virtual Machine.
I always make sure I have the share available to the client machine and that I have the correct credentials and permissions set before mapping network drives.
I should note that I am using a Windows Home Server share here, but this works with most NAS devices at this point.
Step 2: Browse to “My Computer” on the client machine
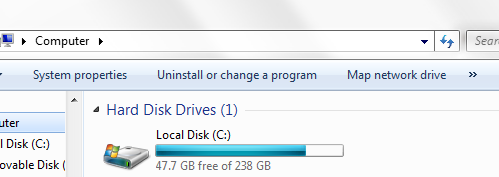
Step 3: Click “Map Network Drive”
Step 4: At the dialog box, enter the address either using the machine name or IP address
(Important note here: one must be able to access the WHS machine from the client machine) and assign a drive letter.
One thing I do is to make shares always the same drive letter on each client PC, so Z:\ for Music, N:\ for NoDuplication (non-redundant shares), and etc. Doing this allows one to transfer settings and scripts easily between clients.
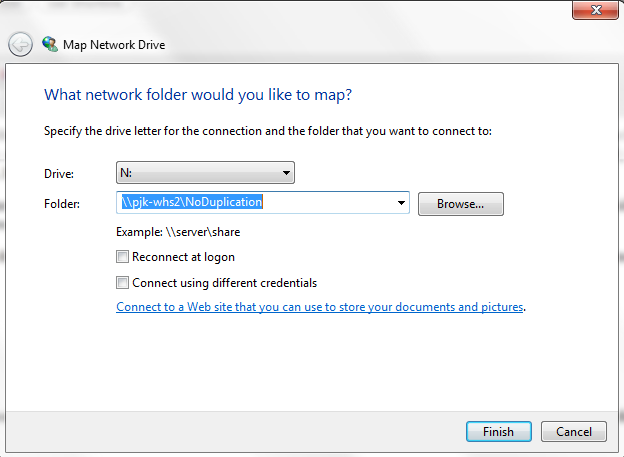
Step 5: Reconnect at logon is something that many situations will require.
All of my media player PCs have reconnect at logon checked as they often run headless in remote locations. A tip here is that this is a best practice when Windows folders such as My Documents, My Music, and etc. are mapped to network drives because Windows can have issues if it cannot access those locations.
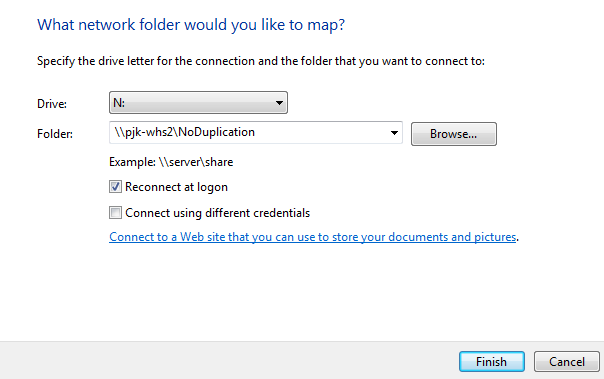
Step 6: Click OK or finish depending on which Windows version you are using.
The drive should now be visible in My Computer. Mapping network shares as drives makes a few things very simple, including moving highly sequential read/ write files to network storage on 7,200rpm 3.5″ drives. This is a very basic, but important step if one wants to offload as much as possible to a NAS system.

I find the “Net Use” command in Windows very handy and have written a simple batch file that runs as an autostart item each time I log on.
NET USE J: \\Servername\Share /USER:Domainname\Username Password
where
Servername = the name of the server
Share = the name of the share
Domainname = the name of the domain where the username is defined
Username = the username
Password = the password
You can leave out the Username and Password if you have the same login on your local windows computer as on your WHS. Most home users also doesn’t have an own Domain so the syntax becomes even simpler then:
NET USE J: \\servername\share
What of the other way round?
I am running WHS in virtualisation (WMware player).
I would like to include a folder on the client hard drive as a shared folder in WHS.
The drive containing the folder on the client is already mapped to WHS as a network drive. However, every time I try to add the folder as a share in WHS, I get an error message that I can only share a folder on an NTFS formatted drive (which the client drive is).
Thanks for your help.