This article is the first in a multi- part series featuring napp-it. For those that do not know what napp-it is, it is a free NAS / SAN web interface for Solaris derivatives. That is a big deal because it takes one of the most robust file systems in ZFS and makes it easy to use. Solaris and OpenSolaris derivatives such as OpenIndiana may not have the press that they once did, but it is built to be an ultra reliable operating system. ZFS has tons of great features built-in for data protection, memory caching, SSD caching, software RAID and etc. Prior to napp-it, managing a ZFS NAS based on Solaris or OpenSolaris meant learning CLI commands. With napp-it, users have an easy way to manage their ZFS NAS / SAN. Today we will be covering the installation and general configuration of napp-it and OpenIndiana as a Network Attached Storage (NAS) device, and creating and accessing a storage pool.
Napp-it running on top of OpenIndiana allows you to share your files utilizing the FTP, CIFS/SMB (Windows Shares), AFP, NFS, rsync, iSCSI, and FOE protocols It can make a great addition to your home, small business, or office network as a robust storage solution, while being easily managed through the use of a web browser interface. We will be using the Desktop version of OpenIndiana. More advanced users may choose to use the server version without the Gnome Desktop Environment. This article will be universal for both Desktop and Server versions. OpenIndiana is binary compatible with Solaris 11 and Solaris 11 Express. For more information check out OpenIndiana’s documentation. OpenIndiana has a great Wiki and FAQ, as well as excellent installation instructions.
Key Features of OpenIndiana and napp-it and their System Requirements
Before we begin, let’s look at a few of the key features of both OpenIndiana and napp-it:
Key Features of OpenIndiana
- ZFS File system
- COMSTAR SCSI Target System supporting iSCSI, iSER, FCOE and FC
- IP Multipathing
- Integrated Layer 3 and Layer 4 Load Balancer
- Crossbow high performance network stack
- Solaris-derived OS
Key Features of napp-it
Napp-it is a web browser managed, free internet NAS, SAN and Backup Server, and much more. The web interface is both intuitive, and easy to use. This makes managing your storage very simple without having to learn the host operating system’s command line interface.
- ZFS Management of disks, pools, and RAID-Z, RAID-Z2 and RAID-Z3 pools within a few mouse clicks
- Single command installation
- Simple and easy user and folder management
- Simple and easy folder and share management
- Easily configured to work with VMware ESXi and other hypervisors as a SAN storage solution
- Works great with Windows as a networked file server and or iSCSI storage target, even supports Active Directory Users and Groups
- AFP File server supporting Time Machine for your Mac
Suggested Minimum Requirements:
(You can get away with less, but you will not be happy)
- Dual core 64bit CPU.
- A minimum of 4 GB of RAM, ZFS likes memory, the more the merrier! (I have 16 GB of RAM in my napp-it server and ZFS can use a LOT of RAM)
- 20 GB boot disk (DO NOT USE A USB DRIVE) and at least 2 additional hard disks for datapools.
- A Network Interface card, two or more are recommended for iSCSI and or NFS storage services.
Your mileage may very with less than 8 GB of RAM. The ZFS file system will use as much available memory as possible as cache to enhance efficiency. It is not unusual for ZFS to consume the majority of all of the available RAM. CPU utilization can be intensive as well. While a single core processor may be enough in some cases, I notice that it is not unusual during large transfers and benchmarks for my CPU to utilize all four cores fairly heavily.
Installing OpenIndiana
Now it’s time to get down to the nitty gritty. Installing OpenIndiana, and setting up your napp-it NAS.
- Download and burn a copy of OpenIndiana Live to a DVD.
- Boot from the OpenIndiana Live DVD, select all the defaults for English and change as necessary.
- OpenIndiana will then automatically go to a Live Desktop, select “Install OpenIndiana”, this will start the installation wizard. It will then ask you a series of questions such as which disk to install to, time zone information, a root password, a user account, and a computer name. After reboot, log on to OpenIndiana with the User Account you created during the installation wizard.
Preparing OpenIndiana for the Installation of napp-it
We now need to change the root password as well as the auto-magic network settings to a static IP address. We will do this by entering the console as root.
Changing the root password:
You will first need to change the root password, to do so Launch a Terminal Session, this the command line shell for Openindiana, and type: su
You will receive a message “Password for user ‘root’ has expired” then prompted with “New Password:” and “Re-enter Password” the second time. You will receive a message that the password successfully changed for root.
Configuring the NIC:
- Type svcadm disable nwam then type svcadm enable network/physical:default
- We need to check the state of the NIC as well as its name . Type dladm show-phys
You should see something like this returned:
LINK MEDIA STATE SPEED DUPLEX DEVICE
e1000g0 Ethernet unknown 1000 full e1000g0
- We will now create a new network connection, type ipadm create-if e1000g0 where “e1000g0” is my device name, then assign a static IP address for the NIC by typing ipadm create-addr -T static -a 192.168.1.199 e1000g0/v4 (Make sure you are using an unused IP address!) We now need to create a static route, and default gateway. This is typically your router or cable modem IP address. Type route -p add default 192.168.1.1 Make sure that you input YOUR gateway IP addres, not mine.
- We will now look at our resolv.conf file. Type cat /etc/resolv.conf and verify that your name server is also the default gateway, this applies to most home users on a peer to peer network, otherwise it will be your DNS server.
- We will now replace the nsswitch.conf with nsswitch.dns. Backup nsswitch.conf by typing mv /etc/nsswitch.conf /etc/nsswitch.backup then replace it with the following command cp /etc/nsswitch.dns /etc/nsswitch.conf
- Verify that you have internet connectivity by typing dig www.yahoo.com this should return the name servers for yahoo.com.
- While still in the console enter the command reboot to reboot the machine.
Installing napp-it
Installing napp-it is a single command operation performed from a Terminal Session as root.
- Simply launch a Terminal in Openindiana, then type su
- Next, we will launch the installer command: wget -O – www.napp-it.org/nappit | perl
- Now you can sit back and watch the magic.
When the installer has completed, reboot.
Basic Configuration of napp-it
In this portion of the setup, we are going to change the admin and operator passwords, create a user, create a pool of disks, and a shared folder.
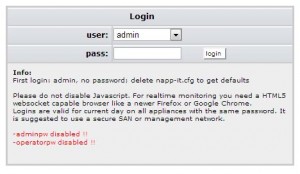
Log on to napp-it the first time with your web browser pointed to the IP address on port 81, in my case it is http://192.168.1.199:81 where you will be presented a Login Screen.
Take note that there currently are no passwords set for the admin or the operator accounts, you will be prompted to create them upon pressing the login button.
In this example, we will only be changing the admin-pw and operator-pw fields.
Upon pressing the submit button, you will then be returned to the Login screen.
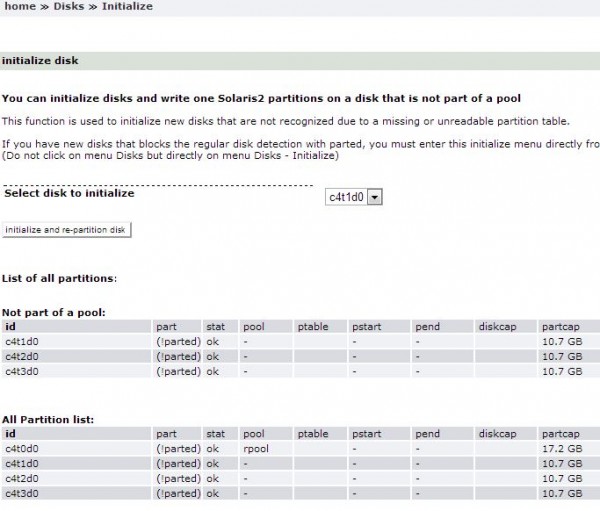
We now need to initialize our disks that will be used to create a new Storage Pool. WARNING! This will destroy all the data on the disks. Keep this in mind before you initialize them.
From the top menu, mouse over Disks and select Initialize where you will be presented with the initialize disk page.
You will note that I have three disks that are not part of a pool, each disk that will be used in a pool will need to be initialized. Select each disk you wish to add to a new pool, one at a time, from the Select disk to initialize drop down menu, then select the initialize and re-partition disk button.
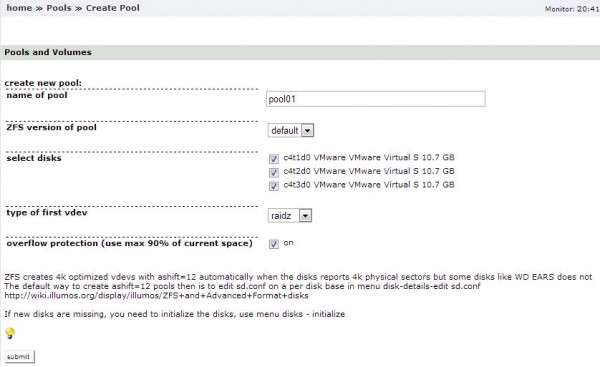
Here we are going to create a basic storage pool running RAIDZ1. We have our newly initialized disks and it is time to put them to use.
From the top menu, mouse over to Pools and select Create Pool. Input a name for your pool, from the drop down for type of first vdev select raidz and select submit.
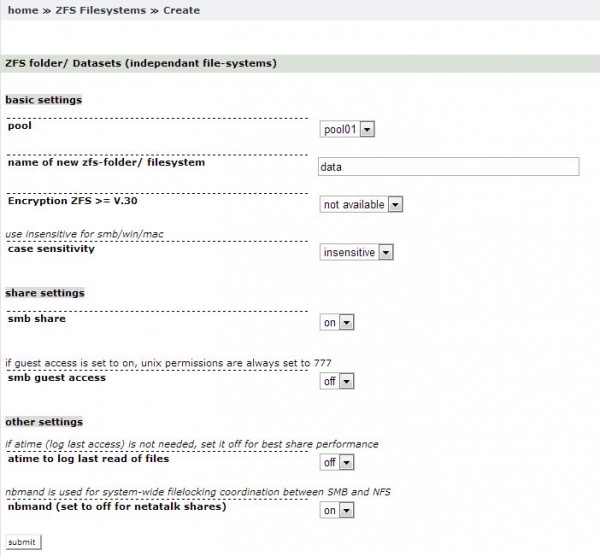
We now need to create a ZFS Folder. Mouse over ZFS Filesystems and select Create. Verify that the newly created pool is selected from the pool drop down menu. Create a name in the name of new zfs-folder/ filesystem field, in my case I am creating a folder called data, and then press submit.
We are now ready to configure sharing. We will be setting the Workgroup name, enabling the SMB/CIFS Server and SMB/CIFS Client services.
- From the top menu, mouse over Services, SMB and select Workgroup. You will be presented with the SMB/CIFS Service screen, in the name of workgroup ex home field, input your workgroup name and press the submit button.
- From the top menu, mouse over Services and select SMB. From this SMB/CIFS Service screen, enable both the SMB/CIFS Server and SMB/CIFS Client services by setting both dropdown menus to online then submit button.
To access your share, open Windows Explorer and input \\openindiana\data where openindiana is the name of the napp-it server.
Congratulations! You have successfully setup napp-it running on OpenIndiana.





Great article. I’m going to give it a try.
Do you know if napp-it is easily installed on Oracle Solaris x86-64 11.1 instead of OpenIndiana?
Per the napp-it basic manual, it is supported.
http://www.napp-it.org/doc/downloads/napp-it.pdf
I thought Openindiana was pretty much a dead project? Would there be a better base OS to put napp-it onto?
It would be interesting to do a tutorial or more on the duo OMNIOS + NAPP-IT and then make a comparison + / – (advantages and disadvantages) of OPENINDIANA vs OMNIOS.
(PS: For now, personally, I’m OPENINDIANA but OMNIOS interests me and seems to me more suited to the “philosophy” and the concept of NAS / SAN ZFS).
OpenIndiana follows the comprehensive approach of Opensolaris as a desktop and server OS. Main problem is that there is no enterprises behind to sponsor such a universal approach.
OmniOS is a pure reduced server OS with NAS and SAN use in mind, based on the same Illumos core like OI but supported by an enterprise whose success is based on this product. This results in a more up to date and stable release and bi-weekly updates. In fact OmniOS is my personal favourite at the moment for a fast and stable ZFS system.
I publish the current state of my insights at:
http://napp-it.org/downloads/omnios_en.html
in short:
OmniOS stable: ok
napp-it support: ok
base tools like smartmontools, netatalk: ok
All-In One/ ESXi support/ Howto install vmware tools: available (I do first tests)
So my best bet is: try it
Steve,
Thx for the excellent write up.
I’ve always wondered why the “nix/solaris” insert your fav…have so many flavors!
Write ups like this will certainly help people like myself that have always been on the fence.
Gea or Steve, can anyone comment on the different flavors as a Storage O/S – “OmniOS vs Nexenta vs OI” etc
Nexenta claims to be the “best”! Is that not the case?
I am glad that you found this article useful! Thank you!
As far as Nexenta being the best, that is a matter of personal preference.
Nexenta changed their licensing model not long ago, this forced businesses to pay. This drove businesses and enthusiasts alike to find other storage alternatives.
OmniOS is on my To-Do List, keep your eye on the forums as I will be posting about my experiences with it.
btw, do or will any of these (OI, OmniOS etc) support SMB 3.0?
The Samba 4.0 project is currently working on implementing SMB 3.0.
I have not found much information from the OmniOS community since the Samba 4.0 project is still being worked on. As of September last year, The Samba 4.0 project was still working on 4 or so components of SMB 3.0. I am pretty sure that any Distro’s that are implementing Samba will be very interested in including this repository.
About these distributions, you must consider three aspects:
1. The quality of the base OS
– this is always the same: Illumos
2. The quality of the distribution (how often are bugs fixed)
They differ in the time for new features in Illumos to be included or fixed
This is better in commercial supported ones like NexentaStor or Omni
and not the same in OpenIndiana and Illumian (Base of NexentaStor)
3, Extras like Web-GUI, Plugins or available or supported add-ons
like netatalk, webserver, mediaserver or the repositories at all, and the question if they are commercial only or only free for private use like Nexentastor (Enterprise and Community)
Great article!
PS. I belive that the nick “Gea” above, is the creator and developer of “napp-it”. Correct me if I am wrong.
Yes he is. The man, the myth, the legend himself.
He’s active on STH’s forum as well, great guy.
@ Gea,
do you know when OmniOS will support (open) VAAI?
I have seen some development news from Jorg January 2012, but then it became silent.
Basically the only thing keeping me to Nexenta for now is their support of ( prop.) VAAI.
Would love giving OmniOS and Napp-it a go…. but no VAAI… no go :-)
I have no info.
You may ask this at the OmniOS-discuss maillist
http://lists.omniti.com/mailman/listinfo/omnios-discuss
I have a basic question – Napp-it to go is great for my NAS; it’s a headless system, and doesn’t need a full OI install, so running off a USB drive is fast and easy. I’ve seen Gea suggest mirroring the Napp-it to go drive and running them in tandem, but I can’t figure out what the most important reason is behind this?
Is it security, or performance related? – redundancy of OS, in case one USB drive fails? Or increased bandwidth for reading the OS off a USB disk?
If you ran Napp-it to go off a single USB, what is the bigger trade off? – increased risk for OS failure, or simply reduced performance of the OS?
OmniOS is the best illumos based OS for Napp-it.
Which is the best OS for napp-it to go?
Is it openindiana or freeBSD or omni OS?
I have seen that freebsd now included zfs and fc target drivers. So will this be a better option for Napp-it to go?
Hi – great question to ask in the forums where gea who runs napp-it is a regular participant: http://forums.servethehome.com/f26/
Your best bet is OmniOS. While OpenIndiana works fine with nappit, sad to say it is a dying project for now. I personally use OI and napp-it for few clients and it works grate but now looking into OmniOS and SmartOS. Nappit use OmniOS for their USB mirror solutions so it should be a good choice. If you want to have freeBSD platform look into freeNAS.
hy steve, iSCSI starcom openindiana suport for FC/fiber 10Gbe?
Hi all,
Maybe a stupid or noob question but in the case of installing napp it + Oi, is it still possible to have access to the desktop version of OpenIndiana during the Nas working ? For example is it possible to use the NAS functions like data backup or sharing files from a laptop or a nomads device and working at the same time on Oindiana desktop?
In advance
Thanks