After the recent article on passing controllers through to ESXi virtual machines, I did get some questions around pass-through in Hyper-V. First off, it works a bit differently in Hyper-V, but you can still expose raw disks and RAID volumes to Hyper-V virtual machines, and this does not require Intel VT-d. This is an important feature of Hyper-V because it allows for the virtual machines to get raw disk access which is important when you have a storage operating system controlling the drives.
Test Configuration
- CPU(s): Intel Xeon X3460
- Motherboard: Supermicro X8SIL-F Rev. 1.02
- Memory: 2x 4GB kits of Kingston ECC 1333MHz DDR3 KVR1333D3E9SK2/4G (Unbuffered)
- Case: Supermicro SC933T-R760B
- HBA: 2x Intel SASUC8I
- Drives: 5x Hitachi 7,200rpm 2TB, 5x Western Digital Green 2TB, 5x Seagate 1.5TB 7,200rpm
- OS(es): Windows Server 2008 R2 with Hyper-V Installed
This is a relatively new build, but is a fairly solid platform.
Setting up a pass-through disk in Hyper-V
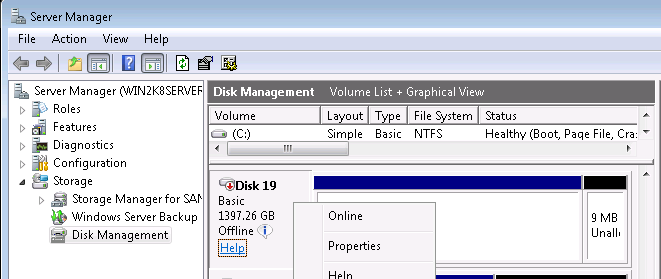
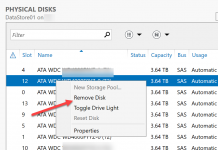
First, one needs to have the drive that one wishes to pass through installed in the PC, and have it visible in disk management (Server Manager -> Storage -> Disk Management). Once it is visible, right click next to the “Disk xx” and select “Offline”. Once completed you should see the below. Note, that when the disk/ volume is offline, as it is in this picture, the menu brings up an option to set this disk to online. When you have a disk/ volume passed through to a virtual machine, you never want to do this as it will pass control of the disk/ volume back to the Windows Server 2008 R2 instance.
Next, go to the Hyper-V Manager and add a disk (you most likely want this to be on the SCSI controller as shown).
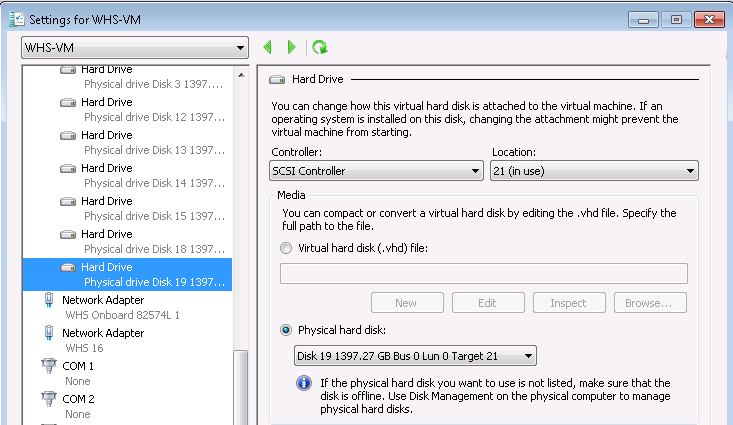
Once the add disk contextual menu comes up, make sure that you select a location that is not currently in use. Then select physical hard disk, then the offline disk/ volume from the previous step.
Once you apply the changes, the disk or volume will be available directly in the guest operating system.
Conclusion
Hyper-V disk and volume pass-through is very simple, and does result in noticeably better performance than passing through virtual disks. This is an easy way to manage both passing disks through to Windows Home Server and also passing RAID volumes through to WHS and other operating systems. I still really like Hyper-V virtualization of Windows guest OSes as basic setup and management is much easier than VMware ESXi, but ESXi does have a lot of merit.

Have you ever tried any of the newer disks with 4k physical sector sizes? Hyper-V doesn’t work with them :-( Any idea when microsoft will correct this oversight?
Unfortunately this article like all others make it sound like this is simple and easy and just works, but it does not. The physical disk does not show up in the guest OS (Win 2008r2) at all, even in Disk Management. The only sign that anything has been added is a device in Device Manager that says it’s working properly but has a blue ? on it called eSATA-2 ExternalRAID SCSI Disk Device. I wish this feature actually worked as all these articles indicate it should.
@ebonweaver
http://msdn.microsoft.com/en-us/library/cc768529%28v=bts.10%29.aspx
States
Do not attach a system disk to a SCSI controller. A virtual hard disk that contains an operating system must be attached to an IDE controller.
It also has some other tips to help you. It works flawlessly. Thanks for the good article!
Great write up – easy to follow instructions that simple work. I would have liked more details on why you made statements like, “but ESXi does have a lot of merit” and “you most likely want this to be on the SCSI controller” though. Just a thought.