Today we are looking at the Corsair Hydro Series H80 CPU cooler. Most users in the server/ workstation market look at air cooling for their CPUs and for good reason. Those that can use Intel’s LGA 1155 CPUs (either Sandy Bridge or Ivy Bridge versions of an Intel core) were fortunate enough to be able to use Intel’s retail HSF CPU Cooler which operated in a fairly quiet fashion and can cool stock clocked LGA 1155 CPUs and even very lightly overclocked “K” series CPUs that are not using the onboard GPU. AMD’s G34 platform that STH covers quite a bit generally requires very specific coolers (my personal favorite of which is a Dynatron A1 solid copper heatsink with a custom mounted fan or passively cooled with chassis airflow.) On AMD AM2/AM3, the Intel LGA 1366 side and the Intel LGA 2011 side, things are a bit trickier since one has higher power consumption and additional heat to dissipate and retail coolers (if available) tend to have decent compromises. I decided to purchase a few different LGA 2011 coolers just to try them out, specifically looking at the server/ workstation market as opposed to the fairly standard overclocking segment that is covered elsewhere. The Corsair Hydro Series H80 CPU Cooler Review is the first cooler being reviewed in this series.
Test Configuration
The test configuration for this series is going to be my single-processor LGA 2011 test bed.
- CPU(s): Intel Core i7-3930K and Intel Xeon E5 8-core 16 thread CPU @ 3.1GHz
- Motherboard: ASUS P9X79 WS
- Memory: 32GB (8x 4GB) G.Skill Ripjaws X DDR3 1600
- Drives: Corsair Force3 120GB, OCZ Vertex 3 120GB 2x OCZ Agility 3 120GB
- Chassis: Corsair Carbide Series 500R
- Power Supply: Corsair AX850 850w 80 Plus Gold
Installation
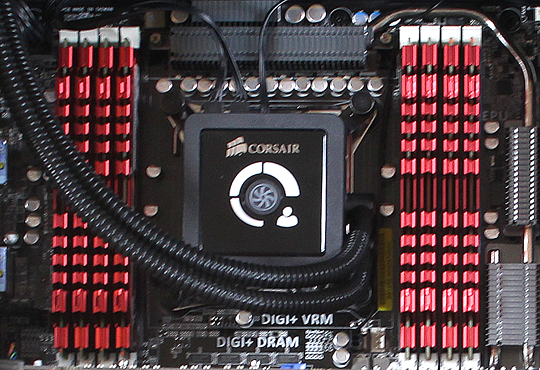
Servers and workstations often come with a chassis that includes all necessary fans. Adding a cooling component to a 120mm fan mount is trivial in the context of consumer cases, while it is not a given that workstation and server chassis may not include appropriate mounting points. The Corsair H80‘s assembly more or less consists of four main components, the retention bracket, the CPU block/ pump housing/ tubes and radiator assembly, and the two fans that are placed on either side of the radiator. I took a picture of the H100 (more or less the same assembly)installed in the test bench it looked just like the Corsair H80 picture so I am using that one. Only difference is that the pair of 3-pin fan connectors are on the opposite side for the Corsair H80 because the H100 has four connectors.

One area that I think does not get enough press on the cooler side is the fact that sticking a huge piece of metal on a motherboard can cause stress on the PCB. I had an old EVGA NVIDIA 680i based motherboard (Intel Core 2 Duo and Core 2 Quad generation) with a giant (for the time) Thermalright Ultra 120 Extreme that ended up warping the board over a few years of use. I greatly prefer waterblocks on the CPU just because it makes the area much easier to access than with large air coolers. This is a fairly uncommon way to cool Intel Xeon CPUs. There are quite a few air coolers that are able to meet or exceed the H80’s cooling capabilities, but they are generally very large units.

Most users will start by bolting one 120mm fan on the outside of the chassis with the radiator on the other side creating a sandwich with the chassis in the middle (best practice is to have the hoses go to the top of the chassis.) The other 120mm fan simply screws into the other side of the radiator. Note, this will overhang quite a bit so if your chassis’ 120mm mounting location is over the rear I/O ports you will probably want to measure things before purchasing the H80 and similar coolers. I took a picture with a tape measure, and you can see that about 3″ of clearance is required from the interior wall of the chassis.

For those with Intel chip sets, the installation is fairly straightforward. The Corsair H80 comes with the necessary bracket pre-installed. For LGA 1155/1156 and 1366 platforms one needs only to install the back plate and cooler anchors. For LGA 2011 one can use the standard cooling mount points found on most motherboards. After the back plate and posts are installed, one simply places the cooler on the CPU and four posts and then tightens the thumb nuts by hand (or using a screwdriver.) Overall very easy. For the Socket AM2, AM3 and AM3+ crowd, you will need to disassemble the Intel Xeon mounting brackets on the water block/ pump housing and then install the AMD brackets. Luckily from there the cooler utilizes the standard AMD mounting interface.
Once the waterblock/ pump assembly, the radiator and the fans are in place, it is time to work on the electrical. First the Corsair H80 has two four pin ports on the side of the copper waterblock/ pump assembly where one can connect the fan wires to.

The fans included with the Corsair Hydro Series H80 are 3-pin units which is interesting given the fact the block has the capability to handle 4-pin PWM units. After this is done the only thing left is to power the entire unit. You can use the 3-pin connector on the motherboard’s primary CPU fan port and the 2 of 4-pin molex connector on a 4-pin connector coming from a power supply.

One feature that must be mentioned is that the H80 has three speed settings (high-medium-low) that can be selected through the button on the pump/ waterblock assembly. I would highly recommend not using the “low” setting with Intel Xeon LGA 2011 chips. Once one makes a selection, the unit will vary fan speed to keep the fans running slowly at idle and faster for high load and heat scenarios. One can also hook the fans up to a fan controller or a motherboard and get finer controls, but this works pretty well.
Overall, a super easy installation, especially if you are using a LGA 2011 (desktop/ workstation) platform. I was pretty fortunate to find this worked in my Norco RPC-4220.
Performance
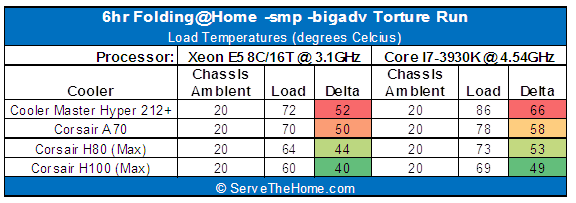
For Intel Xeon E3-1200 series processors, I would suggest that the Corsair Hydro Series H80 is probably not the best cooler since one has a CPU with a max TDP of 95w or less. The Intel retail cooler is very sufficient in that range. With chips such as the Intel Core i7-2600K or Core i7-2700K the H80 starts to make sense because there is a lot of overclocking potential, and therefore heat available. On the lower-power platforms, the low and medium fan settings are all one needs (this one can select by simply pressing the circular fan button on the waterblock.) While that was all well and good, I decided to use some hotter processors. Namely a 150w LGA 2011 8 core/ 16 thread CPU running at 3.1GHz and a Core i7-3930K running at 4.54GHz. Those two chips generate a ton of heat. To keep the CPUs loaded I am using the Folding@Home client using the -smp -bigadv flags to keep all cores and threads highly active for hours at a time. Total run time for each test was 6 hours. I probably need to find something a bit faster, but I wanted to make sure that I was getting the units good and heat soaked. My expectation is that this site has users that want continuous stability rather than a few minutes for a quick maximum benchmark run.

In the next few weeks I will be adding more to this little chart. The 6+ hours for each run (and I average three runs) have not given me a ton of time to test many of these at this point. A lot of other reviews I found online used overclocked 95w TDP CPUs. With the new Xeon E5-2600 series 150w (at stock clocks) 8C/16T chips will be available, making it very interesting to use as a test subject at stock speeds. On the other hand, the Intel Core i7-3930K (which will be like the Xeon E5-1650 when that is released) provides a very hot platform for CPU cooler testing.
Overall we see that the H80 is a strong cooler in the LGA 2011 space. Realistically, all of the listed coolers are doing an adequate job but the H80 is doing well while keeping the CPU area clear.


Another important point is that using water brings the heat from the CPU out of the chassis devoting the existing cooling for HDD’s and misc. motherboard components so you can run slower/quieter fans.
I want one!
I use H60s in my PC and the wifes PC. I was able to get them both on sale for 40$ each. The H60 is so close in performance to the H80 and H100 that unless you *really* need that extra few percent I always recommend the 60. Not to mention its got a thinner radiator making mounting easier. You could probably easily use two of them in a dual CPU setup.
My biggest concern is the fact that its a liquid cooler in a *rack* scenario. If you had one or two of these units fail high up in the rack you could end up with a very very expensive problem if you were unlucky enough to have it trickle down and destroy more equipment. Its pretty unlikely but it is something I would consider (though I would still probably use one if I had a high heat CPU in a server.)