Today we will be taking a look at ASUS’s new Workstation motherboard, called the X99-E-10G WS. This new motherboard is very similar to the ASUS X99-E WS/USB 3.1 motherboard we reviewed earlier. The main difference is 10Gbps Ethernet controllers provided by the Intel X550-AT2 10GbE controllers and expanded storage options. By 2017 we are going to see 10GbE networking become an important rating criterion in most home and SMB reviews. We like where ASUS is headed with the setup.
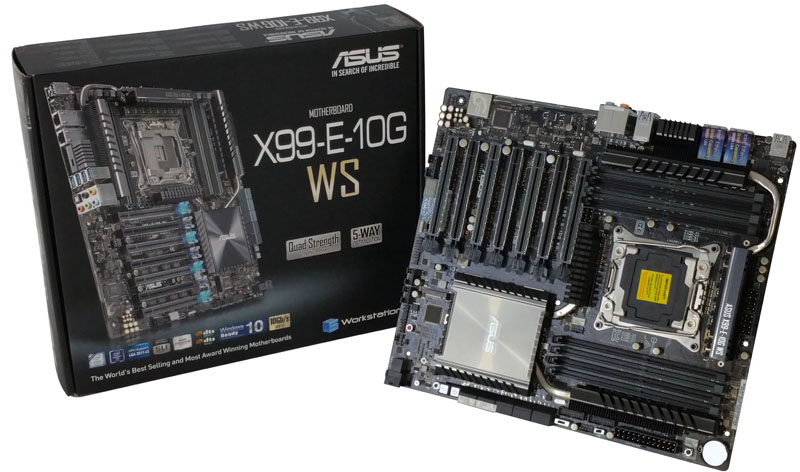
The ASUS X99-E-10G WS drops the SATA Express ports and replaces that with a U.2 connector, adds two more SATA 6Gb/s ports for updated storage options. Adding the Intel X550-AT2 10, 2x Gigabit LAN ports did take up extra space in the back IO area and we now have fewer USB ports. Because of the new configurations, power/reset buttons are at new locations, but over all the new X99-E-10G WS is a very similar to the X99-E WS/USB 3.1.
ASUS X99-E-10G WS Motherboard Key Features
- CPU Socket Type – LGA 2011-v3
- Chipset – Intel X99
- Number of Memory Slots 8×288pin
- Memory DDR4 3333(OC)/ 3110/ 3000/ 2750/ 2666/ 2600/ 2400/ 2200/ 2133
- Maximum Memory Supported – 128GB
- Quad Channel Supported
- Expansion Slots
- PCI Express 3.0 x16
- 7x PCIe 3.0/2.0 x16 (single x16 or dual x16/x16 or triple x16/x16/x16 or quad x16/x16/x16/x16 or seven x16/x8/x8/x8/x8/x8/x8)
- Storage Options:
- 1x U.2 connector
- 1x M.2 x4 Socket 3, with M Key, type 2260/2280 storage devices support (PCIe mode)
- 10 x SATA 6Gb/s port(s)
- Audio Chipset – Realtek ALC1150 8-Channel High Definition Audio CODEC featuring Crystal Sound 3
- LAN Chipset – Intel X550-AT2 10, 2x Gigabit LAN ports
- Form Factor – CEB Form Factor 12 inch x 10.5 inch (30.5 cm x 26.7 cm)
ASUS X99-E-10G WS Motherboard Overview
As we have come to expect from ASUS motherboards the packaging comes with a wealth of specifications and graphics defining the motherboards capabilities on the retail box.
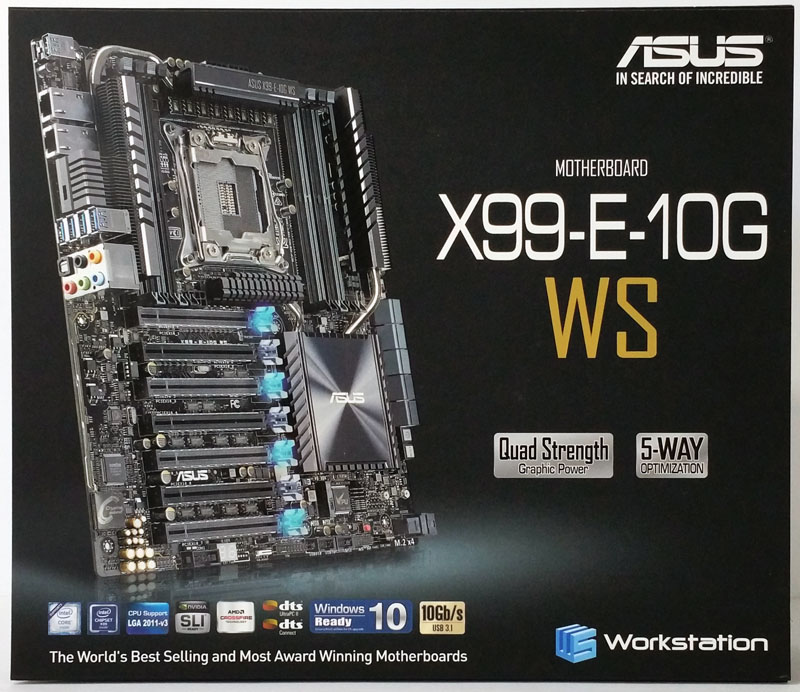
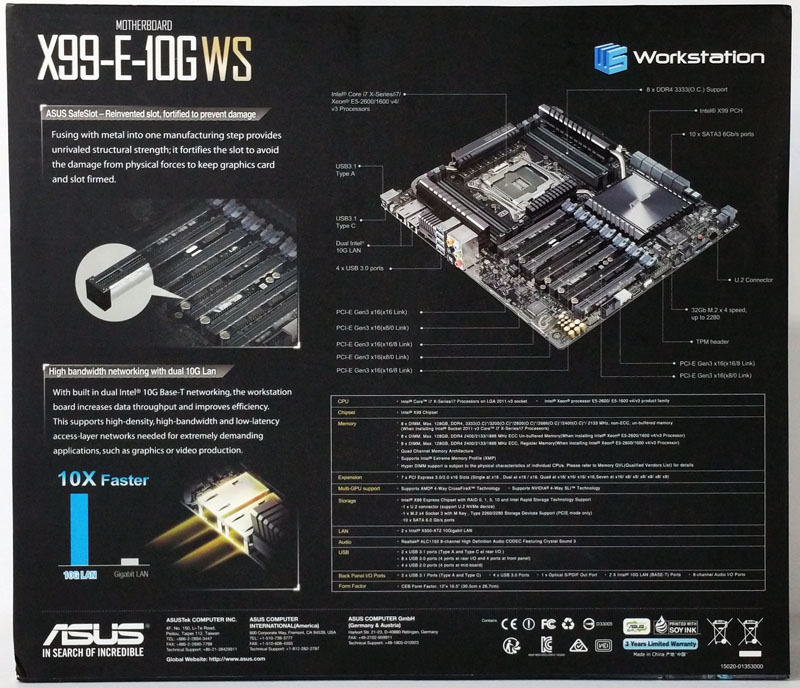
Front and back of the retail box show graphics outlining the major specifications of the ASUS X99-E-10G WS motherboard.
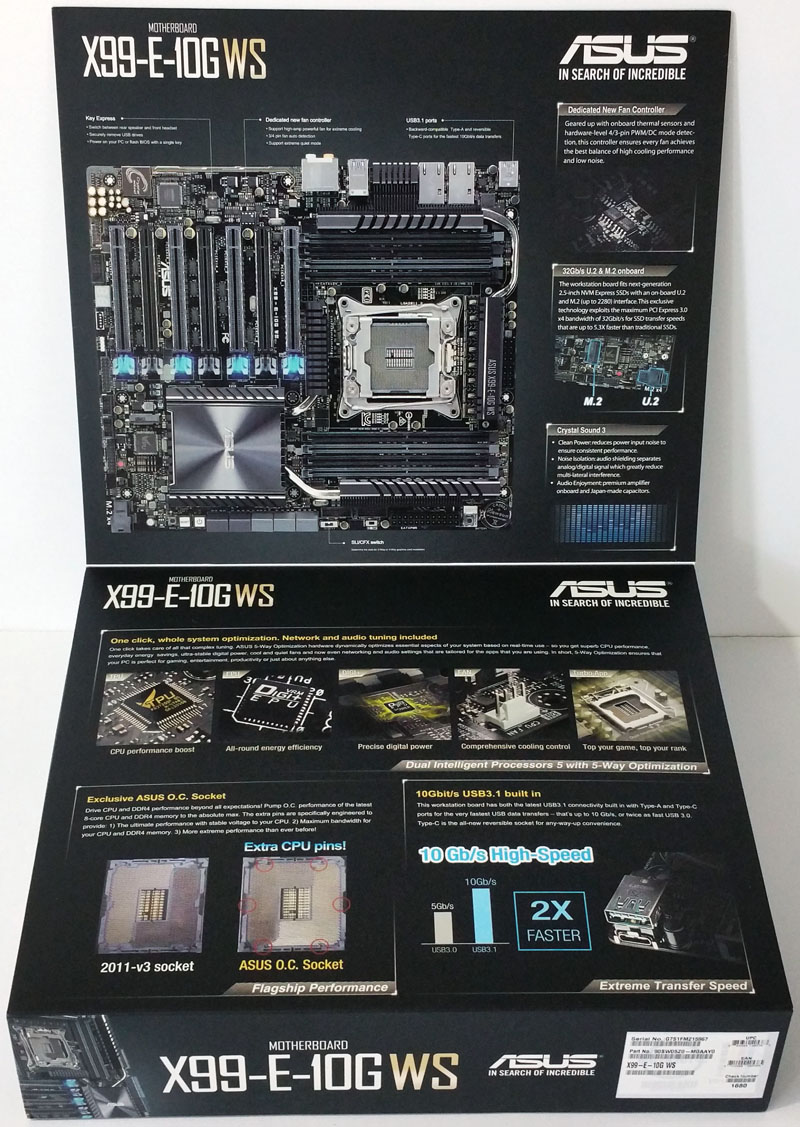
Lifting the front cover of the retail box displays more specifications.
You can also see on the front cover and the flip up lid that the gray PCIe slots have blue LED’s that light up the locking lever.
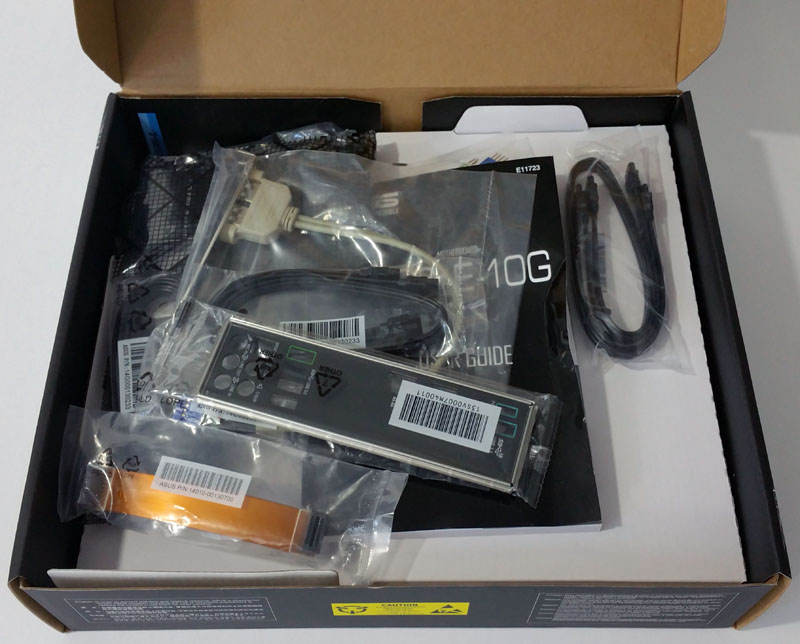
The first thing we see when opening the retail box is the large assortment of accessories that come with the ASUS X99-E-10G WS.
Accessories:
- User’s manual
- Driver DVD
- I/O Shield
- 1x COM port cable(s)
- 10x SATA 6Gb/s cable(s)
- 1x Supporting DVD
- 1x 3-Way SLI bridge(s)
- 1x 4-Way SLI bridge(s)
- 1x SLI bridge(s)
- 1x Q-connector(s) (2 in 1)
- 1x 2-port USB 2.0 module(s)
- 1x Extension Cable for RGB strips (80 cm)
Taking the motherboard out of the retail box, we can now get a good look at the ASUS X99-E-10G WS Motherboard.
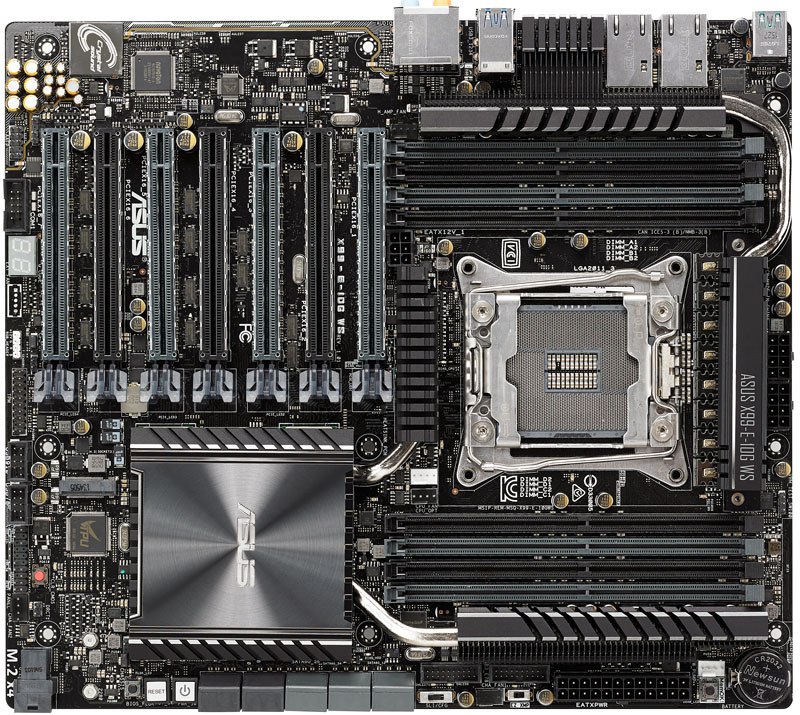
ASUS Workstation series of motherboards waste no space with components and features, the number of PCIe slots needed to support Nvidia Quad SLI and 4-Way AMD Crossfire take up a quarter of the motherboards real estate. Motherboard component cooling includes five heat sinks connected by heat pipes, divided into two sections.
The leading edge of the motherboard is where we find the storage connectors.
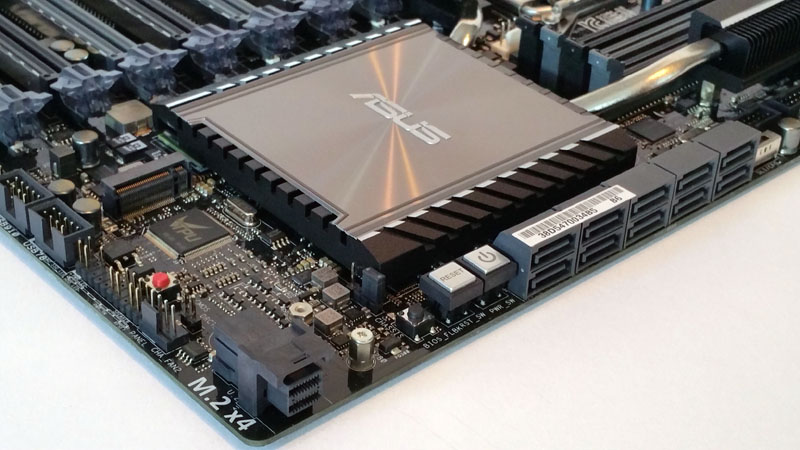
Front Storage ports: 10x SATA 6Gb/s ports with the U.2 connector over at the corner.
The 4x black SATA ports do not support Intel Rapid Storage Technology and RAID configurations. In the middle section at the back, we find the M.2 x4 Socket 3, with M Key. The U.2 and M.4 ports can take advantage of the maximum PCI Express 3.0 x4 bandwidth of 32Gbit/s for SSD transfer speeds.
Just past the SATA ports at the right of this picture, we find a SLI/CFX switch. When enabled the LED’s near the PCIe slots will light up to signify which slots to install the GPU’s in.
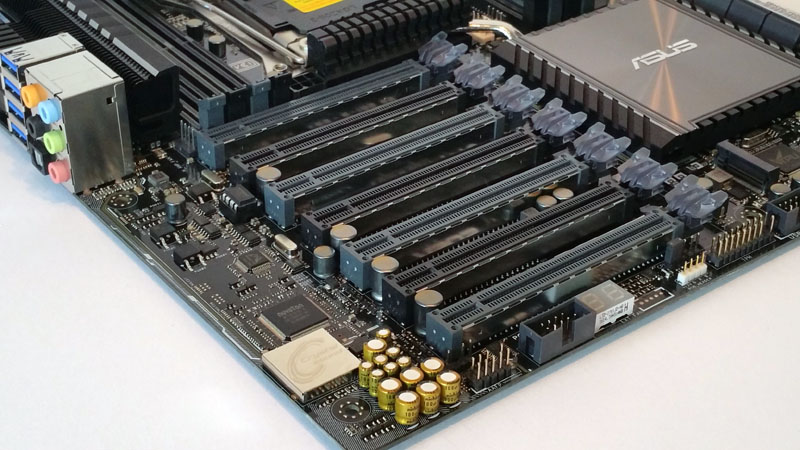
Here we see the PCIe slots, which are: 7x PCIe 3.0/2.0 x16 (single x16 or dual x16/x16 or triple x16/x16/x16 or quad x16/x16/x16/x16 or seven x16/x8/x8/x8/x8/x8/x8)
- PCIe Slot 1: x16 Link (gray)
- PCIe Slot 2: x8/0 Link (black)
- PCIe Slot 3: x16/8 Link (gray)
- PCIe Slot 4: x8/0 Link (black)
- PCIe Slot 5: x16/8 Link (gray)
- PCIe Slot 6: x8/0 Link (black)
- PCIe Slot 7: x16/8 Link (gray)
The PCIe 3.0 slots are reinforced with a metal shield which ASUS calls “SafeSlot”, which adds strength to the PCIe slot when supporting heavy, large dual slot GPU’s. Additional solder points help to add added strength in securing PCIe slots. As we have said before, we like the newly strengthened PCIe slots; we have had broken PCIe slots in the past, mostly in shipping complete systems. With users using heavy copper water blocks on their graphics cards we see this as a welcome addition.
Also, found in the left back corner is the Realtek ALC1150 8-Channel High Definition Audio CODEC featuring Crystal Sound 3 chip and gold clad Japanese-made audio capacitors.
The front right-hand side of the motherboard we find the power connectors and the onboard battery.
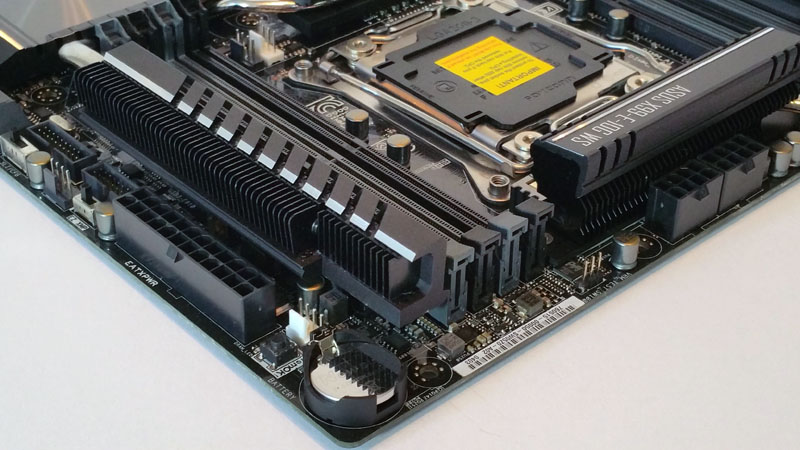
Next to the onboard battery we find the MEMOK button for testing your memory, and behind that is a pump control header for those that want to add water cooling.
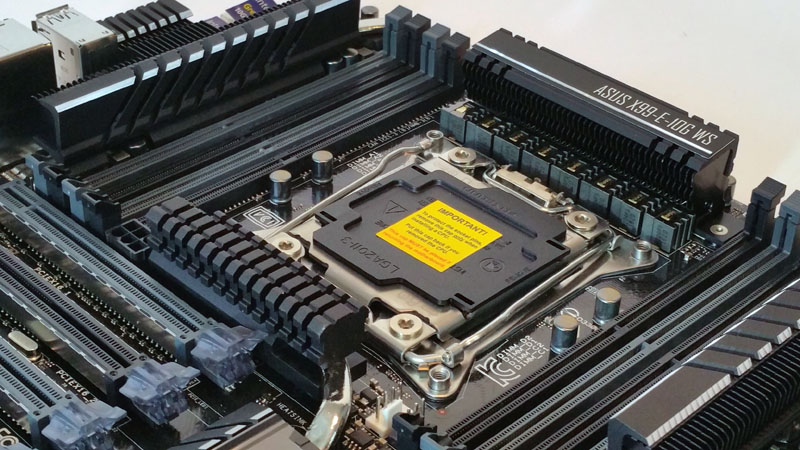
The socket area is busy with many components in this area. Heat sinks line the edges of this area which make fitting memory and coolers tight. Also in another difficult to access location is the CPU fan control headers found in between memory slots and heat sink. These are hard to access if you have a GPU installed.
Let us move on to take a look at the rear I/O ports.
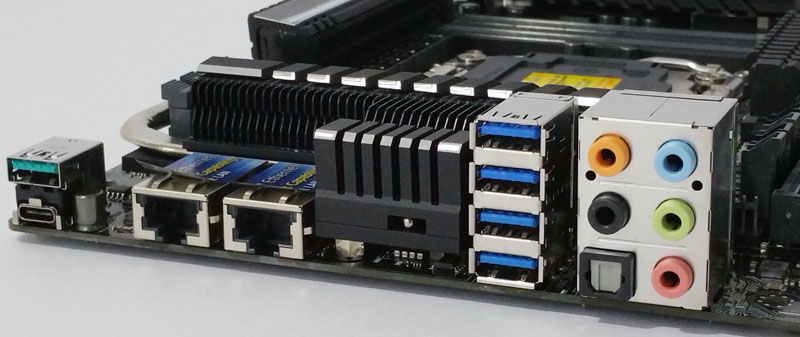
Rear I/O ports include:
- 2x USB 3.1 Type-A + Type-C
- 4x USB 3.0 (blue)
- 1x Optical S/PDIF out
- 8x Audio jack(s)
- 2x Intel 10G LAN (BASE-T) Ports
One of the first things we noticed is the lack of USB ports. USB 3.0 (blue) ports total four, which two of those are for a keyboard and mouse which brings you down to two for external USB devices, printers and other devices of this type. Expanding USB ports with the included onboard USB expansion header which would add two USB ports at the back and two at the front. It is also possible to add USB expansion devices to up this number. Either way USB ports are sparse on this board.
It does include two USB 3.1 Type-A and Type-C ports for higher performing devices.
The main feature of the X99-E-10G WS motherboard is two Intel 10G ports which appear to take up a lot of space with the included heatsink for the Intel X550-AT2 chip.
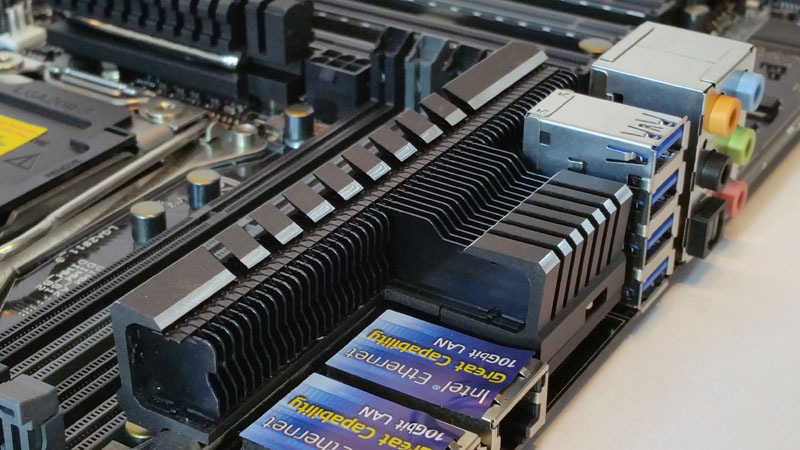
Here we get a look at the expanded heatsink to cool the Intel X550-AT2 chip. 10Gbase-T networking is significantly less efficient than SFP+ 10GbE so we commonly see large heatsinks on 10Gbase-T NICs. This is one of the larger variants we have seen, especially on the newer X550 chipset.
Let us move on to the BIOS and benchmarks now.
ASUS UEFI BIOS
If you have used ASUS motherboards before, you will be right at home with this one.
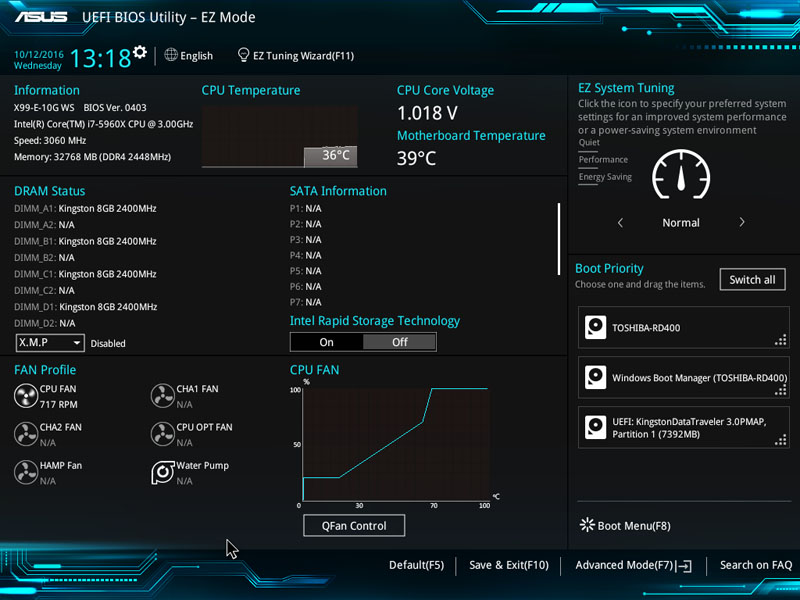
Here we see the main screen or EZ Mode when you first fire up the motherboard. Most of the features you might want to adjust can be found on this screen with easy to read and navigate icons and buttons.
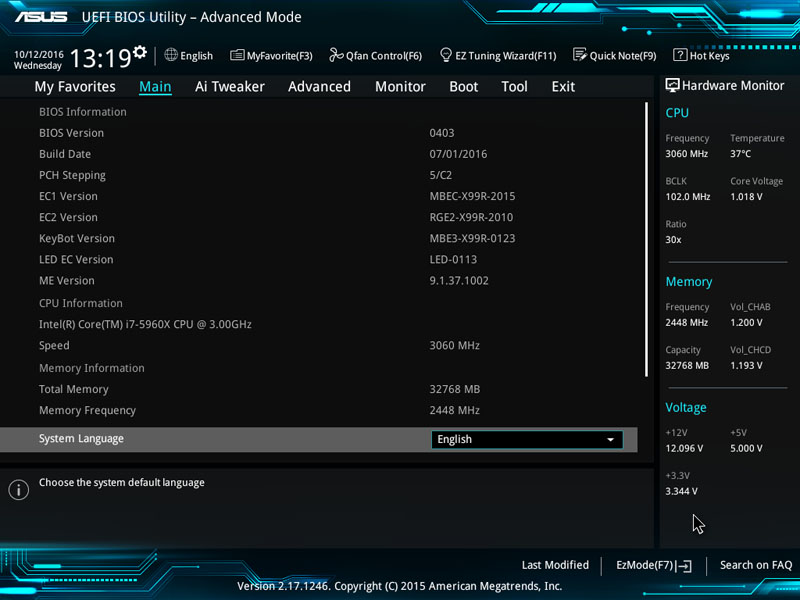
The Advanced screen offers options to control every feature of the motherboard. Here you can find advanced overclocking settings and other options to customize how your motherboard works.
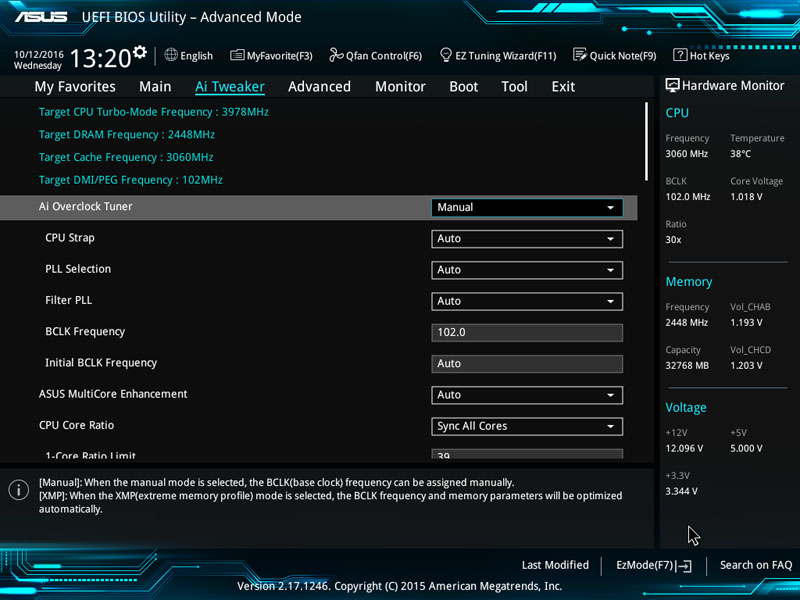
The Ai Tweaker menu has all the knobs to fine tune your CPU operation. AI Tweaker is central for those who wish to push the CPU to higher levels.
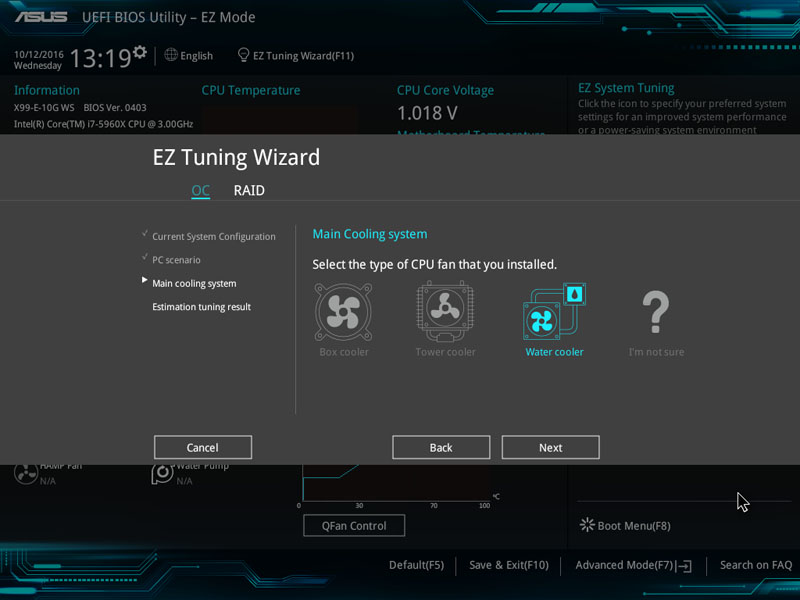
The main feature that we like is the EZ Tuning Wizard. If you are using an unlocked processor like our 5960x, with four simple clicks, you can boost your performance.
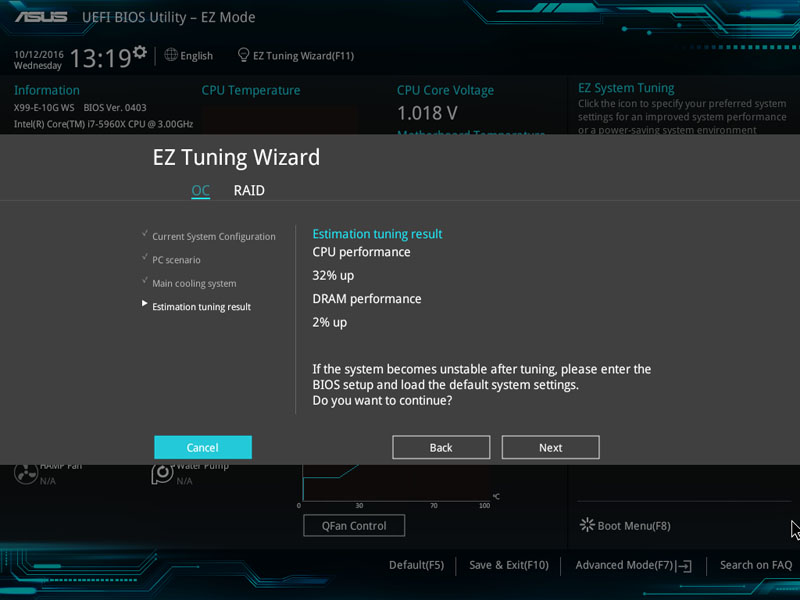
The final step of the EZ Tuning Wizard shows the boost you get after it has applied the new settings. In our tests, we will run both stock settings and after we have used this EZ Tuning Wizard.
ASUS Driver DVD
The ASUS X99-E-10G WS comes with a Driver DVD which allows you to get drives and Utilities installed after your OS has finished installing.
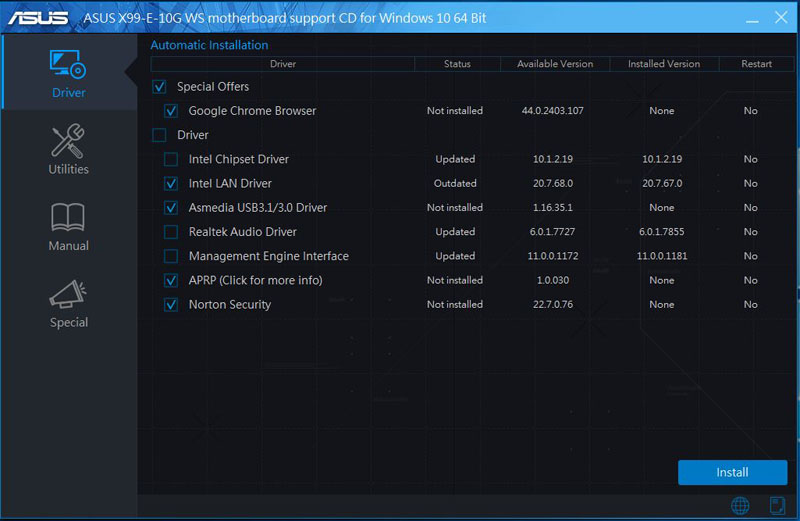
Just toggle which drivers you want to install or use the Drivers check box to install all supplied drivers.
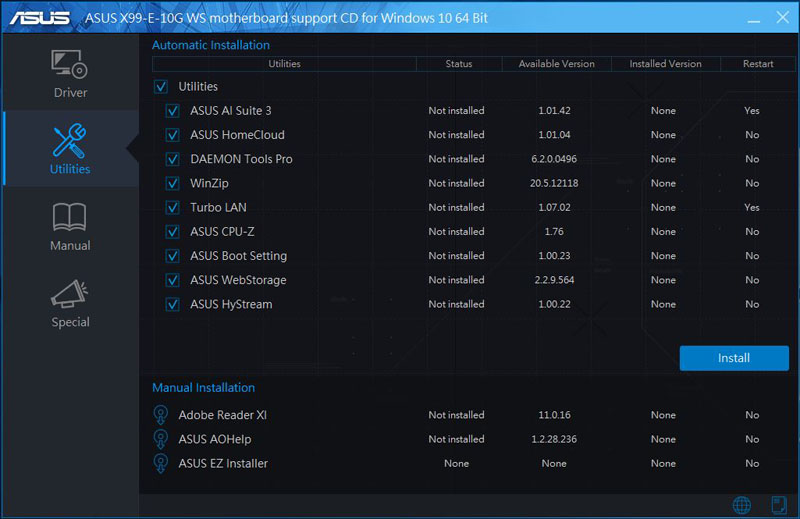
Here we see a list of Utilities available on the DVD that you can install.
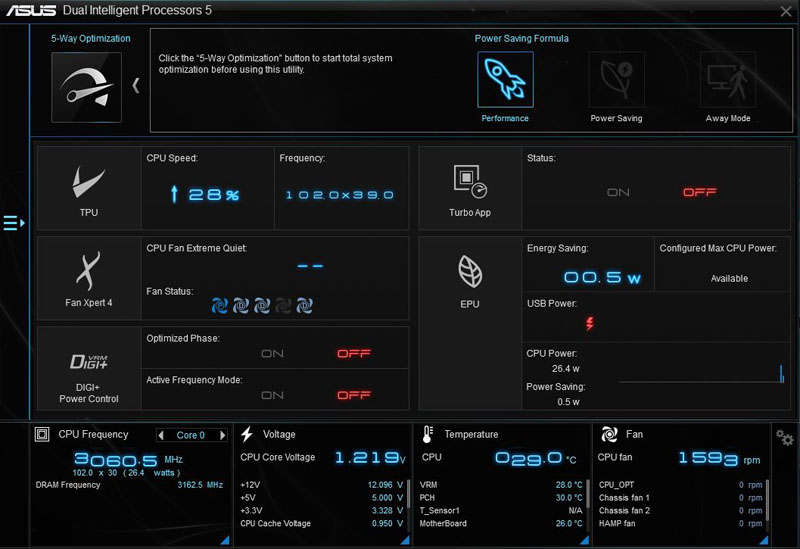
One of the Utilities is the ASUS AI Suite 3 which allows you to adjust system systems while you are on the desktop. Here you can change Fan performance, Power Settings, and many other features without going back to the BIOS.
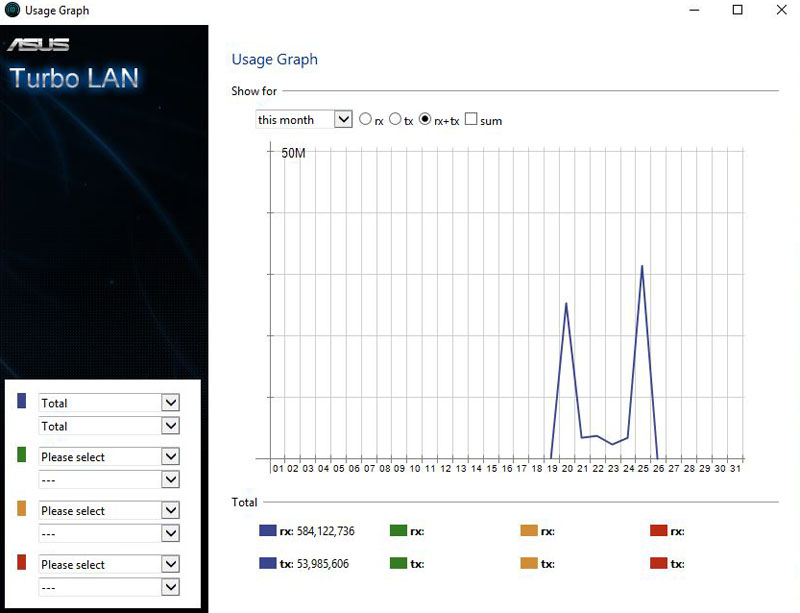
Here we see the ASUS Turbo LAN. Turbo LAN allows you to shape network traffic to suit your preferences, such as giving VOIP applications or games priority over other network traffic. You can also check your network usage as we have shown in this graph.
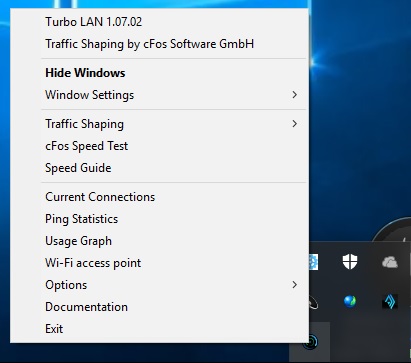
Turbo LAN also runs in the system tray, bringing this up shows added options that Turbo LAN provides.
Our Test Configuration
For testing we used
- CPU: Intel Core i7-5960x 8 cores/16 threads
- Motherboard: ASUS X99-E-10G WS Motherboard
- Memory: Kingston 4x 8GB ECC DDR4 (32GB Total) Part #: KVR24E17S8/8
- Cooling: Noctua NH-U9DX-i4 heat sink
- Storage: Toshiba OCZ RD400 256GB NVMe SSD
- GPU: Nvidia Quadro K5200
- OS: Windows 10 Pro and Ubuntu 14
The ASUS X99-E-10G WS Motherboard does include overclocking abilities; we test with both stock settings, and after using EZ Tuning Wizard, our Noctua NH-U9DX-i4 heat sink handles this configuration very well.
AIDA64 Memory Test
AIDA64 memory bandwidth benchmarks (Memory Read, Memory Write, and Memory Copy) measure the maximum achievable memory data transfer bandwidth.
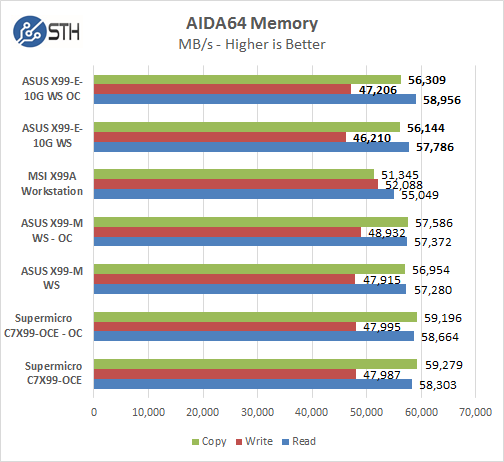
Memory Latency ranged at about 71.9ns and dropped to 69.8ns when OC’d. The ASUS X99-E-10G WS Motherboard ran very close to our other motherboards.
Linux-Bench Test
We ran the motherboard through our standard Linux-Bench suite using Ubuntu as our Linux distribution. Linux-Bench is our standard Linux benchmarking suite. It is highly scripted and very simple to run. It is available to anyone to compare them with their systems and reviews from other sites. See Linux-Bench.
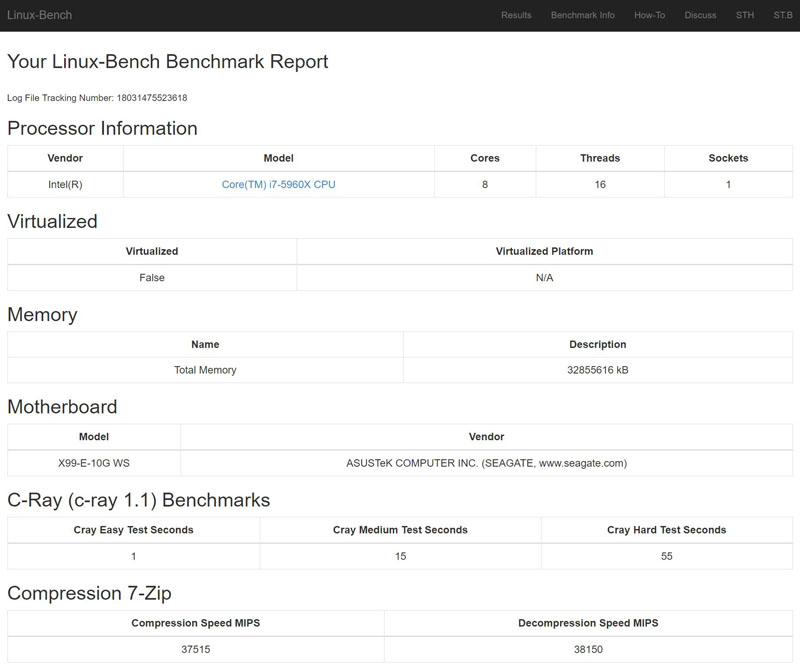
You can find the example full test results for our Linux-Bench. Test results that used stock settings can be found here, and for overclocked settings the results can be found here.
SPECwpc v2
We have just moved our testing to updated SPECwpc_v2 which is a workstation benchmark that measures key aspects of workstation applications.
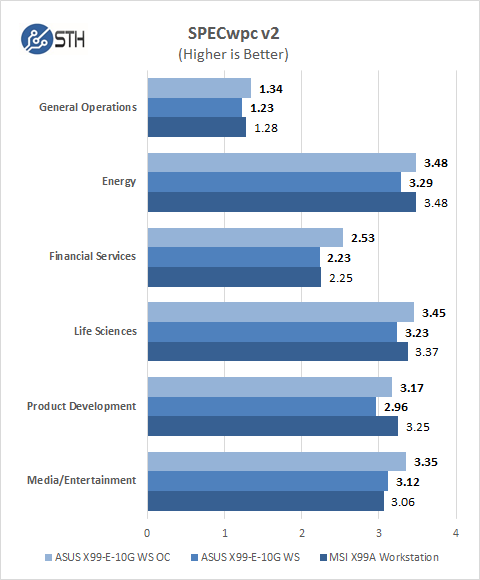
Again, we test with the new SPECwpc v2 benchmark; it includes settings for storage devices such as HDD’s or SSD’s. SPECwpc v2 is a very long test which took most of the day to run. With our past test we used a Xeon E5-2640 v4 processor which has ten cores, here our 5960x has only eight cores but higher clock speeds. When overclocking our 5960x processor, it can pass the E5-2640 v4 in performance. At stock speeds, it is a mixed bag with performance numbers.
3DMark – Fire Strike
3DMark Fire Strike is a DirectX 11 benchmark designed for today’s high-performance gaming PCs.


Here we see the results for this benchmark. Our benchmark results show little difference because the Quadro K5200 are the central aspect of this test.
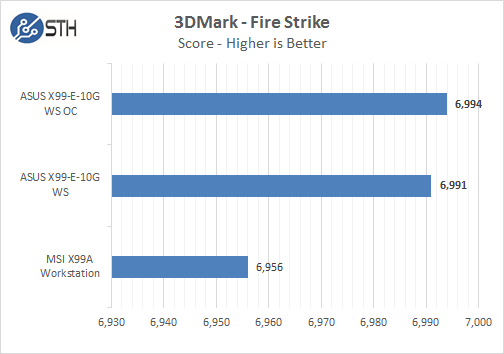
A higher clock speed processor does add extra performance in this test, however even tho this graph shows a significant difference in bar length, the results are not that far apart.
PCMark 8
With PCMark 8 you can test the performance of all types of PC, from tablets to desktops. With five separate benchmark tests plus battery life testing, PCMark 8 helps you find the devices that offer the perfect combination of efficiency and performance. PCMark 8 is the complete PC benchmark for home and business.


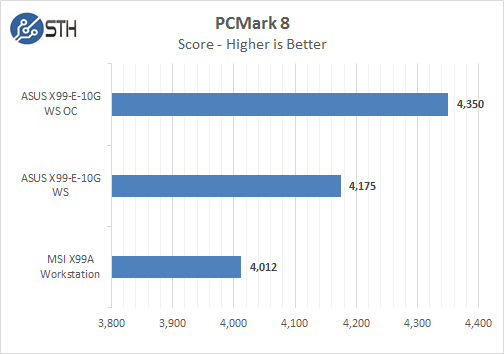
PCMark 8 benchmarks the entire system which when running at stock speeds we find it very close to earlier tests, running with OC settings does give a big boost to this test.
CrystalDiskMark
CrystalDiskMark is designed to quickly test the performance of your hard drives and SSD’s.
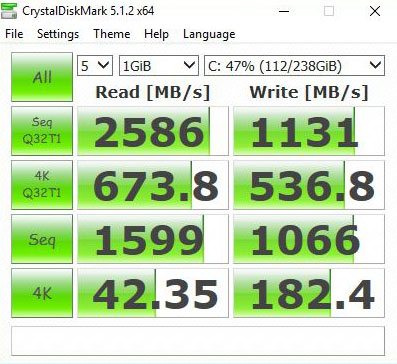
We are now using a Toshiba OCZ RD400 256GB NVMe SSD as our primary OS drive in our reviews. We use Windows 10 Pro for our windows testing and with this drive be sure to install the current OCZ RD400 drivers to get the best performance. As you can see this is an impressive SSD drive, with 42.35 MB/s 4K Reads and 182.4 MB/s 4K Writes. The result is a system that boots very fast and adds performance boosts to many of our benchmarks.
LAN Speed Test
LAN Speed Test is a Windows based network test utility. It measure’s Local Area Network (LAN) speeds which include wired and wireless networks. This simple test builds a file in memory then transfers it both ways across the network. LAN Speed Test a straightforward and fast way to check your network speed.
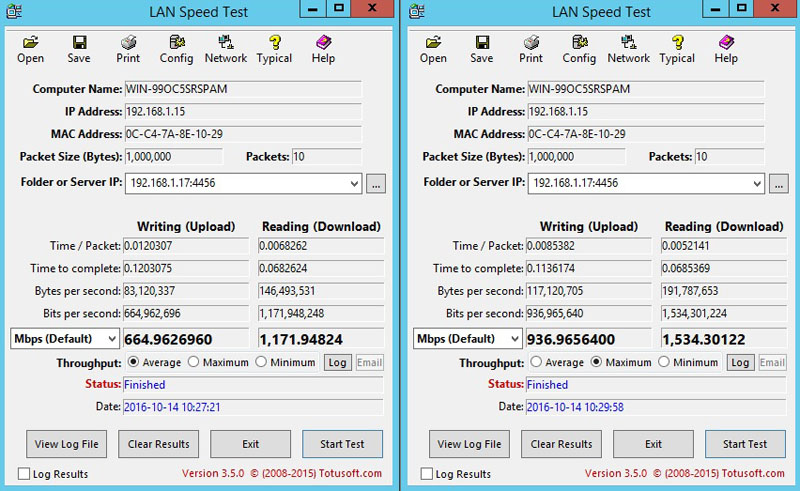
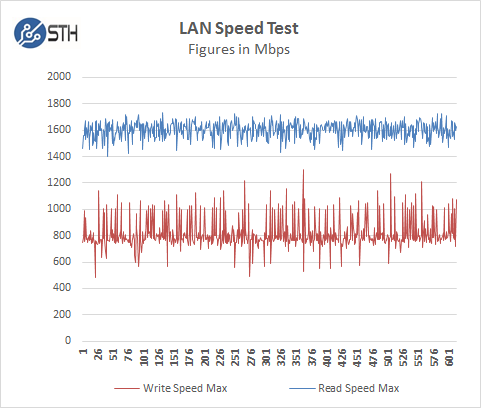
We are expanding the network in our SOHO test lab. The switch we are starting to use is a D-Link DXS -1210-12TC which gives 10G capability. For this test, we connected our ASUS X99-E-10G WS to the D-Link switch and then to another server which uses a Supermicro X10DRI-T4+ motherboard. We now have full 10G capability across the network.
Power Tests
For our power testing needs, we use a Yokogawa WT310 power meter which can feed its data through a USB cable to another machine where we can capture the test results. We then use AIDA64 Stress test to load the system and measure max power loads.
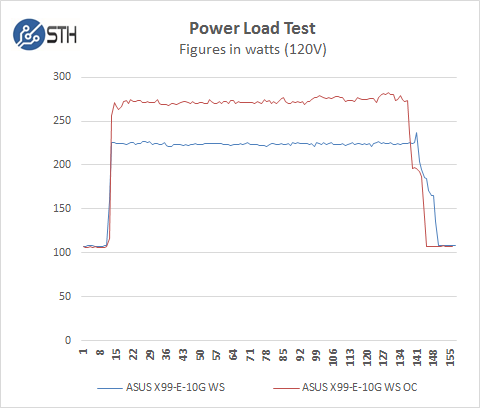
For our tests, we use AIDA64 Stress test which allows us to stress all aspects of the system. At default BIOS settings, we run just above 225watts for a max load with stock settings. When overclocking with EZ Tuning Wizard we see a jump to around 275watts.
Conclusion
ASUS yet again expands its line of X99 based workstation motherboards. So far this lineup includes the X99-WS, X99-E-WS USB3.1, X99-M-WS and now the X99-E-10G WS.
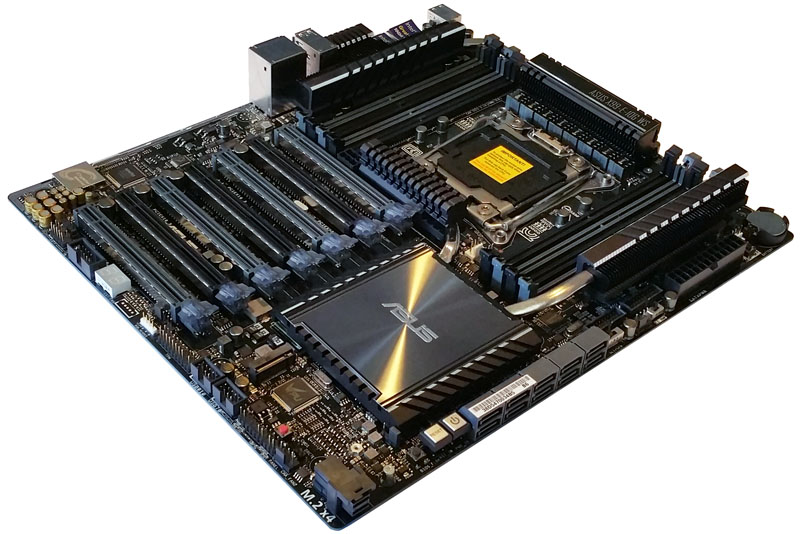
The X99-E-10G WS brings new 10G network capability to the table which will boost transfer times of large files between 10G storage solutions and the workstation. Users should expect to see 10x faster transfers of data across a 10GbE network. In the past we would need to add in a 10GbE PCIe network card to achieve this, now 10G is built right into the motherboard which frees up PCIe slots for more GPU’s. We expect the trend to include 10GbE support on motherboards to continue. As working files become larger, faster networks will become more commonplace.
The ASUS X99-E-10G WS a suggested retail price of $650 for this board (verified with Amazon as of the time of this writing.) Considering that a Dual port Intel X550-AT2 10 Gbit expansion card would cost upwards of $300 or more adding this network feature does add a significant amount to the cost of this motherboard. On the other hand, we are starting to see 10GbE as a mandatory feature for STH readers in the near future. Switch technology has brought the networking costs to extremely reasonable levels.

Am I reading the graphs wrong? 1.4-1.7Gbps download and 0.6-1Gbps upload seems awfully slow for 10G, no?
Reading the same. Indeed, that’s unreasonably slow.
Unfortunately the review is conducted like for a consumer board and lacks:
• BIOS – Can I enable/disable/set Early Snoop, Home Snoop, COD?
• BIOS – Can I disable power saving modes for the Uncore? Frequency pinning?
• Does the board work with Xeon ES? (C’mon STH, buy a cheap E5 v4 to test that.)
• Can I turn off fans below a temperature threshold?
Do you meet such an error message in the ubuntu environment?
PCI_BUS Error: Severity=Corrected, type=Data Link Layer, id=0010(Receiver ID)
device [8086:6f08] error status/mask=00000080/00002000 [7]
Bad DLLP
My PC spec is “Intel Xeon E5-2620 V4 + The ASUS X99-E-10G WS motherboard + Gigabyte N1080D5X-8GD-B”.
Please help to solve this issue. Many thanks.
Hey Alex,
We have encountered this error as well on pascal based GPUs. With the old firmware we did not have this issue (but slot 5 on the motherboard won’t detect gpu from bios). We are using Ubuntu 16.04 with 4 titan x pascals and 6850k.
Many thanks for your response. But this error message is still here even when only using a normal display card. So do you suggest we can try a older firmware for the motherboard? Which version?
I see you are using ECC memory yet the Core i7 doesnot support that – you need a XEON…or am I missing something here?
Can you please describe what you had to do to install Ubuntu 16.04 on this board? I am banging my head against the wall on this.
John – what is the issue? Maybe post in our forums? Try Ubuntu 16.04.3 LTS with HWE kernel.
Hi Patrick – Thanks very much for the quick response. I am trying to install that exact version from a USB stick (without the HWE kernel, which looks like it’s an upgrade after the base version is installed). My problem is I can’t get it to even install. I get the GRUB menu, choose ‘Install…’ and the screen just goes blank. I’ve tried many different BIOS settings (Fast Boot -> enable (USB Full Init, Secure Boot -> Other OS, CSM -> disable) and it just won’t install. I’ll ask on your forum.