Today we follow-up on the Synology DS1812+ unboxing and exterior look with a view of the 8-bay NAS unit’s internals. One major question we like to answer is what is inside these pre-built units. Before we get into this, I would highly discourage you to do the same. Think of this as we are disassembling the Synology DS1812+ so you do not have to.
Inside the Synology DS1812+
Once the hard drive bays are removed from the Synology DS1812+, one can see a fair amount inside the unit. The mot noticeable thing is the 8 drive SATA hot-swap backplane. The other dominating feature when looking inside the unit are the two large 120mm fans that pull air through the unit over the drives. Two implications here. First, the large fans can spin slower than smaller fans, therefore running much more quietly. Second, being able to see so much fan shows that there is not a lot of obstruction in the chassis. Peering through the left side of the drive partition, one can see the Synology DS1812+ motherboard and component heatsinks. We will take a closer look shortly.

The fan bracket can be removed easily with a Phillips head screwdriver. Once this is removed, we can see two pieces of PCB. The first is the rear of the above mentioned 8 disk hot swap backplane. Also on the bottom of the unit we can see a piece of PCB that connects the USB 3.0 ports, the eSATA ports and the 120mm fans. This is a nice touch as the PCB parts feel much more securely mounted versus a cheaper cable based design alternative.

Moving to the side of the chassis, one can see the power supply’s ATX connector reach across the top of the chassis and to the motherboard. One can also see the ribbon cable driving LEDs and the front power switch. The backside of the Synology DS1812+ motherboard has a single DDR3 SODIMM slot that is not filled. One can fairly easily add a 2GB DDR3 stick an hit 3GB of RAM. Uninstalling the motherboard is a bit more involved. The motherboard is secured using screws and standoffs. It is also built to fit perfectly in the allotted space and mate with the two PCB pieces shown above.

For those wondering about memory compatibility, we can see the Synology DS1812+ uses a fairly standard 1066MHz CL7 DDR3 SODIMM.

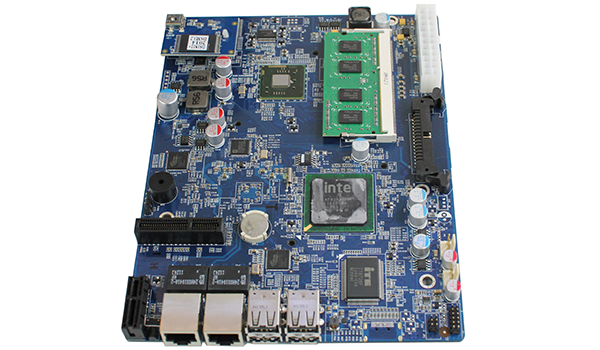
Looking at the front of the motherboard, we can see a few major features. In the top left, we can see a DOM with a USB connector. For those wondering where the Synology DS1812+ keeps its operating system, that is where to look. One can also see the 1GB DDR3 SODIMM situated on the front of the motherboard. This is a good decision because it is a bit harder to reach this slot. By keeping the rear SODIMM slot free, it is easy to expand memory for users who do not want to perform a major dis-assembly. The two black connectors are the points that secure the hot swap backplane and USB 3.0/ eSATA port PCBs.

Removing heatsinks, we see two major chips. For those thinking that the large chip is the main processor for the Synology DS1812+, that would be an incorrect assumption. The large chip is an Intel ICH which provides both USB and SATA connectivity. You can see the very generous amount of thermal paste on the ICH. The smaller chip is a 2.13GHz Intel Atom D2700 processor. The D2700 is plenty fast to push this configuration.

At the end of the Synology DS1812+ motherboard we can see four USB 2.0 ports and two gigabit Ethernet network ports. These are the same ports that are found on the right rear portion of the 8-bay NAS.
Next up in the Synology DS1812+ series, we will look at performance and management features of the device. Stay tuned!


Please keep going with this series.
Wondering – can you go above 4GB like you did on the Supermicro X7SPE-HF motherboard? Please test.
How easy is it to disassemble? Plz show setup too