You may remember back in May Patrick did a review on the ASUS P8Z77 WS workstation motherboard. Since he tests a lot of hardware, this board made it my way to replace an old ASRock P55 Deluxe3 and try it out long term. Below is a write up on my experiences setting up the ASUS P8Z77 WS motherboard, getting it working and using the motherboard for some time.
I took an Intel Core i5-3470T (ES) from a HTPC project build and used the CPU for this build while placing the HTPC project put on hold. For the caliber of motherboard the ASUS P8Z77 WS represents, the CPU is a little underkill. The Intel Core i5-3470T is a dual core, four thread Ivy Bridge CPU. I’ll write about this CPU in a separate article but suffice to say it is a very low power chip. It is also a good CPU to have a play with as it’s not readily available and needs a BIOS update for it to be recognised properly in many cases.
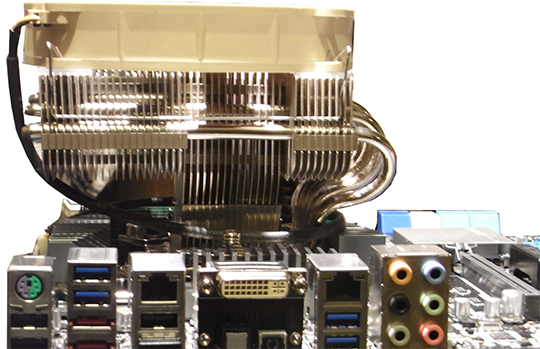
The ASUS P8777 WS motherboard on first view, looks very impressively built. Its got a ton of ports, slots and headers. The heatsink that covers the PCH and VRM chips look nice. They are not tall as with my old ASRock P55 Deluxe3 motherboard and heatsinks/fans that have nuts on the 4x corner mounting points where they connect to the case should be (just) reachable with fingers as is the case with the Scythe Big Shuriken heatsink and fan combo.
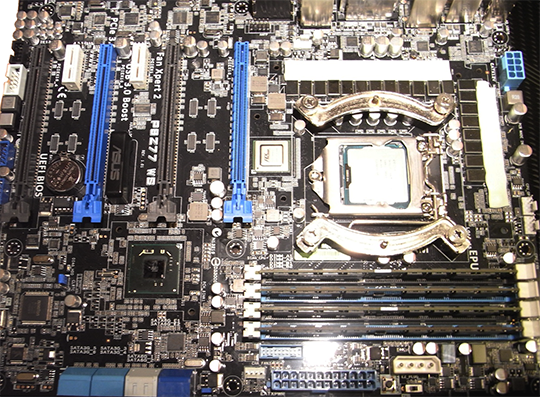
There are also many coloured LEDs all over the board showing various function states, this is something I like (although I think Patrick is less of a fan of them.) They look good and help with problem solving as a LED will be lit by the device causing the issue. In between the 2nd and 3rd PCIe slots are a set of coloured LEDs in a small “ASUS” illuminated enclosure. This shows with colour what power scheme the BIOS is running in, quite neat with not having to enter the BIOS to see. For cases with clear lids/sides, I’m sure it will impress you friends.
Being ATX sized, it was breeze to get into my Cooler Master Storm Scout Tower case. I do a lot of work with nVidia Geforce driver modding and hosting. I crunch the drivers using 7zip, and modify them with editors. Having a workstation motherboard is very nice for my application. It allows me to hook up all my odds and ends easily into one system. I did struggle before with PCIe slots having to rely on the now very old and slow PCI interface to get things done.
Most of the headers and slots are in what is now standard positions on a motherboard, the SATA connectors are very awkward to reach with my case, only the middle 4 can be reached with some difficulty, the top and bottom 2x sets will need some considerable contorting of fingers/arms. But this seems the norm for motherboards these days with horizontal SATA connectors. Luckily for me I only needed to connect the eSATA port on the front of the case.
In the ASUS tested memory list it states that the Kingston Value RAM KVR1333D3E9S/4G are supported, these are ECC modules, the specs say the board supports non ECC unbuffored RAM. I have yet to work out why this RAM is not working officially the Intel Core i5-3470T supports ECC RAM, I need to check with a Intel Xeon CPU to see if this will work, or unless the Engineering Sample CPU I have doesn’t support ECC, or if the chipset is limiting the ECC support, which should be unlikely as the CPU now has the memory controller built into it.
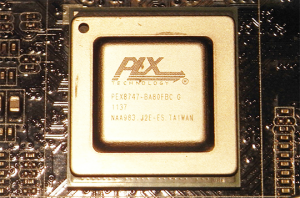
The ASUS P8Z77 WS motherboard perhaps shows how an ATX Ivy Bridge board’s PCIe slots should be done. There are four PCIe Gen3 x16 slots and two PCIe Gen2 x1 slots. The Ivy Bridge (and Sandy Bridge) LGA1155 CPUs only have sixteen PCIe lanes which is not enough to drive that format alone. The ASUS P8Z77 WS motherboard comes equipped with a PLX PEX 8747 PCIe Gen3 bridge chip (hidden under the VRM heatsink.) This is a 48 lane PCIe bridge. Basically it grabs the sixteen PCIe lanes from the CPU and makes 32 lanes from it and vice versa. This then allows for either two full 16x PCIe Gen3 slots and other slots not used, or 16x, 8x, 8x, or 8x,8x,8x,8x for all 4 slots. Quad SLI or CrossFire is possible with all four graphics cards running at PCIe Gen3 x8 through the bridge chip.
This kind of expansion on an Ivy Bridge motherboard is great as it allows for building a budget power house graphics workstation. LGA2011 CPU solution are still much better in terms of PCIe bandwidth but they cost many times more. You’d also need to get PCIe bridges to get all four PCIe Gen3 at 16x lanes on the LGA 2011 socket, with the new ASRock Extreme11 is a good example of this. But the extra PCIe lanes in my case allow me to use my nVidia GeForce GTX470 in x16 mode, while at the same time to run a IBM M1015 HBA and IBM M5015 SAS RAID controller both at PCIe x8. I could run a 3rd SAS controller but this would reduce the PCIe lanes to graphics card so I do not do this. Overall the ASUS P8Z77 WS motherboard provides a lot of expansion which is great for the crunching I do on my workstation.
I did have an issue when I first got the board working where neither LSI SAS controller would start up at boot, they were just ignored. I grabbed the latest BIOS (v0703), and applied this, upon reboot both LSI SAS controllers were recognised and their OPROMs were loaded. Phew! [UPDATE] OK, the cards now work and their respective BIOS’s can be loaded, but if you try and use this motherboard to flash an IBM M1015 to IT or IR mode you will be disappointed, the dreaded PAL error rears its ugly head on the ASUS P8Z77 WS. This only happens when flashing using the sas2flsh utility in DOS, Megarec works fine for MegaRAID Firmware uploads, but MPTSAS2 firmware uploads with sas2flash or MegaCLI. LSI Megarec does complainthat the card IO address is high and not supported but will still flash a card with a MegaRAID Firmware. Be aware that you cannot cross flash from LSI9240 to LSI9211 or update the LSI9211 based firmware in DOS!
There are dual Intel 82574L server class LAN ports, a great bonus for compatibility in most Operating Sytems out there. The ASUS P8Z77 WS motherboard includes an onboard DVI out in case you want to use onboard CPU graphics instead of a dedicated GPU. I would have liked to see a Display Port and/or HDMI port on this motherboard, but that is being a bit picky. The ASUS P8Z77 WS supports 8 Channel Audio via Realtek’s ALC898 audio codec, which deliverers plenty of audio options. I did notice while running 3DMark2001SE that there was interference coming through the speakers via audio jack. ASUS added two extra USB3 ports and two extra SATA3 ports to give a much needed lift where Intel’s Z77 is weak. Well done ASUS.

One gripe is that the ASUS P8Z77 WS motherboard audio internal header, is way over by the rear I/O plate, the worst spot for running a cable to from the front of the case. Normally, this header is by PCIe slot 7, just below the USB headers which also head to the front of the case. I managed to squeeze the cable around the front of the PCIe slots and run the PCIe cards over the top to keep cable management tidy. Alternatively, I would have had to run the cable past the rear fan placement, then past the top fan, past the CPU heatsink/fan.
Another smaller niggle are the onboard power and reset switches. When I had the ASUS P8Z77 WS motherboard sitting on my desk all plugged in and working they were great to use. Now that the motherboard is in its case, I cannot reach them. They are too close to the power supply to be able to reach in and use them. My old motherboard had them near the front of the board close to the front panel header. In a working case they were usable and I used them quite often when tweaking. If ASUS sort the audio header, putting it where the power/reset switches are, then swapped the internal USB header by front panel header with the Power/Reset switches, it would result in a perfectly laid out motherboard.
The UEFI BIOS is excellent, easy to navigate and an ocean of things to tweak and adjust for those who like that sort of thing. I did notice that with the ASUS UEFI BIOS the SAS controller BIOS were available by pressing their respective key combos at boot time. On the new ASRock Fatal1ty Z77-m I had to press the key combo for boot device select, then press the key combo for the SAS controller then finally in boot device select press RAID-CDROM. ASUS has a much easier design here. ASUS allows for more BIOS update options including with no CPU installed. The BIOS chip is in a socket so should something go wrong, you can just replace it.
Another excellent product that ASUS bundles is AI Suite II, here you can tweak all sorts of things, for those who like to fine tune their machine then they will be in heaven with this. It allows for Fan control, power setting, USB boost, and a heaps of others. For the overclocker this board again is heaven as there is every imaginable setting that can be adjusted to fine tune your rig. EZtune attempts to auto overclock the CPU. I did try it and it raised the BCLK to 103Mhz, making max Turbo 3.8Ghz, it did however not change the multiplier. The chip can easily do four more 100Mhz steps to a 40x multiplier making for 4GHz, but it is an ES CPU. Of course, this can all be done in the BIOS as well, if you can ever get around to working out what all the tweakable settings mean.
I can conclude, for those looking at an Ivy Bridge graphics power house but done as cheap as possible, or just a workstation with multiple cards needing PCIe 8x slots then this is an excellent choice. The ASUS P8Z77 WS motherboard is extremely well made, looks good, and performs even better. I’m looking forward to placing a more deserving CPU in it to make the most out of it.


I am trying to find out if anybody is able to run server 2008R2 on ASUS P8Z77-WS with an i7-2700