Many STH users utilize Proxmox VE as one can have a scale-up or scale-out virtualization and storage solution with integrated backup. A common challenge users face, especially with more mobile setups, is that the Proxmox VE web GUI is available on a static IP address generally set up during installation. In this how-to guide, we are going to cover the easy ways to make the change and discuss some ways to make things easier for yourself.
How to Change Primary Proxmox VE IP Address
We are going to set an easy scenario. This is useful if one transfers the Proxmox VE server to a new network. Perhaps one is moving the physical Proxmox server to a new location, thus a new network. Another option is that the network will change as can happen with new IT shops or new service providers. We are going to use “Current Proxmox VE” or “CPVE” as the pre-move and “Future-state Proxmox VE” or “FPVE” as the network that the Proxmox VE server will be moved to.
To add some complexity so you can see more than IP address, we are going to assume that we are going to move to a larger address space and therefore will be changing the IP address to a different address in that space. We will keep the same gateway, but we will change the network mask or netmask. Also, we are going to focus on the main web interface/ management IP address here, not the addresses of VMs and other unique setups.
Current Proxmox VE
Here is the current configuration:
CPVE IP: 192.168.1.3
CPVE Netmask: 255.255.255.0
CPVE Gateway: 192.168.1.1
As a quick note here, by default, Proxmox VE uses a static address during installation. This is the same address as one uses to access the web management interface on port 8006.
Future-state Proxmox VE
Here is the future-state configuration:
FPVE IP: 192.168.2.3
FPVE Netmask: 255.255.252.0
FPVE Gateway: 192.168.1.1
As you can see, we are changing the IP address to something outside of the initial subnet. As a result, we changing IP and subnet.
Optional (but Useful) Before You Start
This is not a must-do, but it is something that is a good practice. We are showing how to change important system files. It is usually a good practice to copy the existing file into a backup location on the machine using the cp (copy) command.
Changing the Primary Proxmox VE IP Address
First, we are going to change /etc/network/interfaces and we will be using nano here since that is an easy text editor for quick changes like this. Note: we are using the command line here because if you change a Proxmox VE host without changing the networking, you are most likely going to need to login via a physical or remote console and use the CLI to change this. We will also show the easier to use web screens as well. Here is what we see when we type:
nano /etc/network/interfaces
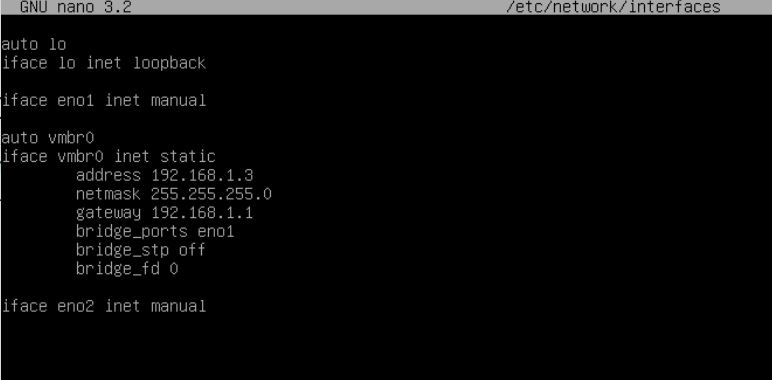
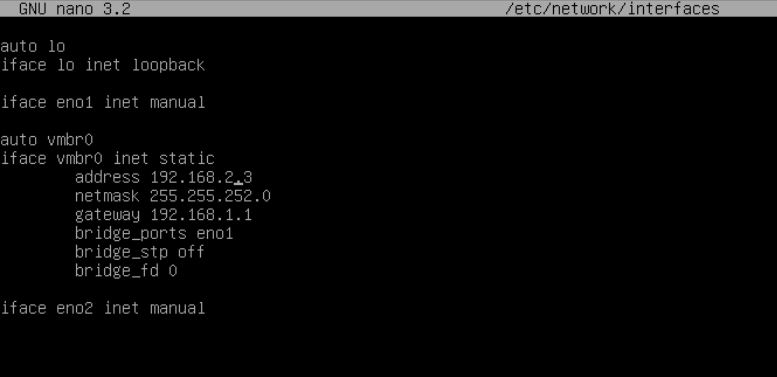
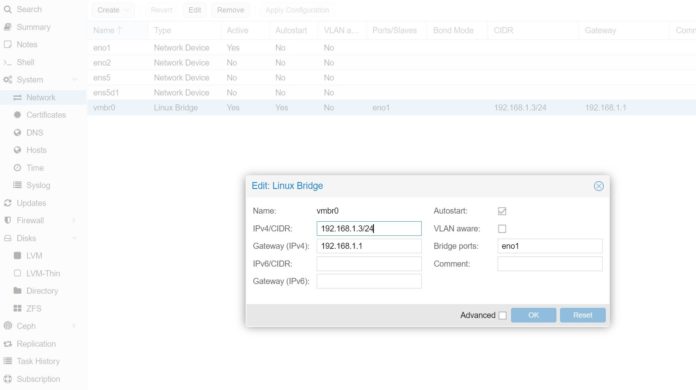
Here we have a very simple setup. eno1 is our management NIC and we see the bridge vmbr0 with its static IP. This static IP we will change to 192.168.2.3 and the netmask to 255.255.252.0 since it is a bigger network.
As a quick aside, this is a small test system we had in the lab, but it is not setup as one would with a leading practice. Generally, we like to set up a NIC dedicated to management functions and put that on its own network. The second network is used for VM traffic which is usually its own bridge/ OVS that we do not put an IP address on. We usually will have a third for dedicated storage traffic, especially when using Ceph.
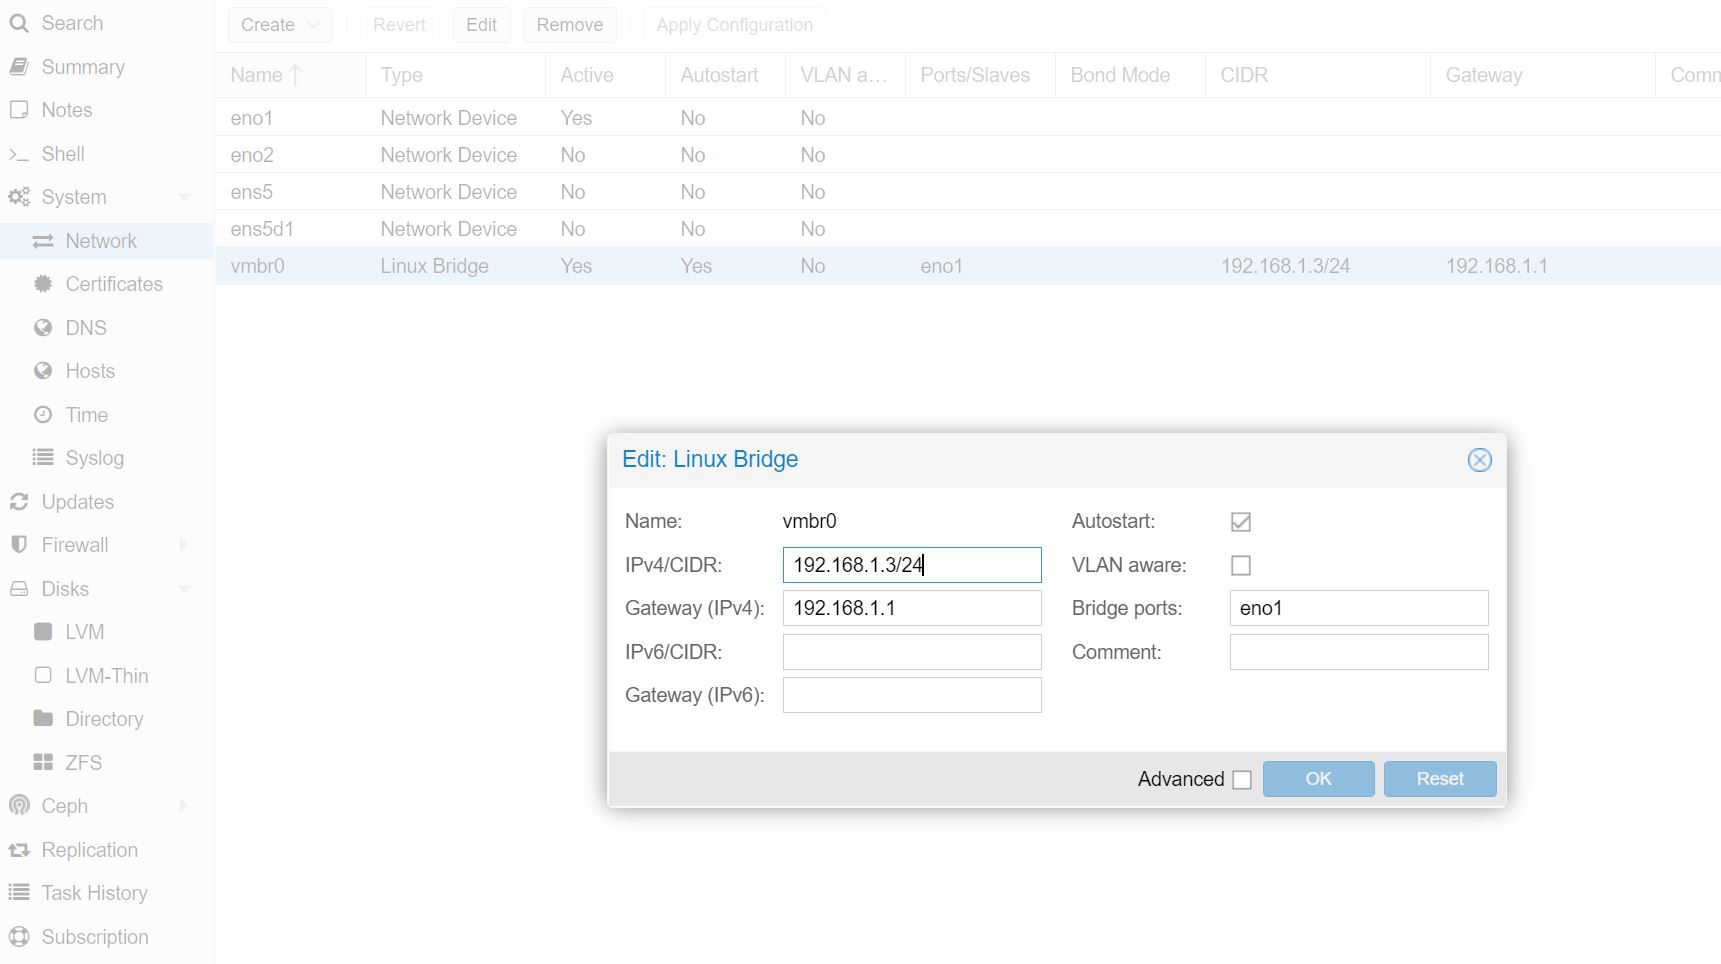
On the web interface, one can see this ties to the PVE Host -> System -> Network tab where we can see the vmbr0 Linux Bridge with the eno1 port. This part is fairly easy to set up if you have access to the web interface via the GUI here. The CIDR /24 corresponds to the 255.255.255.0 network mask if you want to learn more about that.
There are some guides that will say that this is all one needs to do. There is another important step, especially if you do not want errors. That is to change the host file which has the original IP address hard coded. This is the /etc/hosts file. To edit, we use:
nano /etc/hosts
Here is the CPVE state:
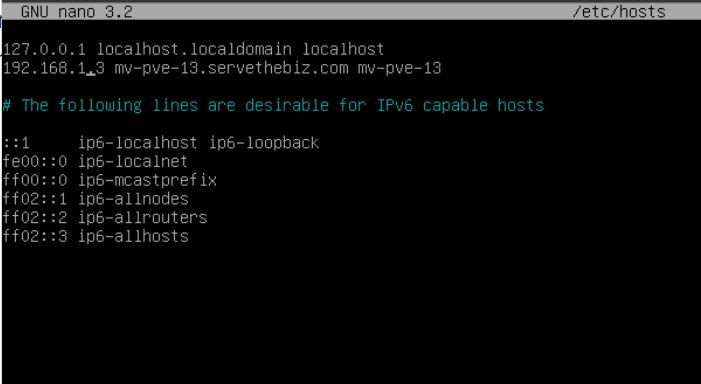
Here is the changed FPVE state:
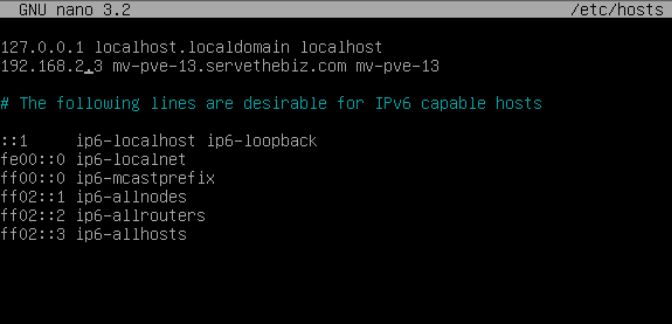
One will notice that there is not a netmask here, only the IP address so we see the 1 change to 2 in our example. This screen looks a little odd. One will navigate to the PVE Host -> System -> Hosts tab and what is in the file above will display on the screen.

Here you will click into the area with the IP address, edit it, then click Save. That Save/ Revert button will light up after an edit has been made.
Final Words
Overall, this is a fairly simple process. Proxmox VE is very powerful and is Debian Linux underneath. As a result, a lot of the functionality, like this, is similar to other Debian-based Linux distributions. Still, the impact of having a static IP (which is overall a good feature) means that if a Proxmox host changes networks then the Web GUI many use for management will not be available. Hopefully, this guide becomes like our Directly Download an ISO to Proxmox VE for VM Creation or Initial Installation Checklist pieces (PVE 7 coming) where one can reference it in the future as needed.
This is also the basic method. If one does something such as changes a network that a Ceph cluster is on, then the Ceph cluster node IP should be something different than this IP address and will also need to change. Most times one would use another network for Ceph but that is a good reason to separate the main management network from the other functions of the Proxmox host.



Hi, this is a great guide!
I would also like to add that if you are in a clustered set-up with multiple nodes, it is also recommended to update the /etc/pve/corosync.conf file as well. Just need to change the IPs of the node that is changing in the cluster and increment the config_version line. Those 3 files are it for a clustered Proxmox install w/o Ceph so far as I’m aware!
It is very useful for servers such as a Proxmox host to have a fixed IP – but that does not mean they need to be assigned a manual static IP. A better solution, in my experience, is to use DHCP but set a fixed IP for the MAC on the DHCP server. That gives you the flexibility to easily change addresses at the DHCP side, and to handle network reorganisations neatly. As you note, Proxmox is Debian and you can easily change the /etc/network/interfaces file:
auto vmbr0
iface vmbr0 inet dhcp
bridge-ports enp2s0
bridge-stp off
bridge-fd 0
I use DHCP for my VMs too.
Addressing and access is by host name, rather than IP address, whenever possible.
(I am relatively new to Proxmox, after a couple of decades with OpenVZ then raw lxc, so I might be missing something.)
Thank you so much I hope this works for my lab !!!
thank you its work beautifully
If you want to clean up your ‘banner’ screen as well, you’ll need to:
1. edit /etc/issue
2. possibly have to run pvebanner (or systemctl restart pvebanner)
Edit /etc/issue did the trick, thanks Richard
I also had to update /etc/resolv.conf with the new DNS server after changing network address. I think I’ll be looking at getting it connected via a reserved DHCP allocation (to keep the fixed address on this network, but make it easier to find again if I ever have to change networks again).
Thanks :) now I don’t have access to my proxmox :)