In my main workstation I have used a custom water cooling loop with a triple 120mm fan radiator since the Intel Core i7-920 came out. That loop is great, but requires a lot of maintenance. Not only that, the setup requires a lot of tubing inside the chassis so I decided to look at some of today’s closed loop liquid cooling solutions. I also decided to move to a new desktop chassis, a Corsair Carbide Series 500R. A quick search did not produce any good results for an installation guide for installing the Corsair H100 in the Carbide 500R, so I decided to write one up.
Overall, this is a one or two out of ten on a difficulty scale where ten is the most difficult. Tools needed are simply a Phillips head screwdriver and if you are not limber some tape would help the process tremendously.
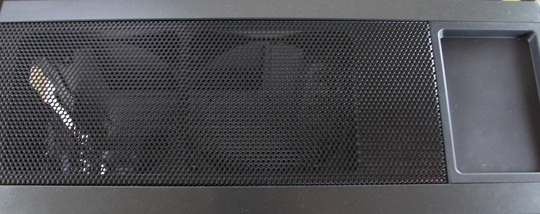
The first step is to remove the side panel via the two screws. Once this is done, the next step is going to be to remove the top fan/ radiator grill of the Carbide 500R. This can be accomplished by pushing down on the front portion of the grill in the middle of the edge (right side of the below picture.) After pressing on the grill, one should see the edge detach and then one can simply pull the grill up.

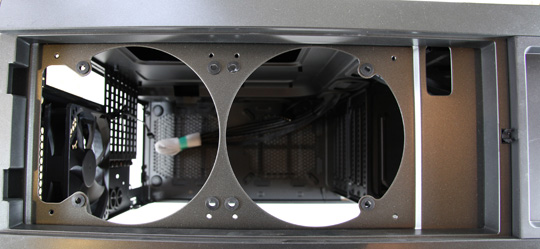
Once you do this, you will be presented with fan mounting points. The Corsair H100 is a dual 120mm fan mounting. The Carbide 500R comes with rubber washers pre-installed to dampen fan vibration on the 120mm holes. The mounting points outside of the 120mm holes are for 140mm fans. When installing the H100, you want to use the 120mm fan mounts.

As one can see from the picture above, there is a big open portion next to the rear (left in picture) fan mounting hole. This cutout is going to be where one wants to orient the hoses that come out the the H100’s radiator and lead to the water block and pump assembly.

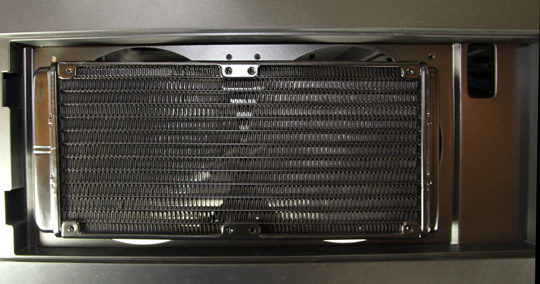
In the above picture, one can see the H100 radiator installed on the inner 120mm fan mounting holes. I have heard of folks mounting the radiator inside the chassis, but I personally like to see heat exchanged outside of the chassis to manage internal ambient temperatures.

One of the biggest tricks to the installation is selecting the correct method to attach the fans and radiator. One needs the long bolts (left on the Corsair H100 hardware picture above.) The goal is to have the bolt run through the fan, rubber washer, chassis, rubber washer then the radiator.

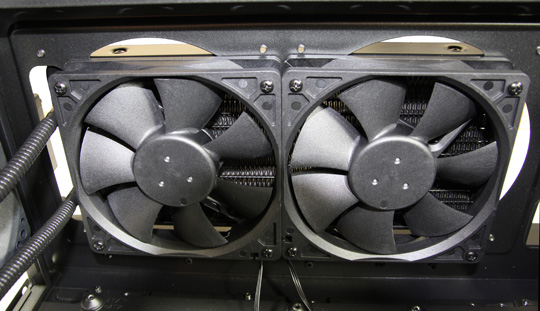
Here is a picture of what the finished product looks like when it is installed within the Carbide 500R. Eight long screws are all one needs to sandwich the chassis between the fans and radiator. I did come away with a few lessons learned that I thought I would share.
- First, it is easiest to install the Corsair H100 in the Corsair Carbide Series 500R when the Carbide 500R is on its side. Screwing the fans in with the chassis standing normally can be very difficult.
- Second, when I put the chassis on the side, it was a bit difficult to get the first two bolts on each fan to line up through all of the components. The easy fix to this that I did on my second installation, and would highly recommend is to utilize some tape to hold the radiator in place over the 120mm mounting holes. This removes the need to use a hand to hold the radiator, leaving only one for the fan and screws.
- Third, make sure that you orient the fan wires the way you want them before installing the fans. You can see from the above picture that I have been orienting them nearby one another in the center of the chassis. This is mainly due to some motherboards that I will be using and their mounting holes.
- Fourth, I prefer having the fans blow out of the chassis, through the radiator and then into the ambient environment. Reasonable minds may differ here, but the thought is simply that I want heat from one of the hottest components pumped out of the chassis and then blown into the environment. Others prefer getting cool air from outside. My best advice is to pick one and ensure you orient the fans correctly before you perform the installation.
Hopefully this quick guide will help those looking to build something similar.


When do we get to see reviews of the components?
Another lesson learned: If you want to use PWM to control the fans: connect the H100 head to the Power Supply fan plug and use a spitter to connect the two fans to the CPU plug.
Thanks for this, good tips.
Hey,
does the H100 work in a Push/Pull configuration with the 500R?
Thanks.
Alex – If you put fans atop of the radiator the 500R’s mesh at the top of the chassis does not fit.
@Alex, if you put the rad inside the case with 2 fans below it you can then install 2,120 or 2x140mm fans in the top slot of the 500R resulting in a push/pull config.
@TBird or anyone who knows, I can’t seem to get my bios to control my fans, can you just confirm what you are saying. The 4 pin power to the psu, and the 2 fan plugs connected via a splitter to the cpu fan socket, so you are bypassing the corsair block, is this right? Also what about the othe fan cable joined to the 4 pin power, still plug that in??
I decided to leave my comments on both the case and the cooler:
First off, Patrick Kennedy’s solution to the assembly of the H100 cooler is perfectly put and well described.
It is a pity that I didn’t find this page before assembling my rig, since it would spare me spending a long time trying to work out what to do.
Upon assembling the H100 in this particular case it became quickly obvious that it would not fit best if fans were mounted directly into the radiators and underneath the case’s top, because the fans would clog the access to the memory modules (motherboard: Asus Sabertooth 990FX).
I was previously advised by Corsair to move the air through the radiator, either taking air off the case (exhaustion) or into the case. I thought that installing the radiator on top of the case rather than inside would sit the radiator nicely, because the case is designed with that assembly into consideration. Secondly, the 500R is well vented with its own set of internal fans. As a result I could install the H100’s fans beneath the top, exactly as Mr. Kennedy describes. All you need is the eight longer screws that come with the H100.
I got excellent cooling results for my AMD FX-8120 processor, which runs fairly hot, even at stock clock speed. Operating in turbo mode, at full throttle and submitted to 100% core activity (HPC mode enabled) I used to get 65ºC with the stock cooler, and now I am getting 42ºC maximum.
I was disappointed with softness and fragility of the molex connector and pins that is supplied with the H100. Luckily for me, the retailer’s technician told me to be careful with the pins, and in fact, one of them got loose, and I had to push it back carefully with a small blade screwdriver.
One may notice that the two cables that run into the male molex of the H100 are not marked for polarity. If both pins get loose, the user is risking a permanent damage to the cooler. With that in mind, I inserted a small piece of red adhesive tape around the 12V rail (yellow on the female connector), and I strongly advise other users to do the same.