If you are looking to get a new host bus adapter (HBA) the LSI SAS3008 controller is perhaps the most popular 12gbps SAS controller on the market. It supports features such as the LSI DataBolt which lets you utilize higher bandwidth uplinks with compatible SAS expanders and 6gbps drives. It also features significantly better performance than the SAS2008 and SAS2308 generations when using the HBA with 8x SSDs. Although there are many “RAID” enabled (IR) SAS 3008 controllers out there, oftentimes what you want is a simple HBA. For applications with software managing redundancy such as ZFS, md raid, and Ceph you will want IT firmware. IT firmware essentially allows the controller to present attached disks to the system and stops the hardware controller from getting in the way.
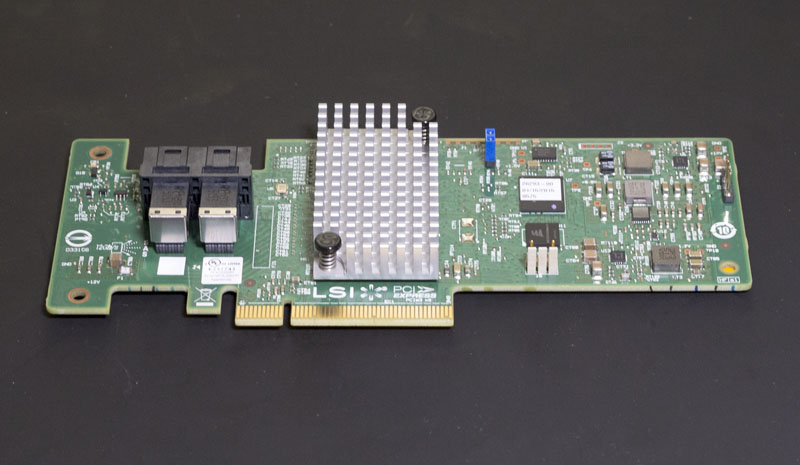
For this guide, we are going to use the IBM/ Lenovo M1215 adapter. These are popular OEM SAS HBAs that have SAS 3008 controller chips onboard. They are usually flashed to IR mode so they do need to be updated to the latest firmware. Although they are essentially equivalent to the LSI SAS9340-8i and functionally equivalent to the LSI SAS 9300-8i save for different connector orientation, they are much less expensive. We commonly find the IBM M1215 for under $100 while the SAS 9340-8i and 9300-8i commonly sell for over $260. In systems where you are using three cards per chassis, that is a $450 savings for completing these simple steps that will take under 5 minutes per card. This is very similar to what we saw years ago with the SAS2008 generation and the IBM M1015.
Warning: Before proceeding, do note that this is a risky process. Issues with firmware flashes can render your card “bricked” and unusable/ unrecoverable. We will not be held responsible if this happens to your card. By following this guide, you accept all risks of damaging your card.
Step 1: Getting the Files
Currently, we are using the Broadcom/ Avago/ LSI P13 firmware for our HBAs which is the latest available. Many users prefer P10 firmware due to it being older and better known. You can simply replace P13 with P10 if you want to flash P10 firmware instead. Since LSI was acquired by Avago which merged with Broadcom, the download pages seem to change often. If the download links change, you should look for the SAS 9300-8i downloads. Currently, that is located here.
- SAS3_UEFI_BSD_P13
- 9300_8i_Package_P13_IR_IT_FW_BIOS_for_MSDOS_Windows
The key files you want to end up with are:
- sas3flsh.efi or sas3flash.efi
- SAS9300_8i_IT.bin (you do NOT want to use the IR bin)
- mptsas3.rom
- mpt3x64.rom
Take these three files and copy them to a USB thumb drive. We are going to use an UEFI shell to perform the flash so there is no need to use a DOS boot disk. Place that USB thumb drive in a USB port of the server you will use to flash.
Please note, if you have sas3flsh.efi instead of sas3flash.efi remove the “a” from the following commands. You should also be able to utilize tab autocompletion after “sas3f” which will make that difference moot. You can also rename sas3flsh.efi to sas3flash.efi if you want to follow the below exactly.
Step 2: Preparing the Adapter
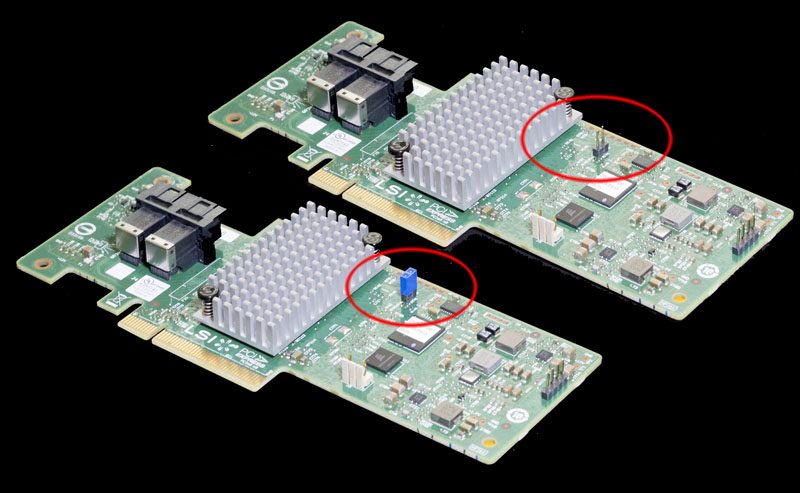
The first step we need to do is to put a jumper on J6 we want to reset the firmware and ensure we have a successful flash. Here is the jumper you need to connect:
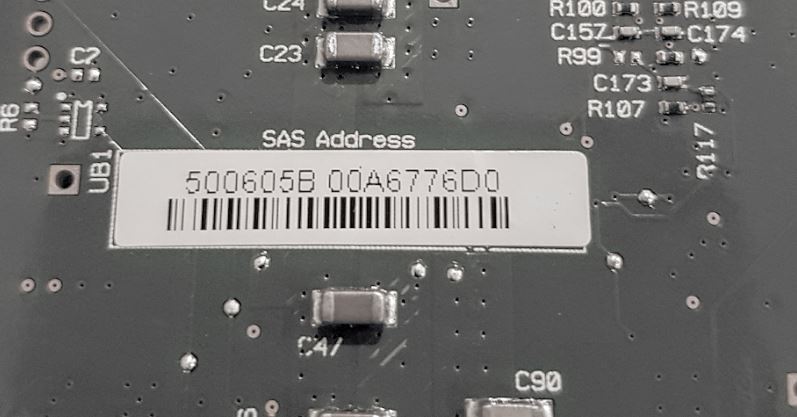
One other tip we have is to use your mobile phone to take a picture of the SAS Address sticker usually located on the rear of the card. We will show another way to get the SAS address but this is useful in the event you forget it later.
After this is in place, take the controller and place it in the motherboard. Although we are going to need to access it again, ensure that it has proper cooling.
Step 3: Booting the Server and Resetting the Adapter
Boot the server you are using to an UEFI shell. Most major manufacturers include this option in their BIOS boot menu.
Once in the UEFI shell you will change to the USB drive (in our case “fs1:”). You will likely want to note the SAS address first.
sas3flash.efi -list
That will give you output similar to the following. If it does not, we may suggest using your smartphone for a quick picture as noted in Step 2.
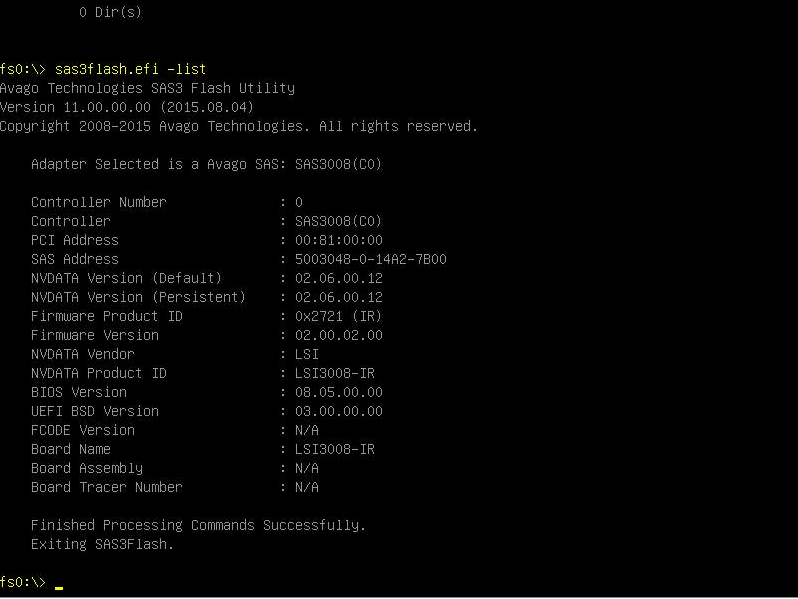
Note the SAS Address as we will use it later. If you took a picture of the SAS address sticker, you may not need this.
sas3flash.efi -f SAS9300_8i_IT.bin -noreset
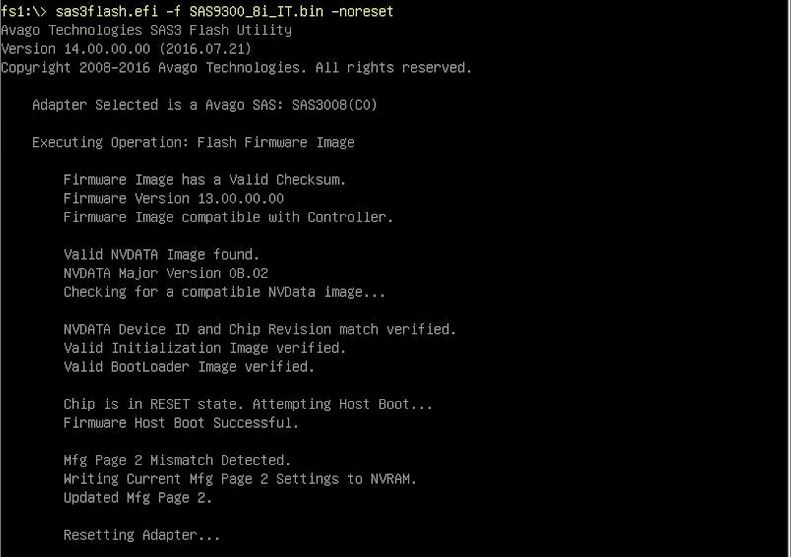
The process will take a minute or two to complete. When it is done, power down the server.
Now that this is complete, you should remove the J6 jumper installed on Step 2.
Step 4: Flashing the Controller
Again, boot the server to the UEFI shell. Now you can navigate back to the USB drive. The first command we will use is erasing the flash region on the card. Here is the command you will need.
sas3flash.efi -o -e 7
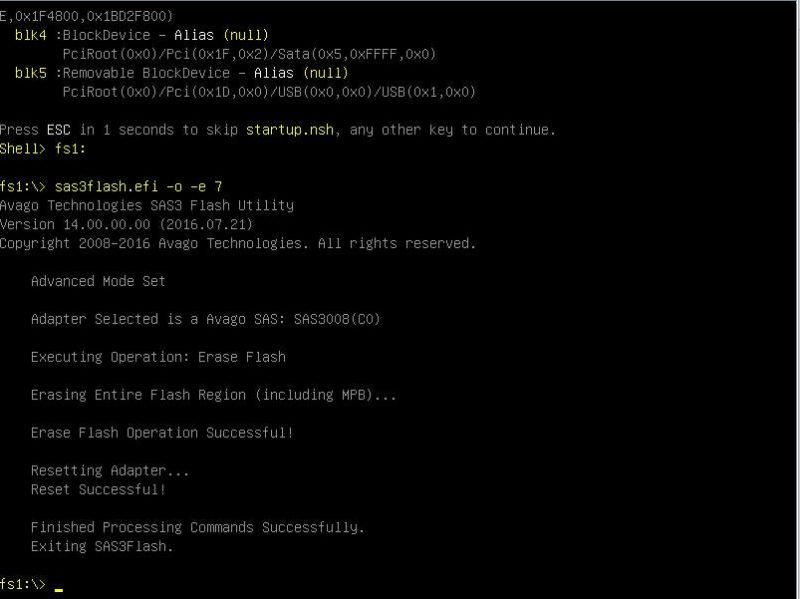
Now it is time to flash the controller. We are also going to flash the BIOS files in the event we want to boot from the device later.
sas3flash.efi -f SAS9300_8i_IT.bin -b mptsas3.rom -b mpt3x64.rom
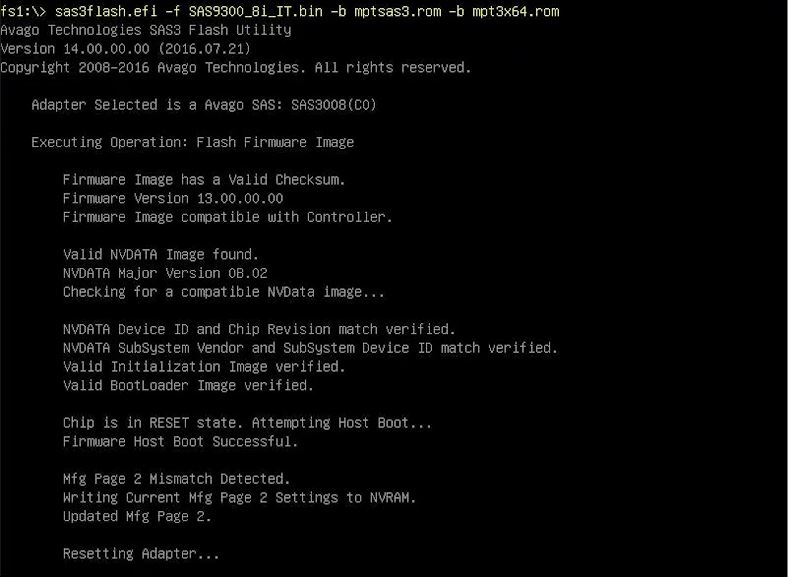
Finally, you will likely want to add the SAS address back to the controller. If you were to do sas3flash.efi -list now you would see the SAS address represented as all zeros. To do this we use the SAS address from the photo in Step 2 or using the old -list output in Step 3. Replace the address string without dashes or spaces:
sas3flash.efi -o -sasadd 50060XXXXXXXXXXXX
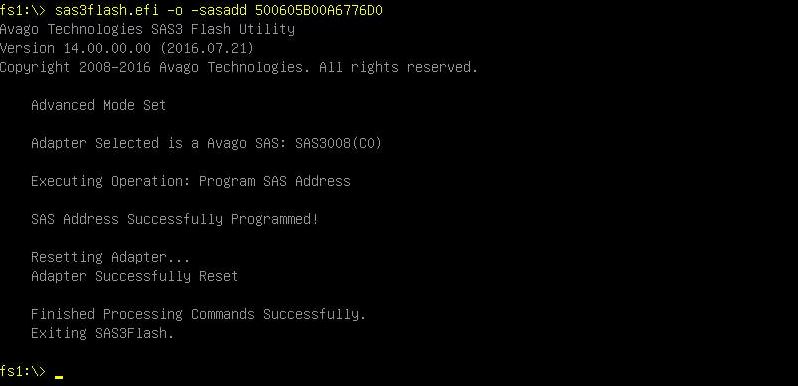
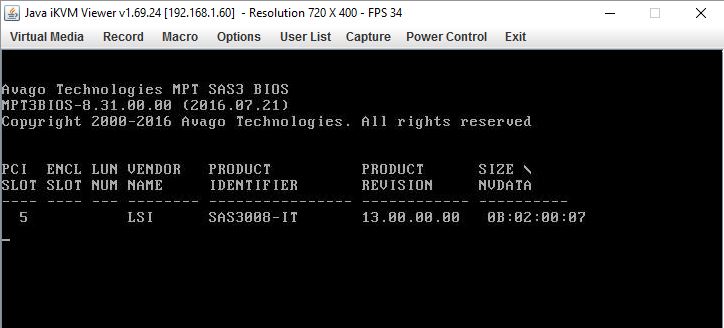
After this is complete, you can do sas3flash.efi -list and see the card is reported as a SAS 9300-8i with the proper address. Congratulations, you are ready to go after a reboot.
Final Words
Now that the controller is ready to go, it is suitable to be used for ZFS storage platforms such as FreeNAS, ZFS on Linux, napp-it plus OmniOS or others. This is also the preferred mode if you are using scale-out storage systems such as Ceph. Overall, this is a great way to save money on HBAs which can get quite expensive across many nodes and in large single nodes. With the current pricing of SAS3 HBAs we are starting to recommend them over their SAS2 counterparts. They are better able to handle the IOPS of several SSDs and provide more host bandwidth as well as more bandwidth to attached drives and drives located on expanders.
We will note that depending on your distribution, you may want to start with P10 firmware. It is much easier to upgrade firmware than it is to downgrade firmware. Check with the distribution of your choice and find the recommended LSI firmware version.
Our current pick of the IBM M1215 for under $100 is based on the fact that they are readily available, inexpensive, basically identical to the 9340-8i and are straightforward to flash. There are some other options out there but this is a good bet given those factors. If you have a more generic card such as a LSI brand 9300-8i or 9340-8i in IR mode you can skip steps 2 and 3.

sas3flash.efi -o -e 6 will preserve the sas address. I’ve also never had to move a jumper on these cards.
Anyone know if the white pin headers are for a fan?
Thanks for such a detailed and useful article!
Great walk through prompted me to re-flash mine _properly_ sadly smart still doesn’t work :( Any suggestions or will my m1215 not do smart regardless?
If I wanted to flash a 16 or 24 port version to the IT firmware, would I just sub the correct files, or is the process more complex than that?
Any reason I can’t use these same steps to flash one to IR? Also it looks like the P15 firmware is out now.
Worked but had to power cycle a few times after the first flash as it kept locking up my system, certainly raised my heart rate :). On my system the adapter was not seen by sas3flash.efi until I put the jumper on, so I believe that is why the jumper is suggested.
When I try the second command ‘sas3flash.efi -f SAS9300_8i_IT.bin -noreset’ I am getting an ERROR: Cannot flash IT Firmware over IR Firmware.
Any ideas?
According to the below broadcom article, you have to use sas2flsh to flash IR to IT. I will be trying this tomorrow.
https://www.broadcom.com/support/knowledgebase/1211161501344/flashing-firmware-and-bios-on-lsi-sas-hbas
Question as to the purpose and pinout of the connector labeled J5. It’s the white 2-pin connector to the bottom right of the heatsink in your photos.
Could not find mptsas3.rom in P16 ZIP files. Rest could be written to the card without trouble.
However…
If the server motherboard (Intel S5520HC) is set to boot in BIOS mode, the card shows initialization messages, lists HDDs and SSDs, and waits for control-c for a few seconds as is normal.
But if the motherboard is set to EFI boot, the card does not show initialization messages. Ubuntu boots in EFI mode, off SSDs attached to the card, just fine.
How to see card initialization and drive listing also in EFI mode?
Have the same LSI 9300 8i in IT mode flashed with P16. However when I boot the board it turns up as a PCIE3.0 x4 instead of x8. Apparently the board is not able to negotiate a x8 PCIE Gen3.0 link. Could you please check yours and notify me of your finding?
Thanks
I have the 9300-16i version but no such board exists on the Broadcom website. I only see 9300-8i or 9305-16i. What do I flash the 9300-16i with to turn it into IT mode?
I verified my LSI 3008 board is in IT mode but am still not able to initialize disk in Windows 10. I receive error “The request could not be performed because of an I/O device error.” The disk is a Enterprise SSD from Dell EMC. Any one have any suggestions?
Dell EMC has a different sector size – 520 bytes instead of 512. You can low level format HDDs, but I recon you are out of luck with SSDs…
Thanks Patrick, nice write-up, still useful and relevant in ’22!
Does anyone have a mirror of the firmware files? I’m not able to locate them anywhere.
Download link
https://docs.broadcom.com/docs/9300_8i_Package_P16_IR_IT_FW_BIOS_for_MSDOS_Windows.zip_p
I could not find a sas3flsh.efi. I was able to find a sas3flsh.exe under DOS. Ideas?
@vasquezmi
found it here https://docs.broadcom.com/docs/Installer_P16_for_UEFI.zip_p
As those stated on broadcom’s docs (link given by Bogdan above), I think the safest way is to flash it from DOS.
Again.. FROM DOS.
From Windows/Linux/EFI you can NOT flash it to older firmware, or cross from IR -> IT or IT ->IR; they can only flash BIOS conttoller or EFI itself. pretty useless.
I don’t know whether that doc is even correct, but I’m sure it’s more accurate than our arbitrary conclusion based on randomly try and error
Just a sidenote as aa said, On my Asrock D1541D4U-2T8R, IR mode is what was on there, and the UEFI Version of SAS3Flash wouldn’t allow me to update to IT Firmware. I had to create a FreeDOS disk and use the DOS version of SAS3Flash with the command ‘SAS3Flash.exe -o -e 7’
Then I was able to swap back to the UEFI USB stick and continue with this guide.
This post was the solution, I was on IT and needed to go back to IR all firmware failed then I followed this step by step the jumper was the key to switching between IR and IT. if your on IR you can flash IR if IT you can flash IT but to switch you need the Jumper.
Eight years after the original post and this is still HUGELY helpful. I just got a Datto box built on the Gigabyte MD70-HB0 motherboard with an on-board LSI3008 controller. The only difference between my system and the original post is that I didn’t have to play with a jumper. Everything else was exactly the same. Current, and last I assume BIOS is v16. I had v4! Thanks, team.