In our last review we looked at the ASUS X99-M WS Motherboard which we found to be a very capable motherboard in a Micro-ATX form factor. Today we move up to the next size board which is the ASUS X99-E WS/USB 3.1 motherboard. This motherboard is an updated version of the X99-E WS which now adds USB 3.1 to the boards impressive feature list. With a larger CEB form factor, the LGA2011-3 platform has significantly more room to expand.
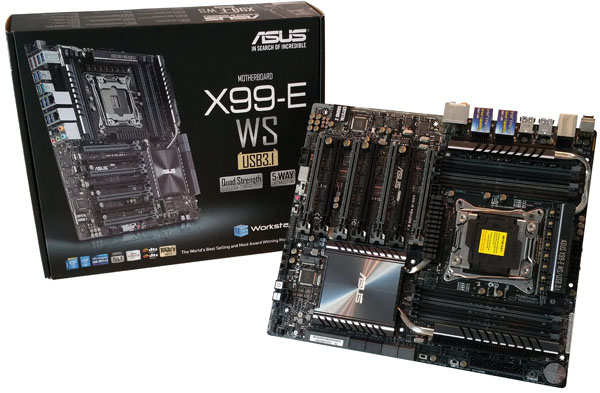
ASUS X99-E WS/USB 3.1 motherboard Key Features
- Single socket R3 (LGA 2011) supports Intel 4th gen. Core i7 series, Xeon processor E5-2600 v3
- Intel X99 chipset
- Up to 128GB DDR4, frequency up to 3200MHz (OC); 8x DIMM slots
- 7x PCIe 3.0/2.0 x16 (single x16 or dual x16/x16 or triple x16/x16/x16 or quad x16/x16/x16/x16 or seven x16/x8/x8/x8/x8/x8/x8)
- Intel i210-AT 1 GbE & Intel i218-LM 1 GbE LAN ports
- 8x SATA3 (6Gbps)
- 1x M.2 Socket 3
- ASMedia SATA Express controller: 1x SATA Express port, gray, compatible with 2x SATA 6Gbps ports
- ASMedia SATA 6Gb/s controller: 2x eSATA 6Gb/s port(s) compatible with 2x SATA 6Gbps ports
- USB 3.1 support
- Realtek ALC1150 8-Channel High Definition Audio CODEC featuring Crystal Sound 2
- Supports 2/4-Way NVIDIA SLi and CrossFireX Technology
- Form Factor CEB Form Factor 12 inch x 10.5 inch (30.5 cm x 26.7 cm)
Workstation Features
- USB 3.1
- 5-Way Optimization by Dual Intelligent Processors 5
- 12K hours Capacitors
- ProCool Power Connector
- Beat Thermal Choke
- Dr. MOS MOSFET
- ASUS PIKE SAS upgrade kit (Optional)
Normally we expect boards of this type to be in the ATX form factor but to fit in all the extra features ASUS went to a CEB size which takes the X99-E WS/USB 3.1 to 10.5 inches wide compared to ATX which is 9.6 inches. Over all this is not much to worry about and you should not have any problems fitting this board into most cases except very small ATX form factor cases. The things to look for is space between the SATA ports and case clearance.
We also reviewed the X99-E WS when it first came out which was almost a year ago now, the X99-E WS/USB 3.1 is an updated version of that board with the included USB 3.1 ports.
Close look at the ASUS X99-E WS/USB 3.1 motherboard
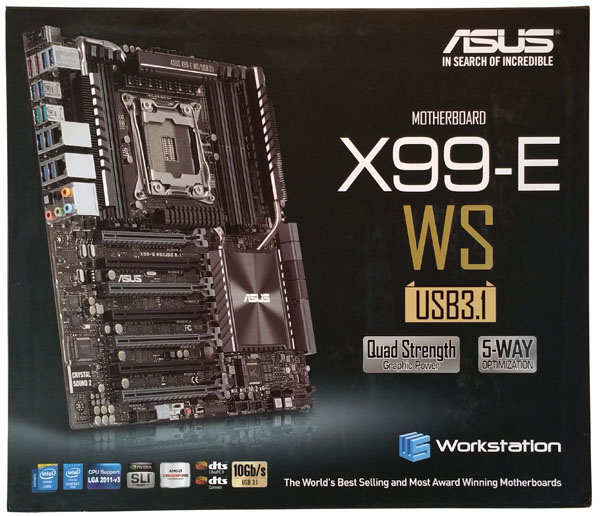
Lets start off with this build by taking a look at the motherboard retail package. The retail box for the ASUS X99-E WS/USB 3.1 is similar to the image of the X99-E WS board with added USB 3.1 nomenclature and specifications.
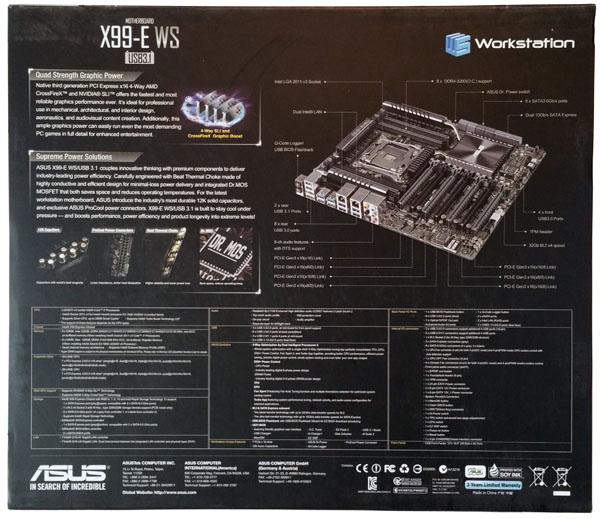
The back of the box shows key features of the X99-E WS/USB 3.1 motherboard.
Opening the front display flap we can see additional information displayed on the retail box.
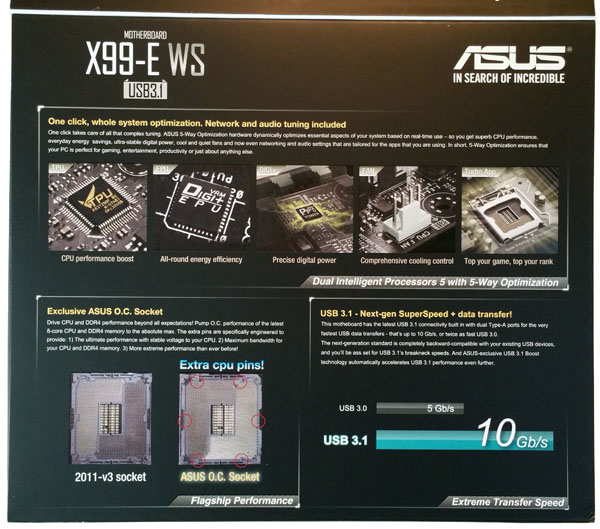
Here we also see that this motherboard also comes with ASUS’s OC Socket which has extra pins to improve overclocking and stability. According to ASUS “the ASUS OC Socket utilizes extra pins to connect a proprietary circuit to contacts found on Haswell-E’s land grid array (LGA). Combined with our customized UEFI, this exclusive feature enables higher DDR4 memory frequencies, lower latencies and enhanced stability while overclocking, extending all the way to extreme overclocking conditions, such as Liquid Nitrogen (LN2). OC Socket is 100% compatible with new Haswell-E LGA 2011-v3 CPUs, ensuring the ideal combination of overclocking performance and compatibility.”
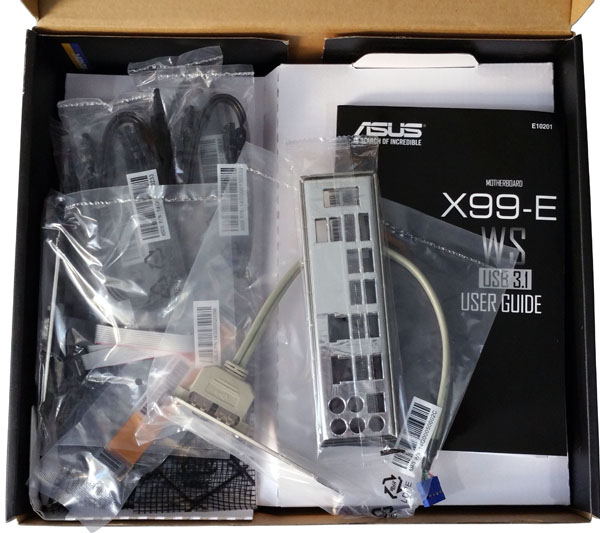
After opening the box we see the accessory contents in the top section of the box. We have said it before, we like ASUS products as you get just about everything you need or could use included as accessories. We also like that it comes with a printed manual.
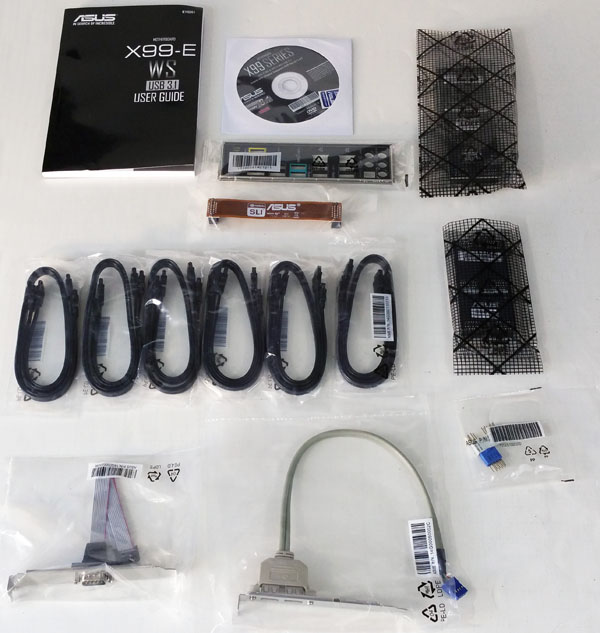
Accessories:
- User’s manual
- ASUS Q-Shield
- 1x COM port cable(s)
- 12x SATA 6Gb/s cable(s)
- 1x 3-Way SLI bridge(s)
- 1x 4-Way SLI bridge(s)
- 1x Q-connector(s) (2 in 1)
- 1x 2-port USB 2.0 module(s)
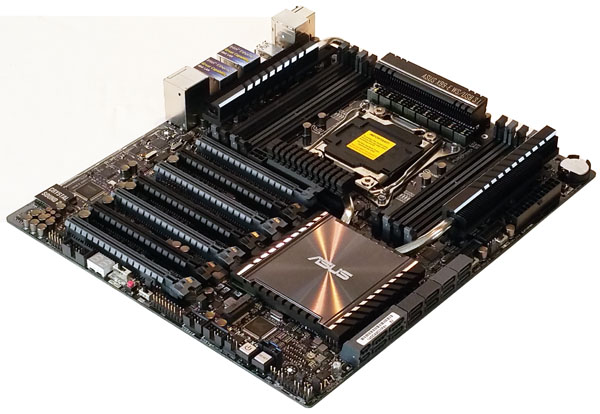
Here we see a top down view of the X99-E WS/USB 3.1, the X99 chipset heat sink takes up most of the space on the lower half of the motherboard, this will help to keep things nice and cool.
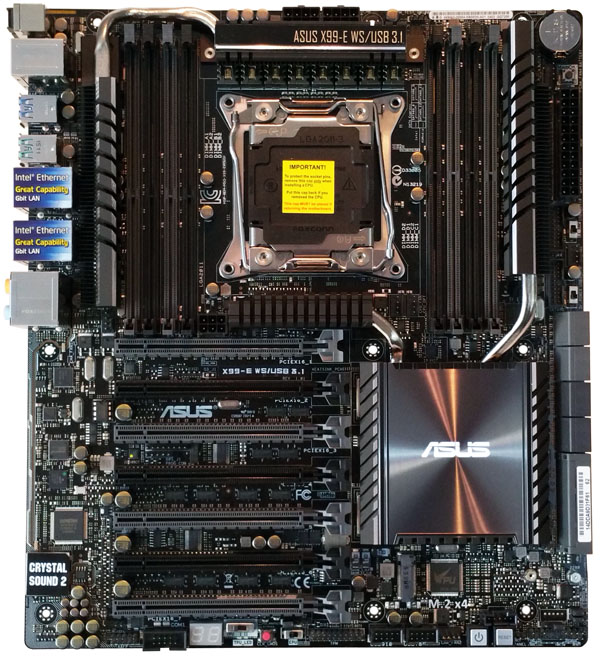
There is also a large number of connections, switches and headers that line the edges of the motherboard. We also see space for the M.2 SSD which takes advantage of the CEB form factor’s extra width for the motherboard. ASUS has used every spare bit of space on the X99-E WS/USB 3.1 motherboard to pack in features.
One of these areas is with storage and ASUS does not disappoint there.
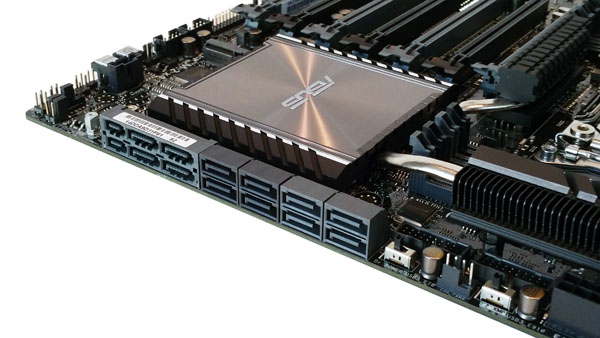
Here are the storage controllers:
- 1x SATA Express port, gray, compatible with 2 x SATA 6.0 Gb/s ports
- 1x M.2 x4 Socket 3, gray, with M Key, type 2260/2280 storage devices support (PCIE mode)
- 8x SATA 6Gb/s port(s), gray,
- Intel Rapid Storage Technology supports
- ASMedia SATA Express controller: 1x SATA Express port, gray, compatible with 2 x SATA 6.0 Gb/s ports
- ASMedia SATA 6Gb/s controller: 2x eSATA 6Gb/s port(s) compatible with 2 x SATA 6.0 Gb/s ports
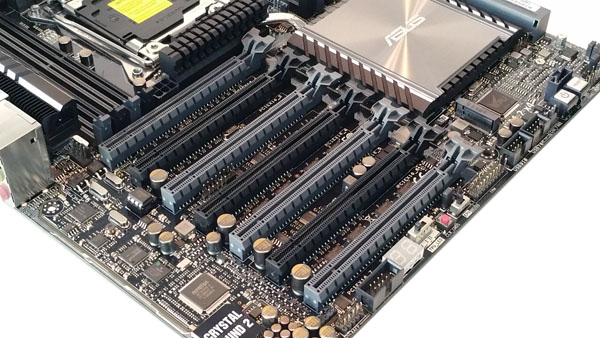
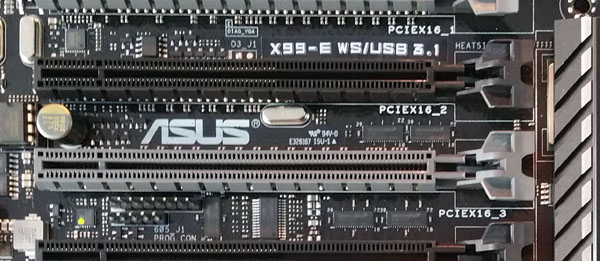
Here we see the PCIe slots, which are:
- 4x PCI-E 3.0 x16 (double-width) slots (light gray)
- 3x PCI-E 3.0 x16 (double-width) slots (dark gray)
Depending on the expansion cards used, they are automatically configured as follows:
- 7x PCIe 3.0/2.0 x16
- single x16
- dual x16/x16
- triple x16/x16/x16
- quad x16/x16/x16/x16
- seven x16/x8/x8/x8/x16/x8/x8)
Multi-GPU Support includes
- Supports Nvidia 4-Way SLI Technology
- Supports AMD 4-Way CrossFireX Technology
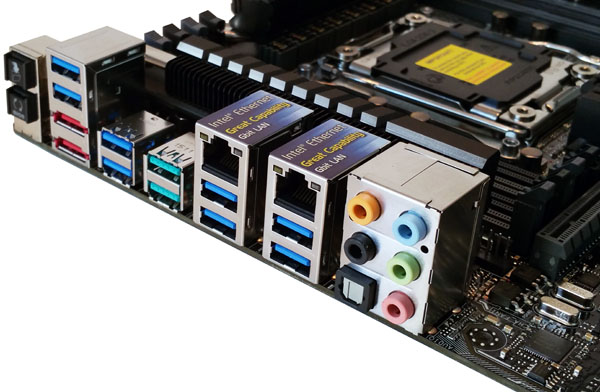
At the back of the motherboard we find on the far left a Q-Code Logger button and a USB BIOS Flashback button. Next are two USB 3.0 ports that also function as Q-Code Logger and the lower port is the USB BIOS Flasback port. The two Red ports are eSATA ports. Next we have two USB 3.0 ports and two USB 3.1 ports in Green/Blue color. Then we have two LAN Ports with two USB 3.0 ports under each. Then the final stack is the Audio output ports.
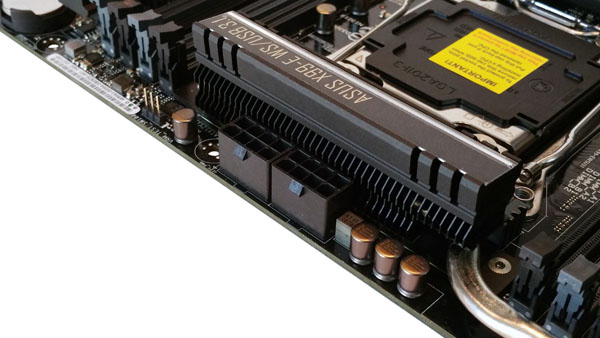
Directly behind the VRM Heat sink is 2x 8-PIN CPU power connectors. Using 2x 8 Pin power connectors helps to improve stability especially when overclocking. Only one 8 Pin power connector is required.
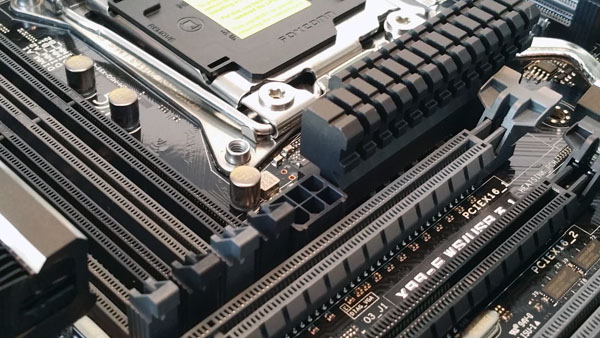
At the back of the board near the CPU socket and PCIe slot is an additional 6 Pin power connector, this is not often used but will provide extra power to PCIe slots if needed. We can see this being needed if 2x Dual GPU cards, Quad GPU setups or if all seven PCIe ports are used and M.2 Storage device are installed.
The X99-E WS/USB 3.1 includes Crystal Sound 2 for workstation needs such as include Video or Audio editing that can support 8-Channel High Def Audio output.
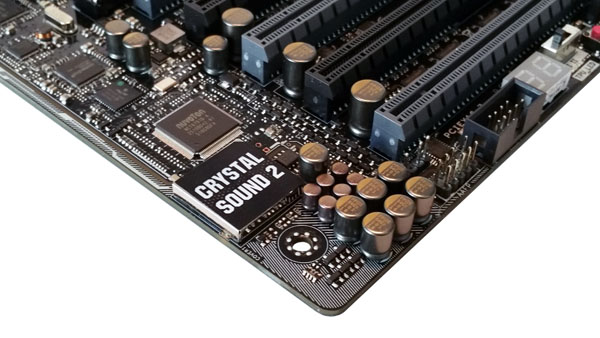
Onboard Audio Features
- Audio ChipsetRealtek ALC1150 8-Channel High Definition Audio CODEC featuring Crystal Sound 2
- Supports : Jack-detection, Multi-streaming, Front Panel Jack-retasking
- High quality 112 dB SNR stereo playback output (Line-out at rear) and 104 dB SNR stereo playback input (Line-in)
- High-fidelity audio OP AMP(s)
- DTS Ultra PC II
- DTS Connect
- Optical S/PDIF out port(s) at back panel
- BD Audio Layer Content Protection
- Audio Shielding: Ensures precision analog/digital separation and greatly reduced multi-lateral interference
- Dedicated audio PCB layers: Separate layers for left and right channels to guard the quality of the sensitive audio signals
- Audio amplifier: Provides the highest-quality sound for headphone and speakers
- Premium Japanese-made audio capacitors: Provide warm, natural and immersive sound with exceptional clarity and fidelity
- Unique de-pop circuit: Reduces start-up popping noise to audio outputs
- Top notch audio sensation delivers according to the audio configuration
- EMI protection cover to prevent electrical noise to affect the amplifier quality
BIOS
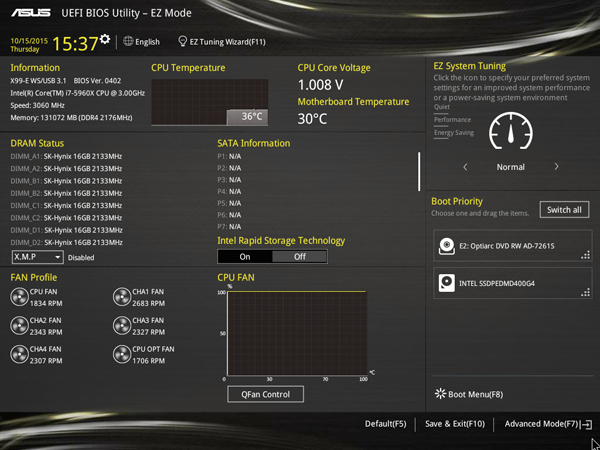
Let’s take a look at the X99-E WS/USB 3.1 BIOS which offers many features. When entering the BIOS the first screen you will see is the UEFI BIOS Utility – EZ Mode.
EZ System Tuning allows for system tuning at the click of a button, options are Quiet, Performance and Energy Saving. Other options allow for selecting the boot drive and FAN Profiles.
Coming from our Dual CPU systems which use the more standard Award classic style we find the BIOS on the X99-E WS/USB 3.1 to be outstanding and sets a new standard for UEFI BIOS’s. It is laid out very well and very functional, many features can be enabled by the click of a button.
More advanced features can be enabled by clicking on Advanced Mode at the bottom of the screen.
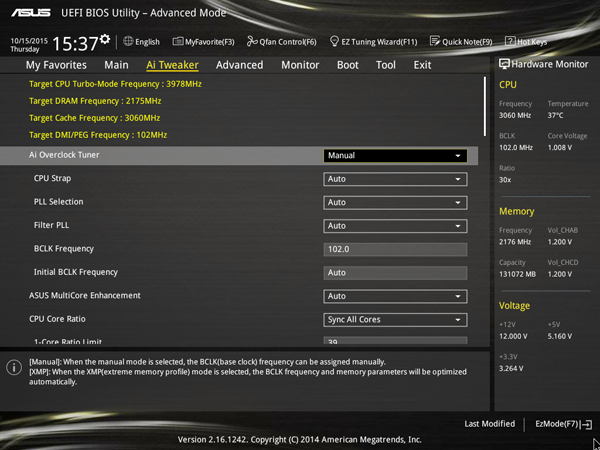
Here we can see many features that can be fine-tuned or activated with drop down menus, the ability to monitor CPU, Memory and Voltage settings on the right and still be able to use your keyboard to move about the different menu options.
Driver DVD
When installing Win 8.1 or Win 10 many of the drivers needed to operate your system are installed during the install process. Checking the device manager after everything is done we found all devices were functional.
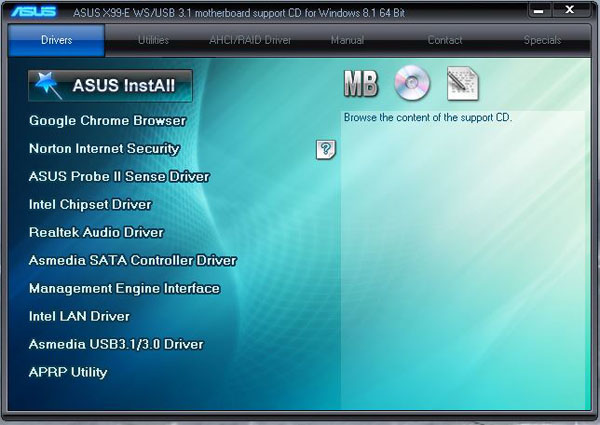
You could continue to operate the system with these drivers installed or go through the driver DVD to install ASUS recommended drivers. After our OS was installed we did go through and install the drivers from the DVD and we recommend doing so.
The top menu also has an option to install Utilities.
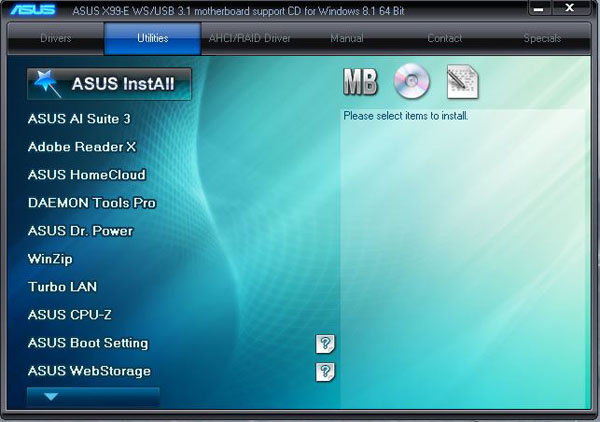
Normally we do not have a need to use any of these Utilities but we did install AI Suite 3 so we could take a look at what it offered.
AI Suite 3
For the most part we usually setup our systems using the BIOS but sometimes we may want to monitor some feature or even adjust certain settings, AI Suite 3 provides us with easy access to many features with having to restart and going back into the BIOS.
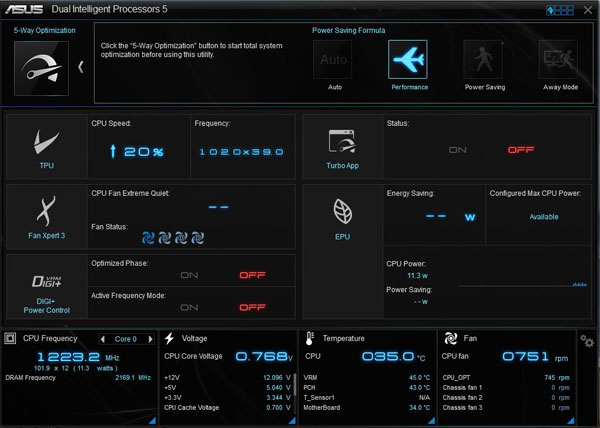
The one key feature here is 5-Way Optimization and according to ASUS “One click takes care of all that complex tuning. Your PC is smart with ASUS 5-Way Optimization. It dynamically optimizes essential aspects of your system based on real-time use – so you get superb CPU performance, everyday energy savings, ultra-stable digital power, cool and quiet fans and now even networking and audio settings that are tailored for the apps that you are using. In short, 5-Way Optimization ensures that your PC is perfect for gaming, entertainment, productivity or just about anything else!”
In our Lab we typically use large machines that can pull huge amounts of power and generate lots of heat and noise. We find this feature helps tune a machine that drops to low power states to conserve power but has the ability to quickly spool up when applications need that extra punch. Using AI Suite 3 we can toggle between different performance modes with the click of a few buttons when we need that extra performance punch and then switch back down when we do not.
Overclocking
We have seen on several motherboards the ability to overclock with a few simple clicks to get extra performance out of our systems. This has become a standard on many gaming motherboards for awhile now and these workstation motherboards from ASUS are no different. We selected an Intel Core i7-5960X Haswell-E 8-Core for this reason, it can be overclocked.
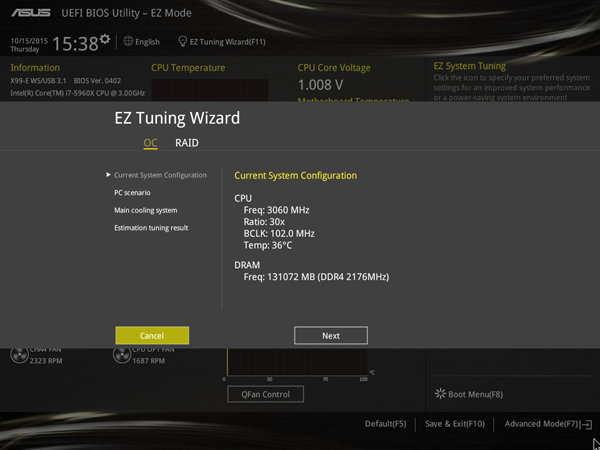
We ran our tests using Defualt or Stock settings and then again using the EZ Tuning Wizard. Simply click the EZ Tuning Wizard at the top of the screen and you will be presented with a few options.
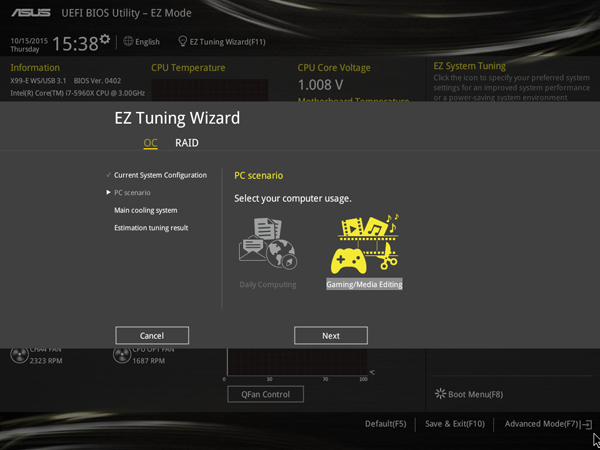
The first option is the PC Scenario that you will use this machine as. We used Gaming/Media Encoding as this will give us the highest overclock.
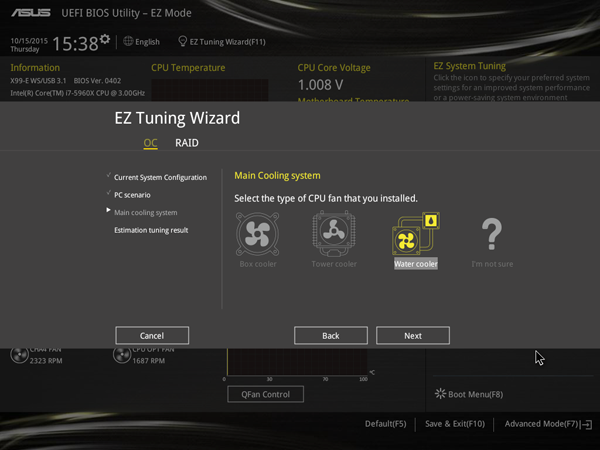
The next option is for the type of cooling that we used on our system. We did not use Water Cooling but from past experience using this feature we know that the EZ Tuning Wizard gives us plenty of head room to use this with our Noctua NH-U9DX-i4 heat sink.
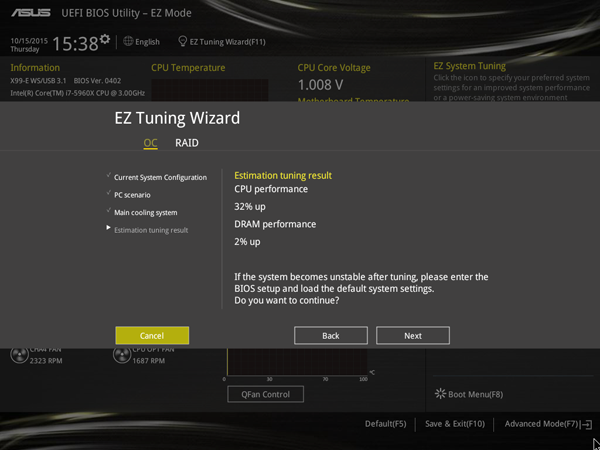
Clicking on next and we will see a screen that tells us what performance boost we will get which is ~32% boost. Not bad for a few simple clicks.
Our test setup
For testing we used:
- CPU: Intel Core i7-5960x Haswell-E 8 (8 core/16 Threads)
- Motherboard: ASUS X99-E WS/USB 3.1
- Memory: Crucial 8x 16GB ECC RAM DDR4
(128GB Total)
- Cooling: Noctua NH-U9DX-i4
heat sink
- Storage: Micron P400e 200GB SSD
- GPU: Nvidia K5200 and Tesla K40
- OS: Windows 8.1 and Ubuntu 14.04
We used Crucial 8x 16GB ECC DDR4 kits, we had no issues with using these memory kits but they cannot be OC’d so we see the 2133MHz speed in the tests we ran.
AIDA64 Memory Test
AIDA64 memory bandwidth benchmarks (Memory Read, Memory Write, and Memory Copy) measure the maximum achievable memory data transfer bandwidth.
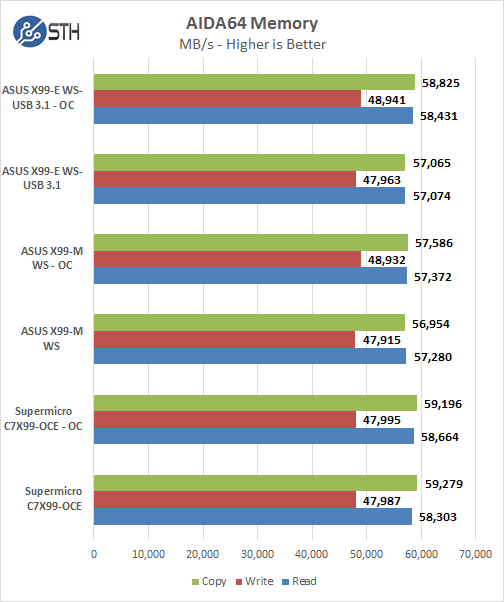
Memory latency was ~73.6ns and with 8x 16GB (128GB Total) DDR4 memory sticks installed we saw memory speeds of 2133MHz. We did not see any improvements in benchmarks when running the CPU in Overclocked state using the memory kits we selected for our tests. We also see that there is really no difference between the X99-M WS and the X99-E WS/USB 3.1 when it comes to memory performance, even with double the number of memory slots.
Linux-Bench Test
We ran the motherboard through our standard Linux-Bench suite using Ubuntu as our Linux distribution.
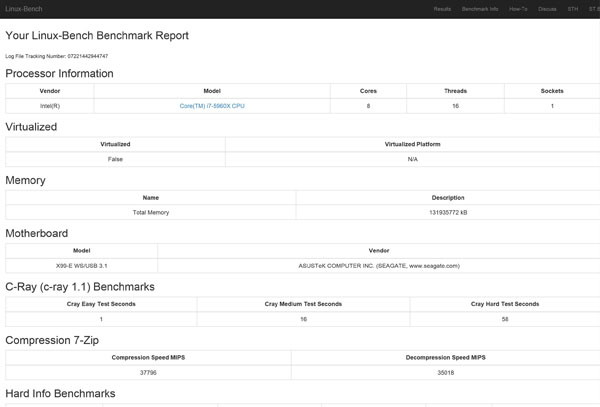
The example full test results for our Linux-Bench run can be found here:
ASUS X99-E WS/USB 3.1 Linux-Bench Results and ASUS X99-E WS/USB 3.1 Overclocked Linux-Bench Results
AIDA64 GPGPU Benchmark
For our GPU testing we use AIDA64 Engineer to run the provided GPGPU tests which has the ability to run on all installed GPU’s and the CPU’s.
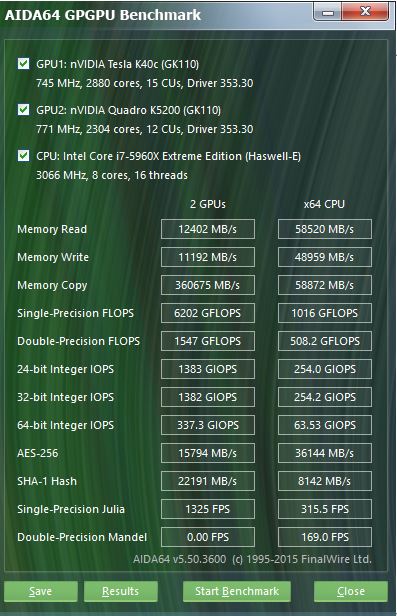
This test see’s both the K5200, K40 and the 5960x present in the system and goes through a lengthy benchmark test. Our combined GPU single-precision performance came in at 6,202 GFLOPS or 6.2 TFLOPS.
SPECwpc
SPECwpc_v1.0.2 is a workstation benchmark that measures key aspects of workstation applications.
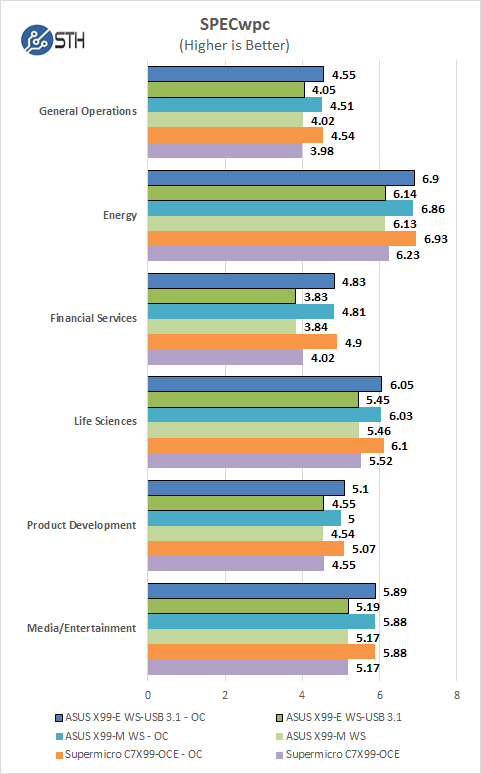
SPECwpc results can vary by a large amount depending on the GPU and Storage drives used. Several results can be boosted by using a higher end GPU. We ran this benchmark with default and Overclocked settings and we can see a good boost to scores using an CPU that can be Overclocked. For the most part results are neck and neck between the two boards we have tested. Again we also see that there is really no difference between the X99-M WS and the X99-E WS/USB 3.1 when it comes to this benchmark. However on the X99-E WS/USB 3.1 you can double up on the GPU’s which will help increase performance a great deal.
SPEC CPU2006
SPEC CPU2006v1.2 measures compute intensive performance across the system using realistic benchmarks to rate real performance.
In our testing with SPEC CPU2006 we use the basic commands to run these tests.
- ” Runspec –tune=base –config=servethehome.cfg ,” then ” int ,” or ” fp .”
- To do multi-threaded, we add in ” –rate=16.”
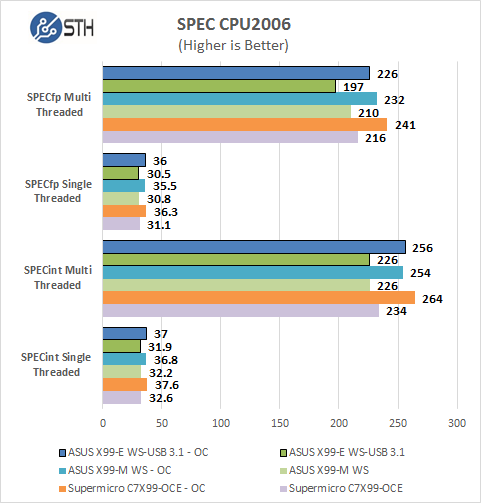
Our CPU2006 test results are also impressive for a system like this. Single threaded results are a bit faster than a dual CPU system we normally run in the Lab, after Overclocking the system we see a large boost to scores. On this test the X99-E WS/USB 3.1 held up good with single threaded tests but seemed to lag behind a bit on multi-threaded tests.
Power Tests
For our power testing needs we use a Yokogawa WT310 power meter which can feed its data through a USB cable to another machine where we can capture the test results. We then use AIDA64 Stress test to load the system and measure max power loads.
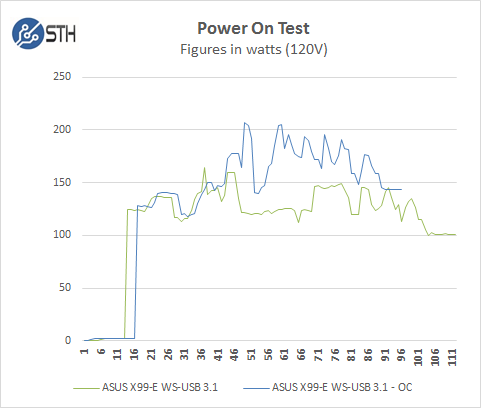
Boot up power use on single socket workstations is much lower than our Dual CPU rigs, we only see about 165watts at peak usage for our default BIOS tests, but at OC settings we see a big boost of ~41watts more and peak use of 206watts on start up. Loading the system up with 4x GPU’s would also increase these numbers but the main thing to look at is the increase in power use when Overclocking.
Fully Loaded Stress Tests Power Use
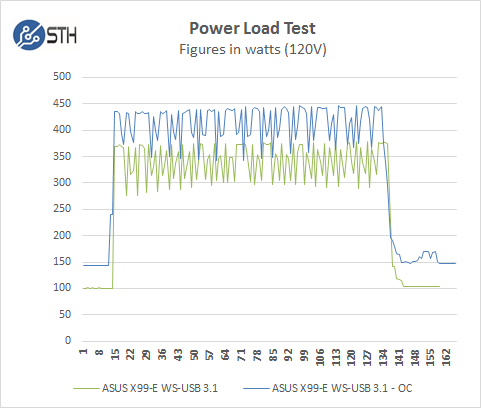
For our tests we use AIDA64 Stress test which allows us to stress all aspects of the system. At default BIOS settings we see ~374watts at max usage, but with the OC settings we jump up another 65watts to a peak of 439watts. We also noticed that our idle power use is ~40watts higher than stock settings. Using the same basic components that we used on the X99-M WS motherboard we see higher power use mainly because of the extra DDR4 RAM sticks installed.
Conclusion
In the lab we have used many ASUS Workstation class motherboards, including dual socket systems and we have found one thing in common: stability. Stability is the main feature you are looking for in a workstation class motherboard. Many of the tasks we do with workstations involve complex problem solving with advanced graphics programs. The ability to crunch through large CAD projects or video renders without a hiccup is what matters and the X99-E WS/USB 3.1 does that well.
The BIOS on the ASUS’s workstation line up is what we consider as the gold standard, it is the best out there by far, simple to use, easy to read and navigate and stable. It also offers automatic overclocking with the EA Tuning Wizard that boosts performance with a few simple clicks. The presets we find are conservative in that they do not push VCore to high that creates cooling issues. But the important part of the EZ Tuning Wizard is it is stable and for long periods of time. We have been running different ASUS workstation boards for a long time and cannot remember when we had an overclock fail.
The X99-E WS/USB 3.1 includes a great number of advanced features that expand its usefulness. Its rather simple to create a highly powerful workstation that also conserves power with the 5-Way Optimization feature. Software wise we find the AI-Suite to be useful and functional in that you can setup the machine to conserve power and noise, then with a few simple clicks let it rip at full power for major number crunching needs.
That brings us to all the PCIe slots, there are 7 total on the X99-E WS/USB 3.1. This gives the ability to run Quad SLI or Crossfire setups or even seven single width PCIe cards which can be a mix of GPU’s, PCIe SSD’s or even fast network adapters.

Despite the assertion of the article, the feature most adults want in a workstation is a memory controller that accepts dense modules and supports ECC. After that, it’d be support for SATA express. I have yet to see an application of SLI or its equivalents on a FirePro or a Quadro.
This is just another overpriced gaming board being marketed as something else because the kiddies are using XBoxes and Playstations to blow things up instead of PCs and ASUS is trying to recover some costs before giving up on the market.
Is the RAM RDIMM or UDIMM? And does the 5960X enable ECC when paired with the RAM?
I am disappointed there’s no Xeon E3 support.
It’s a WS board.. not a ROG.. which means official support from ASUS for workstation class CPU’s. (Sure other gaming X99’s may support processors unlisted on their specs as well.. but its up to the buyer of those other boards to take the plunge w/a healthy dose of Caveat Emptor to know this.. and for the BIOS to contain the proccessor ID’s, which maybe they do, maybe they don’t.. the WS means IT DOES, and is listed so on the ASUS website.
This is not only a Socket 2011-3, its a Socket LGA 2017-A, which means latest and greatest X99.. furthermore since when was the memory controller on the motherboard in ANY of the high pin count sockets or workstation class chipsets? It wasn’t on Socket 1366, 2011, 2011-3, or 2017-A. The memory controller is in the CPU (That’s one of those things the extra pins are for.. I see no reason why this board wouldn’t easily support 256GB or more RAM. Anyway, talk is cheap.. and as Barry and Levon would say the proof is in the pudding.
http://i.imgur.com/o3fKS8J.jpg – SIX 32GB Samsung DDR4 ECC RDIMMS = 192GB
Heck, if they release 64GB DIMMS of the right rank, I see no reason why this board couldn’t even support 512GB..
Xeon E3 have a different socket type (1151), although this motherboard does support E5 Xeons
Right-O about the dimm ranks . From the E5 data sheet at http://www.intel.com/content/dam/www/public/us/en/documents/specification-updates/xeon-e5-v3-spec-update.pdf
“Quad-rank LRDIMMs require calibration of all four of their DRAM ranks. Due to this erratum, only half of the ranks are calibrated.”
Building a new rig with an e5 1650 v3 on this board. Going with 2 new 32g dimms every 6 months and let the monster grow.
Thanks for driving the point home that the MC is in the CPU now days. The CPU holds all the cards wrt dimm juju, so Asus et al. tend to to spec th elowest common denominator at publishing date.
Well, while all you folks are jawing about the fine specs on this beauty, I just need to know one thing. Where can I but one of these little suckers RIGHT NOW! Thanks for any reliable info. Ima
One small problem with this board : No PS2 functionality. For most people this won’t be a big deal but as a work station it really should have this. Many times drives cannot be accessed from the Bios due to driver issues with various USB based keyboards. PS2 keyboards require no drivers. I’m surprised ASUS would neglect such a basic aspect of functionality on a work station motherboard.