Today we have our review of the Lenovo ThinkStation P700 workstation. We have looked at several of Lenovo’s workstations over time, from the P300 to the full sized P900. Today we have another P Series desktop workstation that fits in the mid-sized tier. This workstation sits at the center of the P series lineup and we feel is the sweet spot in terms of performance and costs. All though this workstation is not as big as the P900, it does have dual CPU capability and offers an impressive storage capacity and has plenty of PCIe slots to run two full sized GPU’s.
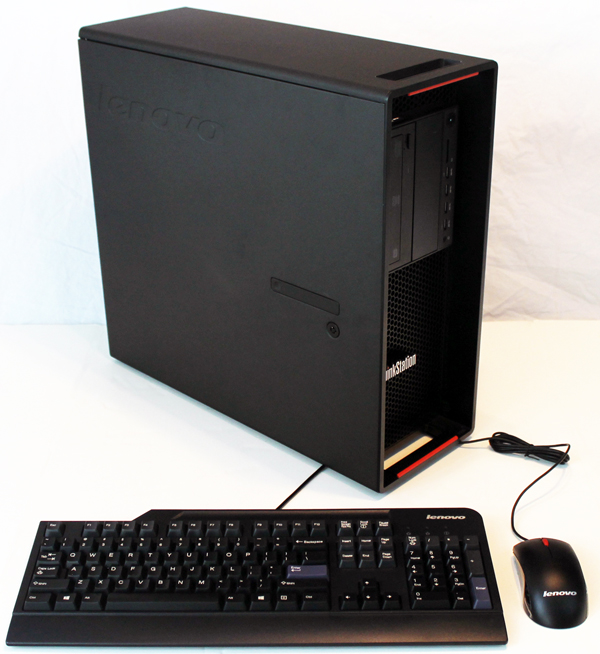
Lenovo ThinkStation P700 Key Features
- Processor: Supports Intel Xeon EP Processors E5-1600 v3 and E5-2600 v3 family of processors
- Chipset: Intel C612 chipset
- Memory: 12 DIMM slots, up to 2133 MHz DDR4
- Expansion Slots: 3x PCIe x16, 1x PCIe x8 (open ended), 1x PCIe x4 (open ended), 1x Flex Connector
- Graphics: Up to NVIDIA Quadro K5200 8G (2DVI+2DP)
- Flex Module: up to 4 devices, Max Storage Devices – 12, Max 3.5″ = 6(24TB), Max 2.5″ = 10(10TB), Max M.2 = 2(1TB)
- Dimensions: 6.9″ x 18.5″ x 17.3″ (175mm x 470mm x 440mm)
- Weight: 28.66 lbs.
Key benefits of the P700 include FLEX Trays and bays that let you configure or expand storage as needed. Tool-less construction is a hall-mark of the P Series, just like the other workstations in this series red touch points high light componets that are easy to remove for replacement or upgrading. The P700 also includes Lenovo’s patent-pending tri-channel cooling air baffle which also add helps to reduce fan noise. The P700 also offers a wide range of choices of Intel Xeon processors and NVIDIA Quadro graphics cards.
Close look at the Lenovo ThinkStation P700
Lenovo workstations like the P700 arrive in a large shipping box, ours arrived double boxed this time which we are happy to see. This helps protect the workstation inside from punctures and rough handling from shippers.
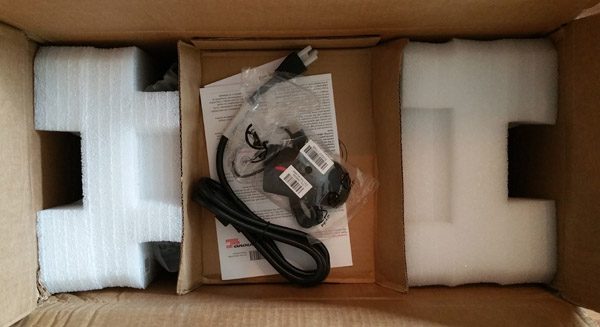
As we open the shipping box the first thing we see is a cardboard tray at the top which houses the power cord, documentation and mouse. We also see the large foam inserts on both sides of the workstation.
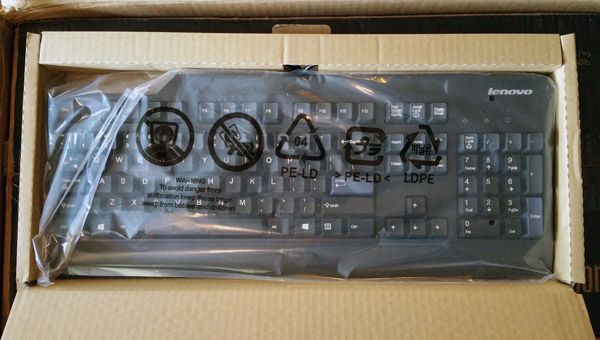
Down the side of the box is another cardboard box which includes the keyboard.
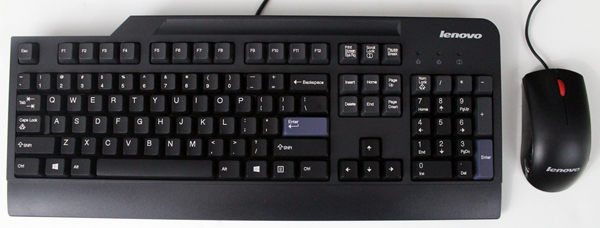
Here both keyboard and mouse are laid out and ready to plug into the P700. We used both the keyboard and mouse in our testing and found them to be more than adequate for the purpose of everyday use.
Here we have taken out the P700 and set it up on our table, built into the case are hand holds that ease lifting the machine onto a table or moving it around. The P700 can also be laid on its side and allows for the ThinkStation logo to be rotated.
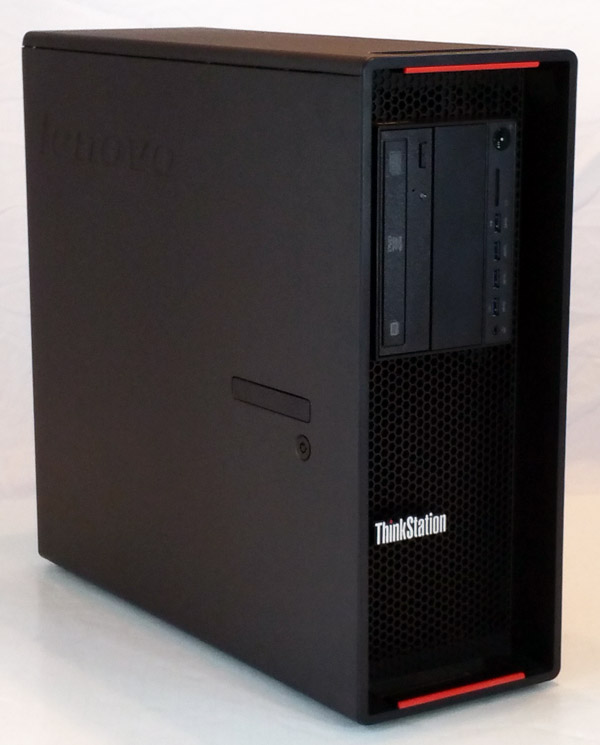
This P700 workstation has very clean lines. We like the black honeycomb mesh that covers the front of the case. This mesh helps to provide good airflow.
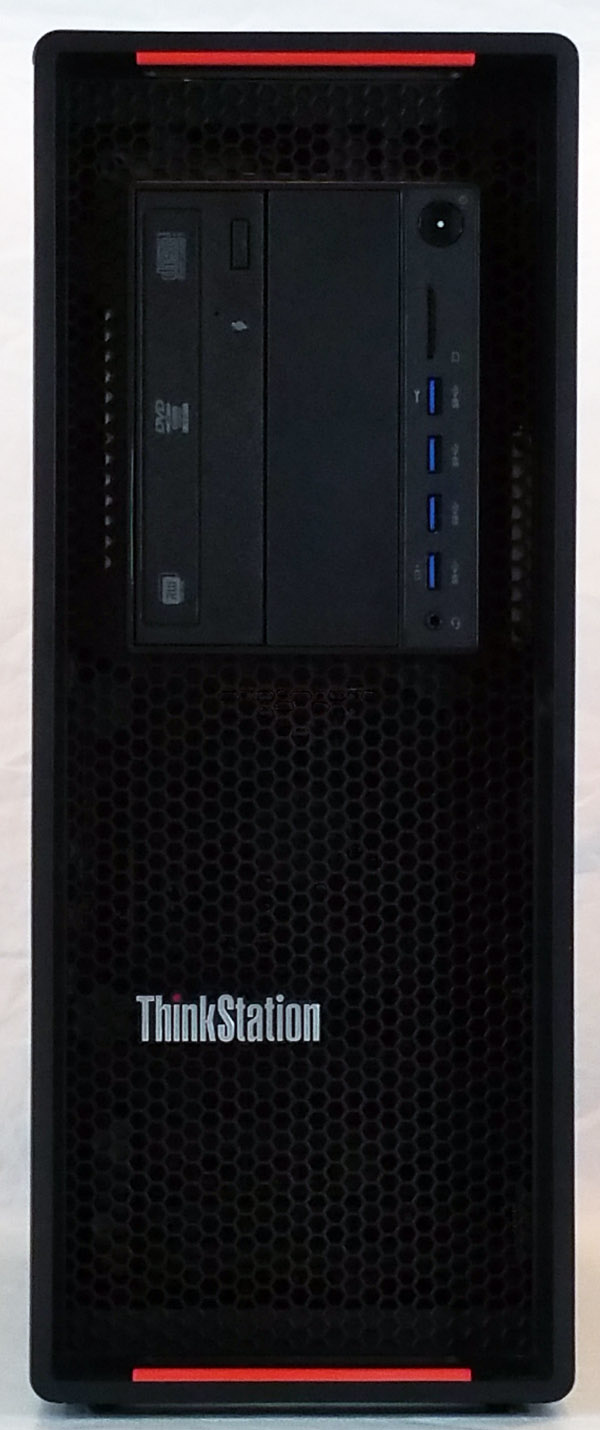
We have often said you can never have enough USB ports on a workstation, with 8x USB ports at the back and in the front bay area we find four more USB 3.0 ports bringing the P700 up to 4x USB 2.0 and 8x USB 3.0 ports. Also available on the front panel is a 9-in-1 Media Card reader which comes in handy for many multi-media devices storage drives. The middle area on our unit was empty but there is also options to have additional storage drives installed here, or a second DVD drive.
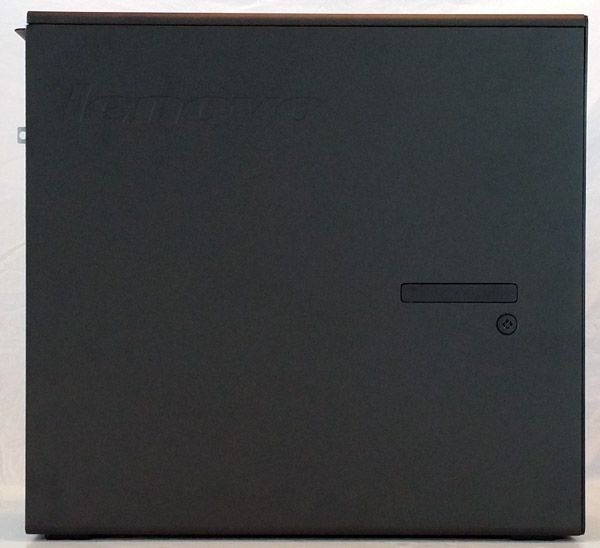
The side of the P700 is plain like most workstations and it also includes a locking access lever to remove the side panel.
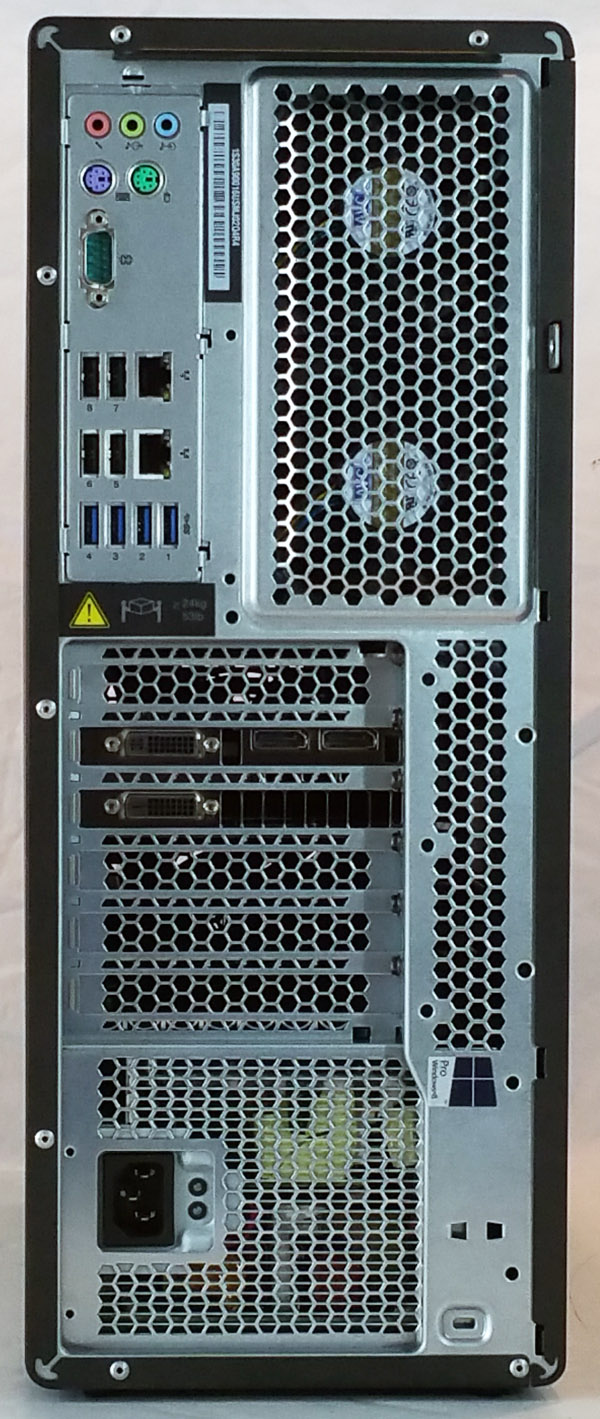
At the back of the case has the necessary air-flow openings. The IO area consists of Audio Ports, PS/2 Connectors, a Com Port, 4x USB 2.0 Ports, 4x USB 3.0 Ports and 2x 1Gb Ethernet ports.
The P700 is designed to be hands-on and reduce the work required to do upgrades. Each of the red touch points that you see here are locations that can be removed.
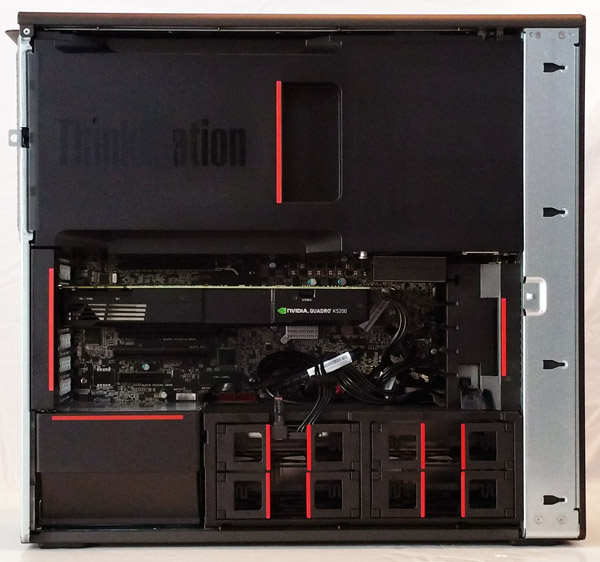
No tools are required to remove these components. The only items that would require a screwdriver to remove are the CPU heat sinks. Here we see the patent-pending tri-channel cooling air baffle that comes installed in the P700.

This channels air from the front of the case through the CPU area to cool the processors.
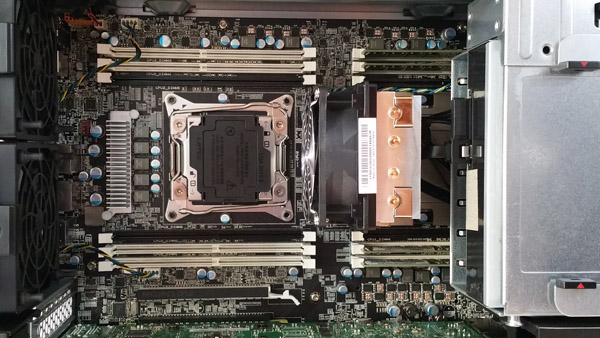
Our review system came equipped with one CPU which is installed at the front of the case. The CPU heat sink extends under the front Flex bay area and has an extension on the left side for the cooling tower and fan to extend upwards into the case. These are not especially heavy duty heat sinks on their own, but with the cooling shroud installed to channel air through the system these work very well.
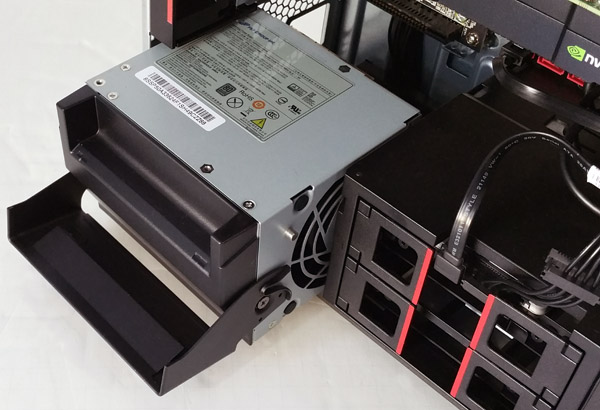
The power supply on the P700 simply unlocks and can be pulled out of the system for replacement, no tools are needed to do this.
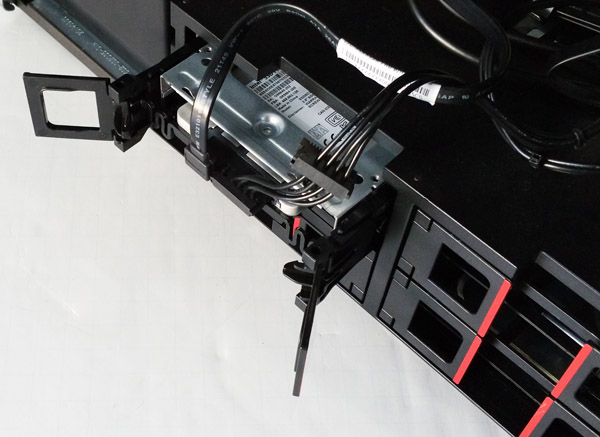
Lenovo’s FLEX drive trays allow for easy removal and support both 2.5” and 3.5” disk sizes. Each tray can support two 2.5” drives giving the total capacity from 4 to 8 drives total.
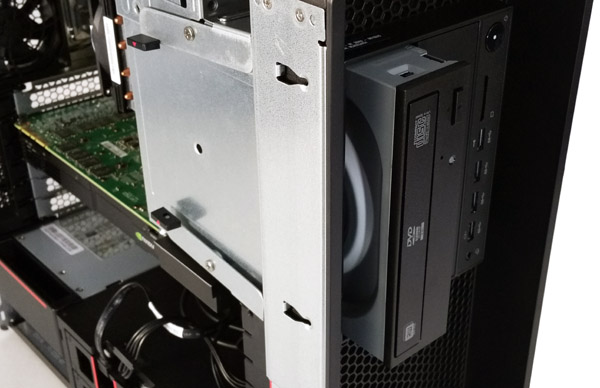
At the front of the system we find what Lenovo calls its Flex Bay. There are two 5.25” drive bays here which can have a DVD player as we see here or HDD’s, ultra-slim optical drive, firewire and media card readers. The two levers in the back unlock our DVD player and allow it to be removed.
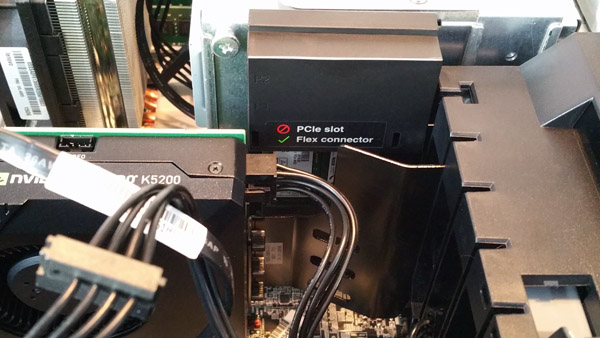
This feature we really liked on the P700, this is a Flex Connector. Options for this include LSI Raid Flex adapter for SATA/SAS Raid, two M.2 SSD and one Multi-I/O Flex adapter for two PCIe SSD’s.
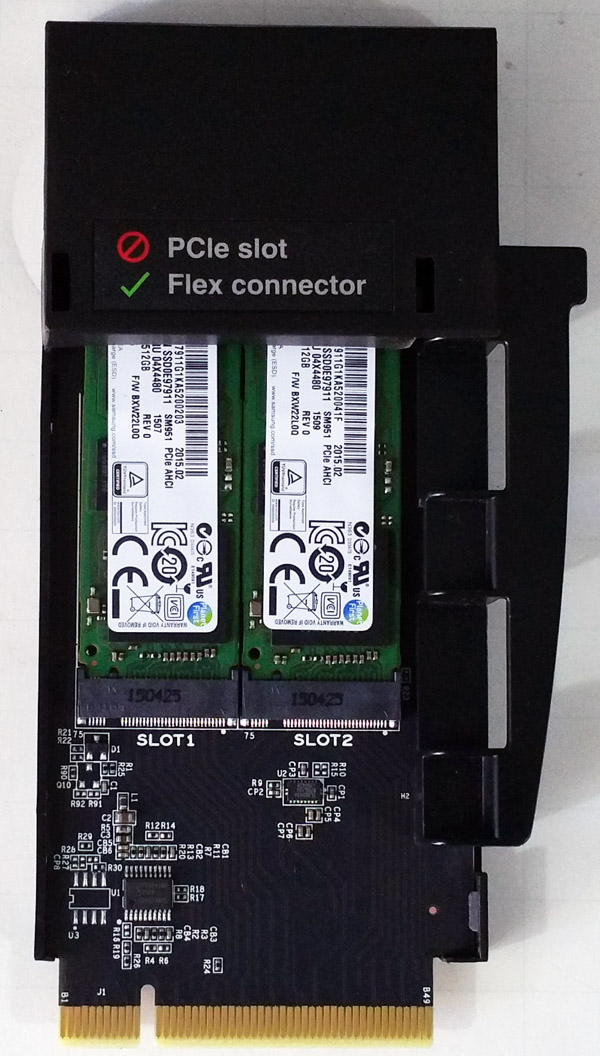
On our system we have 2x PCIe M.2 512GB SATA RAID 0 for a total of 1TB. This solution frees up PCIe slots for other uses and is very fast.
BIOS
Let’s take a look at the P700 BIOS. On startup a message will come up that allows you to press “Enter” to enter the BIOS.
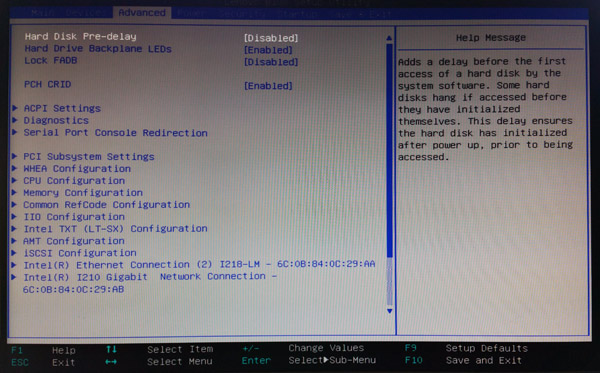
In the Advanced menu tab we see a wide range of options that can be adjusted here. Most systems will come pre-configured so there will be no need to adjust any of these features.
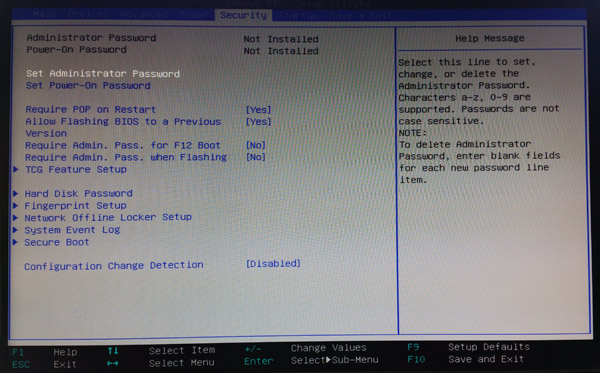
The other Menu tab of importance is the Security tab, here there are many different security features that can be enabled if you wish to add added security features to your system.
Bundled Software
There is a large list of bundled software that is preinstalled on the P700.
- Create Recovery Media
- CyberLink PowerDVD
- Lenovo PowerENGAGE
- Lenovo Preferred Pro USB Fingerprint
- Lenovo Solution Center
- Lenovo System Upddate
- McAfee
- Microsoft Office Trial
- PiP Anywhere
- PowerDVD Create
- REACHit
- SHAREit
- ThinkVantage Password Manger
Much of this can be uninstalled if you would have no use for it.
Lenovo Solution Center acts as a central hub for monitoring system health and security. With LSC, you can monitor your system’s virus and firewall status, update your software, perform a backup, check battery health, and get registration and warranty information. You can also immediately test or schedule a test of your system’s hardware, and learn from hints and tips to achieve maximum system performance. LSC uses a snapshot feature, which allows you to compare your current hardware and software configuration with the earlier configuration that was created the first time you launched Lenovo Solution Center.
We do like Lenovo Solution Center (LSC) so let’s look at that.
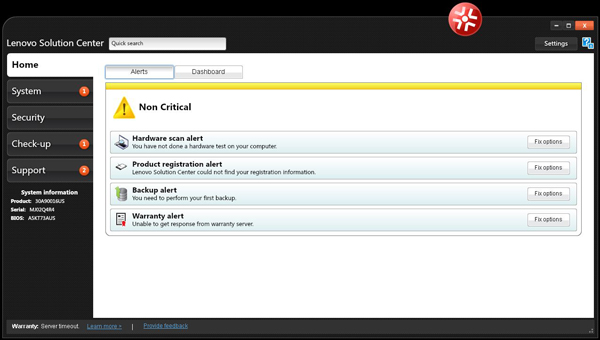
The Home screen will alert you to any items that you should look into, anti-virus, backup’s and warranty alerts. Clicking on these alters will allow you to diagnose and fix these issues.
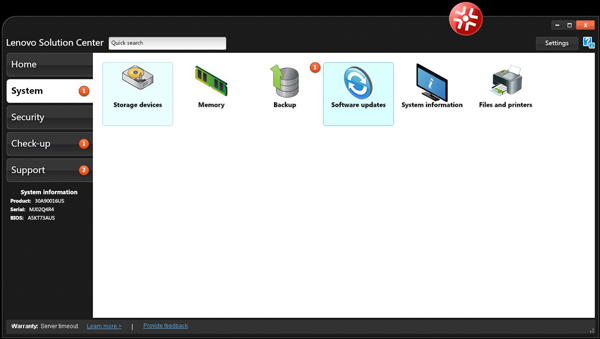
In the System menu you can select each section and see the status of each component.
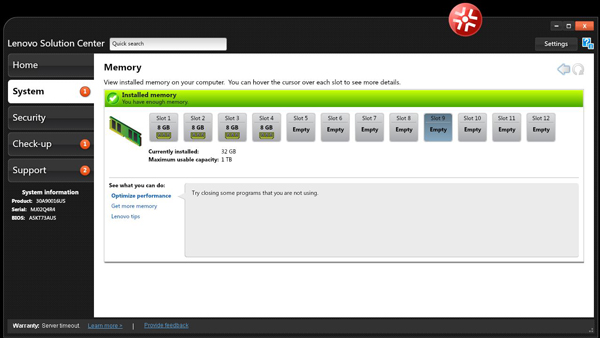
As an example if we select the Memory menu we will see a list of all available memory in the system, in our case we have 4x 8GB DDR4 memory sticks installed. If we wish to expand our memory there is also a link provided that will take you to the Lenovo Memory order page.
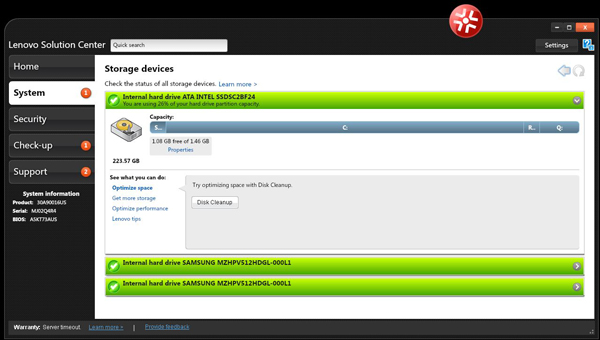
Another menu item is Storage Devices. We can see what drives we have installed in our system, our System Drive is an Intel Pro 2500 SSDSC2BF240H501 2.5″ 240GB SATA 6Gb/s MLC Enterprise Solid State Drive (SSD). Also installed in the Flex connector we have 2x SAMSUNG MZHPV512HDGL-000L1 SM951 512GB M.2 PCIe SSD in Raid 0. There is also a link that will take you to Lenovo’s site if you wish to order additional storage.
Windows 10 Ready
When we first powered up our P700 we found Windows 7 SP2 Pro as the installed operating system. This was fine for us but we kept seeing the Windows 10 upgrade button at the bottom task bar. We decided to run our tests under Win 7, then do the Win 10 upgrade and see run our tests again to see what might happen to our test scores. We are adopting Windows 10 on all our review systems now so we wanted to see the results of these comparisons. Some tests we run under Linux so they are stand alone and not a comparison.
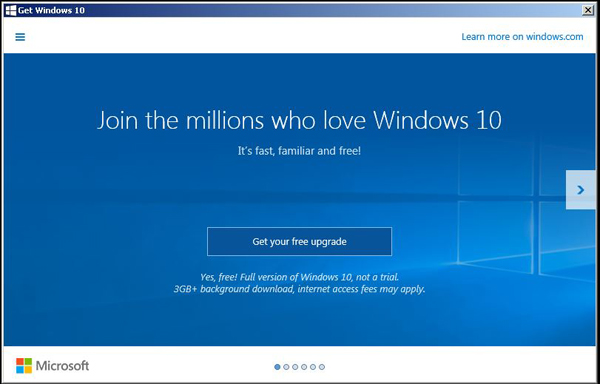
After clicking on the Win 10 upgrade Icon on the bottom task bar we are presented with this screen. Following the prompts soon Windows 10 is downloaded and installed on our system. The whole process took about 30 minutes which we followed up by doing an update to bring our upgrade to the current release. The whole process was easy and we had no issues during this process.
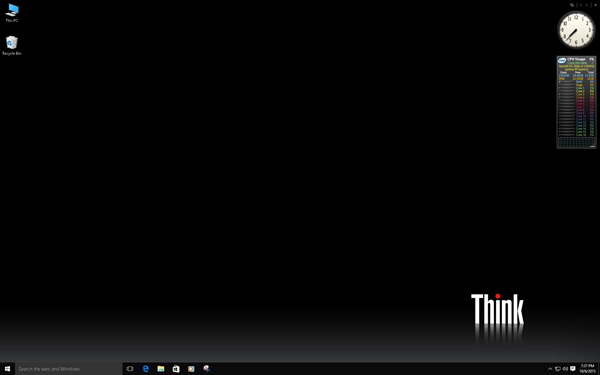
Soon we are sitting at the desktop under Windows 10, we added gadgets we like to use with 8GadgetPack and we are all set to start running our tests again but now under Windows 10.
Let’s move on to testing the Lenovo Thinkstation P700 Workstation.
Our test setup
For testing we used the P700 with the following configuration:
- CPU: Intel Xeon E5-2640 V3 Processor (8 cores/16 Threads) 2.6 GHz and Turbo speed of 3.4GHz
- Memory: 4x 8GB (32GB) DDR4
- GPU: Nvidia Quadro K5200
- Storage: 1x 240GB SSD SATA / 2x PCIe M.2 256GB SATA RAID 0
- OS: Windows 7 Pro 64bit, Windows 10 and Ubuntu 15.04
The P700 is capable of running two processors which greatly expand compute power and can then use all available memory slots. Additionally a second PCIe slot opens up so that another graphics card can be installed.
AIDA64 Memory Test
AIDA64 memory bandwidth benchmarks (Memory Read, Memory Write, and Memory Copy) measure the maximum achievable memory data transfer bandwidth.
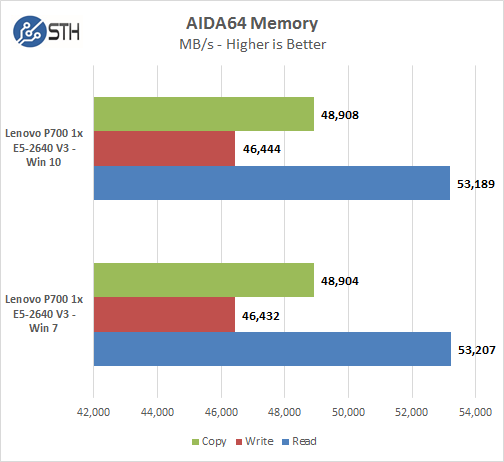
Memory Latency ranged at ~74.1ns and with Win 7 and ~74.6ns with Win 10. As far as memory performance and the two different OS’s we see almost no difference.
Linux-Bench Test
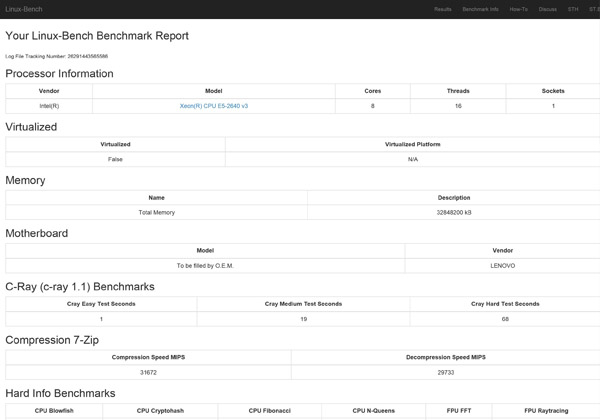
An example of full test results for our Linux-Bench run can be found here: Lenovo ThinkStation P700 Linux-Bench Results
AIDA64 GPGPU Benchmark
For our GPU testing we use AIDA64 Engineer to run the provided GPGPU tests which has the ability to run on all installed GPU’s and the CPU’s.
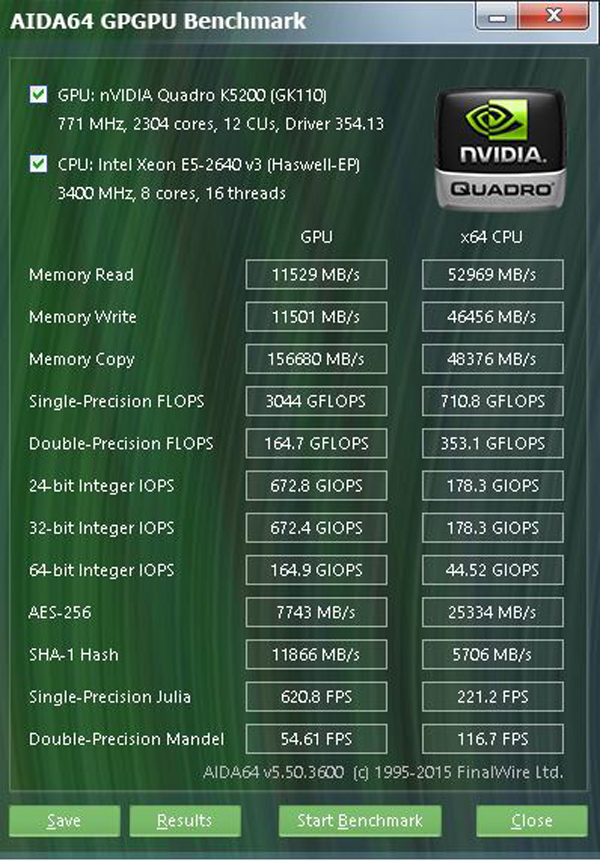
This test see’s both the K5200 and the Intel Xeon E5-2640 V3 GPGPU performance. The K5200 is a good match for this system and depending on what workloads you will be using it can really boost some applications performance.
SPECwpc
SPECwpc_v1.0.2 is a workstation benchmark that measures key aspects of workstation applications.
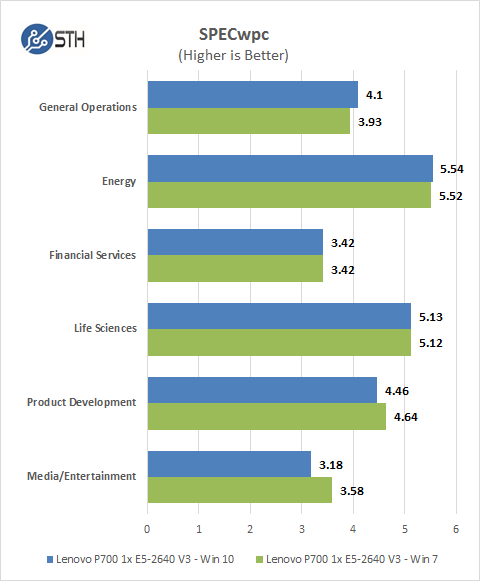
SPECwpc results can vary by a large amount depending on the GPU and Storage drives used. Several results can be boosted by using a higher end GPU. The difference between Win 7 and Win 10 are slight here with a hit to performance in Media/Entertainment.
SPEC CPU2006
SPEC CPU2006v1.2 measures compute intensive performance across the system using realistic benchmarks to rate real performance.
In our testing with SPEC CPU2006 we use the basic commands to run these tests.
- ” Runspec –tune=base –config=servethehome.cfg ,” then ” int ,” or ” fp .”
- To do multi-threaded, we add in ” –rate=16.”
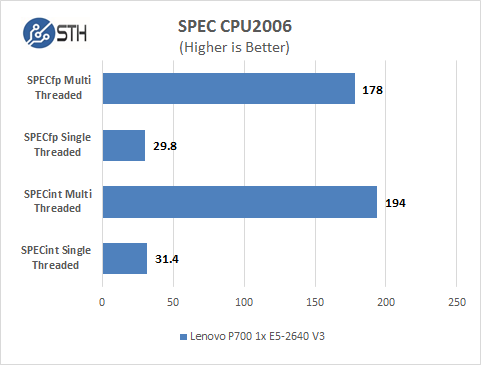
Our CPU2006 test results are also on par with CPU’s of this type. This system is only running on one processor, multi-threaded scores would be greatly improved with two processors installed. Single-Threaded results are not too far off from a 5960x which would a processor of choice for a high-end single socket workstation.
Storage Tests
For these tests we used CrystalDiskMark. We consider our drive test results to be FOB or fresh out of box type tests as we did not have time to completely bring these drives to steady state numbers.
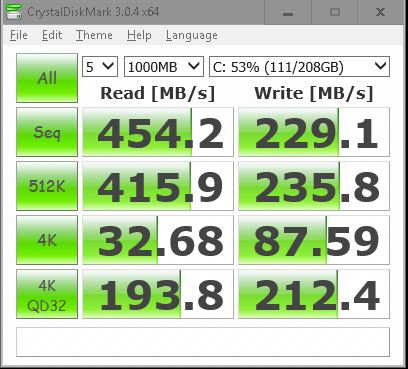
This is the C: Drive which has the operating system installed on. Our drive is an Intel SSD Pro 1500 Series (240GB, 2.5in SATA 6Gb/s, 20nm, MLC)
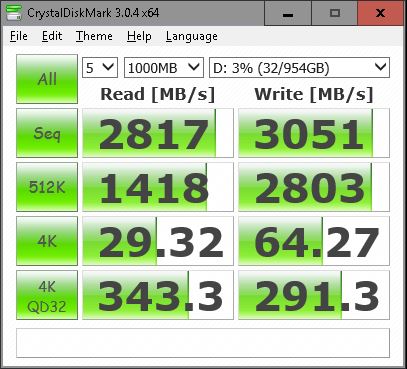
Our D: Drive is the M.2 FLEX equipped with 2x SAMSUNG MZHPV512HDGL SM951 M.2 512GB PCI-Express 3.0 SSD’s in Raid 0. That is some serious storage performance!
Power Tests
For our power testing needs we use a Yokogawa WT310 power meter which can feed its data through a USB cable to another machine where we can capture the test results. We then use AIDA64 Stress test to load the system and measure max power loads.
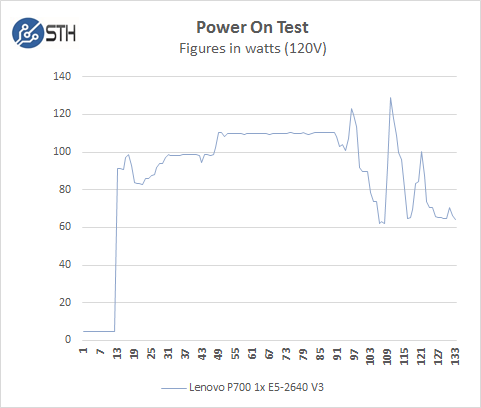
Booting up the P700 with a single processor use little power, it does cap out at ~130watts in our review configuration, then settles down to ~65watts on idle.
Fully Loaded Stress Tests Power Use
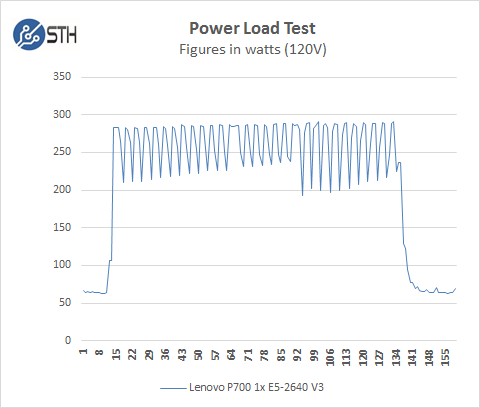
For our tests we use AIDA64 Stress test which allows us to stress all aspects of the system. At default BIOS settings we see ~285watts at max usage, we would expect to see an additional 200watts if two E5-2640 V3 processors were used.
Conclusion
We said in the beginning that the P700 fits into the sweet spot of Lenovo’s P Series of workstations, it offers high performance features at a lower cost than the P900 and considerably more performance than the single socket P500 and is roughly the same size.

The P700 also allows you to scale up to a dual processor configuration should workloads change and require more processing power or memory. The only drawback would be if you need to run three GPU’s and that would make the P900 more attractive.
The real jewel of the P700 is it’s FLEX Connector and the ability to install LSI FLEX for more robust storage needs and even M.2 FLEX adapter that we had on our review unit. This greatly increases storage performance and our unit with 1TB of fast M.2 SSD’s installed was very fast. Our system was fully SSD enabled and had the feel of a fast system because of this.
Other aspects of the P700 include the standard features we find on the whole P-Series workstations, such as the patent-pending Tri-Channel Air Baffle which works surprisingly well in keeping the processors cool and reduces system noise. The entire P-Series lineup offers complete Tool-Less upgrades which make installing new components effortless. The P700 is a solid workstation in both construction and performance.


Very thorough review, looks like this is a solid workstation. Would the noise level be comparable to a ‘typical’ desktop pc here?